# E-mail Settings
This chapter covers basic email settings for all platforms, as well as per platform specific guides.
# Android Phone and Tablets
For Android based phones, tablets, Chromebook and IoT devices, there are a number of options of e-mail clients. Some vendors supply their own developed email client however Google’s own GMAIL client is common across all legitimate android devices and we support this client.
### POP/IMAP
[](https://wiki.rackcorp.com/uploads/images/gallery/2022-06/nR1It9DKvXiCMTa7-image-1656323242555.png)
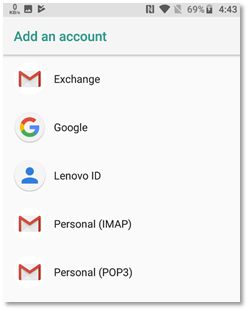
Figure 26 go to the add account function under 'Accounts' In Android settings, or Gmail
[](https://wiki.rackcorp.com/uploads/images/gallery/2022-06/PsNlIYpX4gWXKfLL-image-1656323255611.png)
Figure 27 choose to add an IMAP account
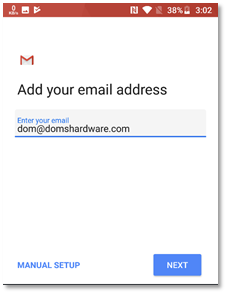
[](https://wiki.rackcorp.com/uploads/images/gallery/2022-06/uEXtBfIPxRspFJnw-image-1656323261960.png)
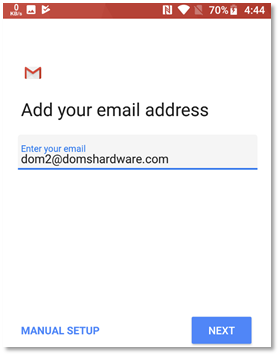
Figure 28 Once the email address is entered, Manual setup is unlocked. Choose **MANUAL SETUP**
[](https://wiki.rackcorp.com/uploads/images/gallery/2022-06/GhnTwp7uWb3BNAR3-image-1656323278724.png)
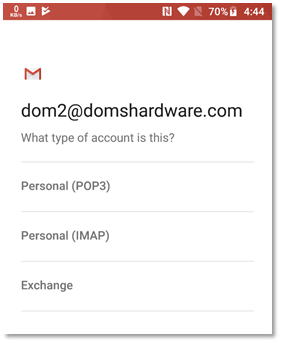
Figure 29 choose IMAP account. Optionally you may choose POP3
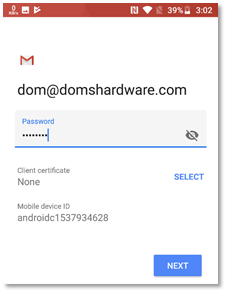
[](https://wiki.rackcorp.com/uploads/images/gallery/2022-06/XyKrQXDlZDTDkCZW-image-1656323298575.png)
Figure 30 enter the password for the IMAP email account you wish to setup
[](https://wiki.rackcorp.com/uploads/images/gallery/2022-06/VY0tJtR57MeGiP4q-image-1656323309933.png)
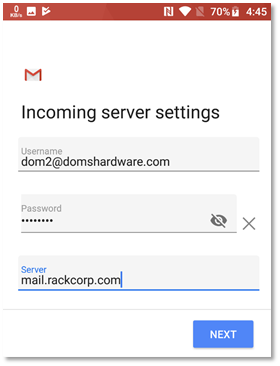
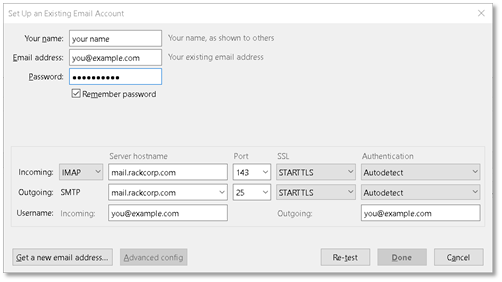
Figure 31 change the **INCOMING** mail server to **mail.rackcorp.com**
[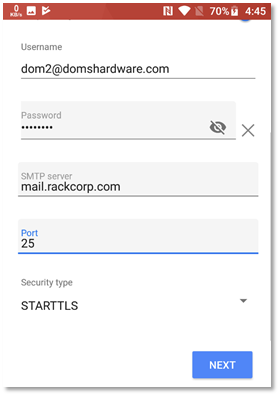](https://wiki.rackcorp.com/uploads/images/gallery/2022-06/f7Q5S834UMJtPayM-image-1656323319715.png)
Figure 32 change the **OUTGOING** mail server to **mail.rackcorp.com**. **Change** the port to 25 and security to **STARTTLS**
If you are using our Mongolian servers, please use **mail.mn.rackcorp.com** as the mail server.
[](https://wiki.rackcorp.com/uploads/images/gallery/2022-06/Xf0Q43sd0n6S5dvh-image-1656323339394.png)
Figure 33 successful account configuration will result in a success message
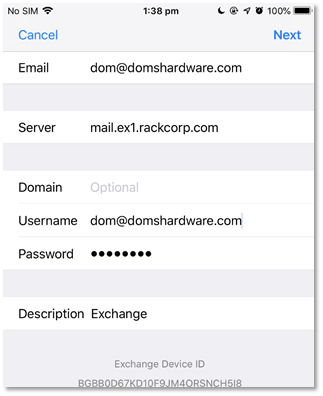
### Exchange
[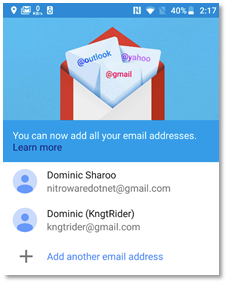](https://wiki.rackcorp.com/uploads/images/gallery/2022-06/TtOhbjVhmWOlgSFC-image-1656323359349.png)
Figure 34 within GMAIL, choose add account or add another email address
[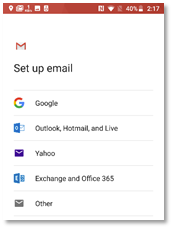](https://wiki.rackcorp.com/uploads/images/gallery/2022-06/UwfEN0A9DJu81Yln-image-1656323370352.png)
Figure 35 GMAIL will present a list of account types. Choose EXCHANGE
[](https://wiki.rackcorp.com/uploads/images/gallery/2022-06/JNadfqGf73TbDkoZ-image-1656323380566.png)
.Figure 36 enter the email address for your EXCHANGE account at the prompt to begin the setup process
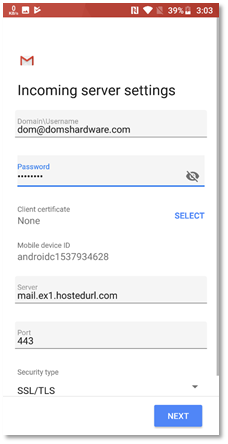
[](https://wiki.rackcorp.com/uploads/images/gallery/2022-06/0KYEiVm884oeOdEN-image-1656323393255.png)
Figure 37 enter the password for your exchange account when prompted
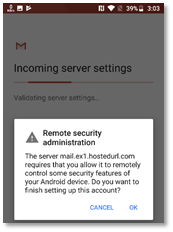
[](https://wiki.rackcorp.com/uploads/images/gallery/2022-06/CidWmWuLDYexHBss-image-1656323404575.png)
Figure 38 several prompts will be made during the exchange setup process. Agree to these by pressing OK
[](https://wiki.rackcorp.com/uploads/images/gallery/2022-06/TeoDOfY3GbyLM41K-image-1656323413179.png)
Figure 39 once your password is accepted, a further page will display a summary of your account settings. simply press NEXT
[](https://wiki.rackcorp.com/uploads/images/gallery/2022-06/0gIUwt1ml4xlqEZN-image-1656323424557.png)
Figure 40 several prompts will be made during the exchange setup process. Agree to these by pressing OK.
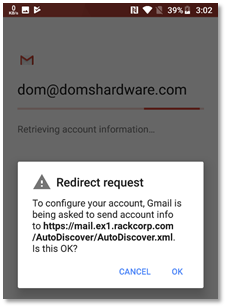
[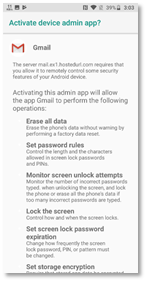](https://wiki.rackcorp.com/uploads/images/gallery/2022-06/RtEDPoLwWPKjSlsK-image-1656323446837.png)
Figure 41 To add exchange accounts to a mobile device, the exchange server requires mobile device management rules as listed to be applied to your device.
Please read the above screen carefully. Changes to the security settings of your device will be made automatically and are required to add exchange mail to your device.
[](https://wiki.rackcorp.com/uploads/images/gallery/2022-06/MONMs7nV2prgdfXQ-image-1656323456415.png)
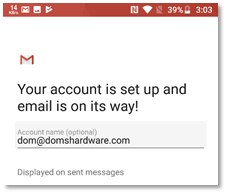
Figure 42 when the Gmail exchange setup process is complete the success message is displayed
# Apple iPhone and iPad
### POP/IMAP manual setup
[](https://wiki.rackcorp.com/uploads/images/gallery/2022-06/fUojpEJe90GyzRe4-image-1656323488764.png)
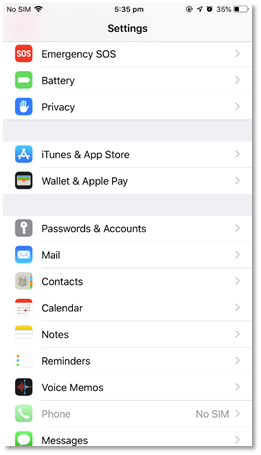
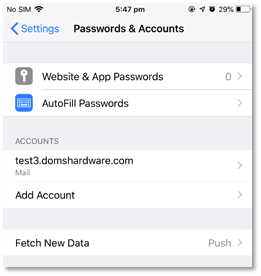
Figure 43 Navigate to the settings icon in your idevice, and then Passwords and Accounts
[](https://wiki.rackcorp.com/uploads/images/gallery/2022-06/E8Gv0nxGJyxvazHl-image-1656323496199.png)
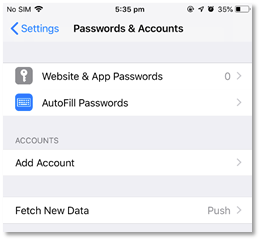
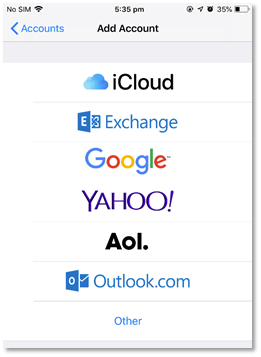
Figure 44 in the Settings -> Passwords & accounts page, hit Add Account. Fetch New Data should be Push
[](https://wiki.rackcorp.com/uploads/images/gallery/2022-06/FseyRhVlsS5JFRRJ-image-1656323513514.png)
Figure 45 we are manually setting up an IMAP or POP account so choose Other
[](https://wiki.rackcorp.com/uploads/images/gallery/2022-06/dQzMLuBX7TySLKgR-image-1656323526830.png)
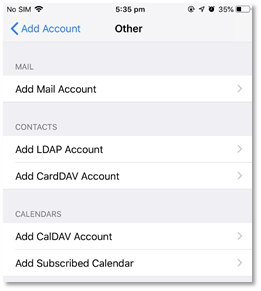
Figure 46 Under Other - Add Mail Account
[](https://wiki.rackcorp.com/uploads/images/gallery/2022-06/ouzsqiRvfHkPpGuK-image-1656323540640.png)
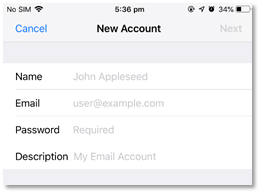
Figure 47 Fill in your email account details as requested
[](https://wiki.rackcorp.com/uploads/images/gallery/2022-06/ux6toodwpxqx0cxo-image-1656323549724.png)
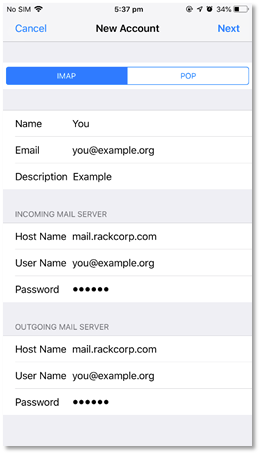
Figure 48 fill in the email account and server details as illustrated
If you are using our Mongolian servers, please use **mail.mn.rackcorp.com** as the mail server.
[](https://wiki.rackcorp.com/uploads/images/gallery/2022-06/zjxrV9z1HuB3SN4F-image-1656323594389.png)
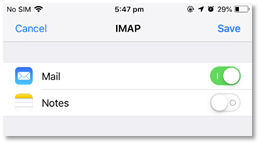
Figure 49 once your account details are saved and tested, you can choose what data to sync to the mail server, leave the default setting
[](https://wiki.rackcorp.com/uploads/images/gallery/2022-06/wJlDYV4b5S6uLG7T-image-1656323608297.png)
Figure 50 on success your email account is now added to the account list in iOS
### Exchange
[](https://wiki.rackcorp.com/uploads/images/gallery/2022-06/rukqcYfyHcXCuUGB-image-1656323639715.png)
Figure 51 we are setting up an EXCHANGE account
[](https://wiki.rackcorp.com/uploads/images/gallery/2022-06/SfJJSP17iYq5V5BL-image-1656323660888.png)
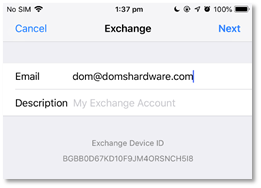
Figure 52 enter your email address for your exchange account
[](https://wiki.rackcorp.com/uploads/images/gallery/2022-06/EdhWQ6HOF386KyHA-image-1656323687668.png)
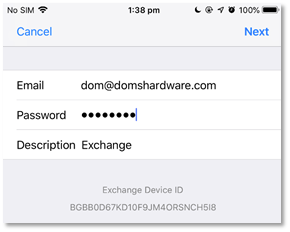
Figure 53 enter your password and create an account description
[](https://wiki.rackcorp.com/uploads/images/gallery/2022-06/ZDML6uE8uRMlvJ0d-image-1656323761877.png)
Figure 53 enter your password and create an account description
[](https://wiki.rackcorp.com/uploads/images/gallery/2022-06/fxQ1fQQ7o0s5kzk9-image-1656323772148.png)
Figure 55 fill in your account details as follows
[](https://wiki.rackcorp.com/uploads/images/gallery/2022-06/xMW7V5szIQNh6XeM-image-1656323780830.png)
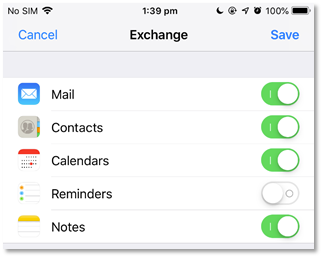
Figure 56 once your account details are confirmed and verified, you will receive a sync options screen. Choose here what options you want to sync to your device. Syncing contacts for example will overwrite your existing contacts and upload existing contacts
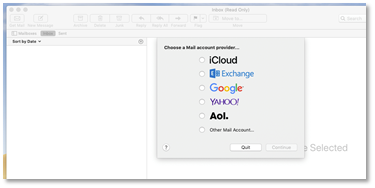
# Apple Mac OS
### Exchange setup
###
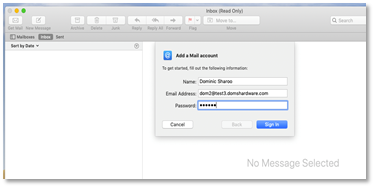
POP3/IMAP manual setup
[](https://wiki.rackcorp.com/uploads/images/gallery/2022-06/0bNGBqMpgY4Kq72n-image-1656323219274.png)
Figure 23 in Mac Mail accounts, select add other mail account
[](https://wiki.rackcorp.com/uploads/images/gallery/2022-06/POzq3AXR8QGCk8hK-image-1656323214675.png)
Figure 24 In the Mac Mail setup wizard, fill in your POP/IMAP account details
[](https://wiki.rackcorp.com/uploads/images/gallery/2022-06/BV2aUGDewXKAovZw-image-1656323209631.png)
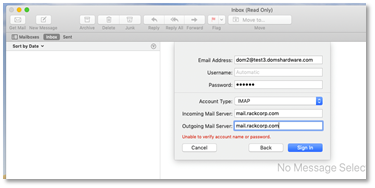
Figure 25 Mac Mail setup wizard will then request the server names. Fill in mail.rackcorp.com
If you are using our Mongolian servers, please use **mail.mn.rackcorp.com** as the mail server.
For Apple MacOS 14.5 sonoma and newer, the OUTGOING userid and password is set automatically by the system if you add your email via the SETTINGS->ACCOUNTS page and use Mac Mail
# Basic E-Mail Settings
RackCorp supports mail auto discovery. This is a feature built into modern email clients that allows the email program to obtain the correct mail settings for a user based just on their email address and password.
This works for POP, IMAP and Exchange email options on RackCorp.
If you do not wish to use auto discovery, standard email settings are supported including optional SSL and TLS encryption between the end user and RackCorp mail servers.
## Email Settings | POP/IMAP
Choose **POP** OR **IMAP** email server. **IMAP** is generally recommended.
**POP** Email downloads entire emails to your device before they can be viewed and optionally deletes them from the server.
- Pros: Useful for archival, allows inbox and mail management such as zero inbox
- Cons: not ideal for multi devices, slower to look at new emails
**IMAP** downloads a header of the email first so the sender, subject, date can be previewed and keeps all the mail on the server.
- Pros: Lightweight and stores mail on server, ideal for multi device use and low bandwidth
Cons: offline viewing of email depends on settings and if entire mail has been downloaded.
### Global Common Settings:
| Email
|
|
| Username
|
|
| Password
| your\_password
|
| Incoming Server
| mail.rackcorp.com
|
| Outgoing Server
| mail.rackcorp.com
|
| Outgoing Server Type
| SMTP
|
| Outgoing Server Username
| (or tick ‘same as incoming’) if available
|
| Outgoing server password
| your\_password
|
| Webmail
| https://webmail.rackcorp.com
|
**You must fill in the OUTGOING username and password to be able to SEND email from our system.**
For Apple MacOS 14.5 sonoma and newer, the OUTGOING userid and password is set automatically by the system if you add your email via the SETTINGS->ACCOUNTS page and use Mac Mail
---
###
### USA Common Settings:
| Email
|
|
| Username
|
|
| Password
| your\_password
|
| Incoming Server
| mail.us.rackcorp.com
|
| Outgoing Server
| mail.us.rackcorp.com
|
| Outgoing Server Type
| SMTP
|
| Outgoing Server Username
| (or tick ‘same as incoming’) if available
|
| Outgoing server password
| your\_password
|
| Webmail
| https://webmail.us.rackcorp.com
|
---
###
### Mongolia Common Settings:
| Email
|
|
| Username
|
|
| Password
| your\_password
|
| Incoming Server
| mail.mn.rackcorp.com
|
| Outgoing Server
| mail.mn.rackcorp.com
|
| Outgoing Server Type
| SMTP
|
| Outgoing Server Username
| (or tick ‘same as incoming’) if available
|
| Outgoing server password
| your\_password
|
| Webmail
| https://webmail.mn.rackcorp.com
|
---
### Krgyz Common Settings:
| Email
|
|
| Username
|
|
| Password
| your\_password
|
| Incoming Server
| mail.kg.rackcorp.com
|
| Outgoing Server
| mail.kg.rackcorp.com
|
| Outgoing Server Type
| SMTP
|
| Outgoing Server Username
| (or tick ‘same as incoming’) if available
|
| Outgoing server password
| your\_password
|
| Webmail
| https://webmail.kg.rackcorp.com
|
---
Choose a type of encryption from **SSL** or **TLS**. **TLS** is recommended for compatibility.
### POP
| **POP with SSL**
| **POP with TLS or STARTTLS**
|
| Incoming Server Port: 995
Outgoing Server Port: 465
| Incoming Server Port: 143
Outgoing Server Port: 25
|
### IMAP
| **IMAP with SSL**
| **IMAP with TLS or STARTTLS**
|
| Incoming Server Port: 993
Outgoing Server Port: 465
| Incoming Server Port: 143
Outgoing Server Port: 25
|
RackCorp global **webmail** for standard email is available at https://webmail.rackcorp.com
## Email Settings | Exchange
To setup exchange email accounts in your client, the recommended way is to use auto discover with an exchange compatible mail client or use Outlook Web Access (OWA, Microsoft’s implementation of webmail, web based version of the Outlook email client for Exchange Email).
Supply your email address and password to the email client and it will perform the setup process. The setup process on most clients this will also setup Calendar, Tasks and Contacts. On Mobile devices, a device security policy may be applied by the setup process.
The address for OWA varies depending on the region and is available in your Outlook account information
**[https://mail.ex1.rackcorp.com](https://mail.ex1.rackcorp.com)** is the global OWA system
**[https://mail.ex1.rackcorp.mn](https://mail.ex1.rackcorp.mn)** is the Mongolian OWA system
**mail.ex1.rackcorp.com** is the primary RackCorp Exchange server if manual configuration is desired
Figure 1 Outlook Web Access (OWA) webmail on RackCorp
# Microsoft Office Outlook
Guide for Outlook 2010,2013,2016,2019,2022 & Office 365
### Outlook 2010/2013/2016 - Standard E-Mail
[](https://wiki.rackcorp.com/uploads/images/gallery/2022-06/3MNewn5BIsb6Hzmm-image-1656322814985.png)
Figure 2 Microsoft Outlook account settings (File Menu)

Figure 3 Microsoft Outlook Add Account - Auto Setup

Figure 4 Enter your account password here if prompted during the auto setup process enter it. If you are also prompted to allow server settings, press allow
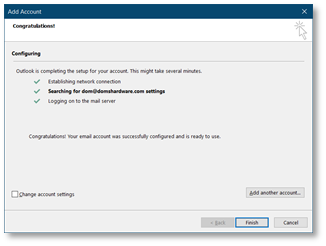
Figure 5 Microsoft Outlook auto account setup successful notfication
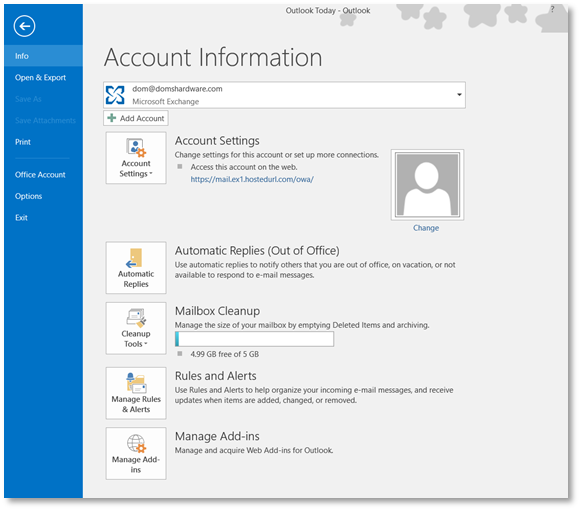
Figure 6 settings for your newly added account are available from the File menu in Microsoft Outlook and selecting the appropriate account from the drop down
### Outlook 2019/Outlook 365 - Standard Email
The setup screens for both these versions vary to other versions of versions of Outlook so verbal setup instructions will not be fully applicable.
[](https://wiki.rackcorp.com/uploads/images/gallery/2022-06/5q3MZ5Be2SL7TGb2-image-1656323004435.png)
Figure 7 Microsoft Outlook account settings (File Menu)
[](https://wiki.rackcorp.com/uploads/images/gallery/2022-06/JUWWl5yA1q6Hpfgx-image-1656323008992.png)
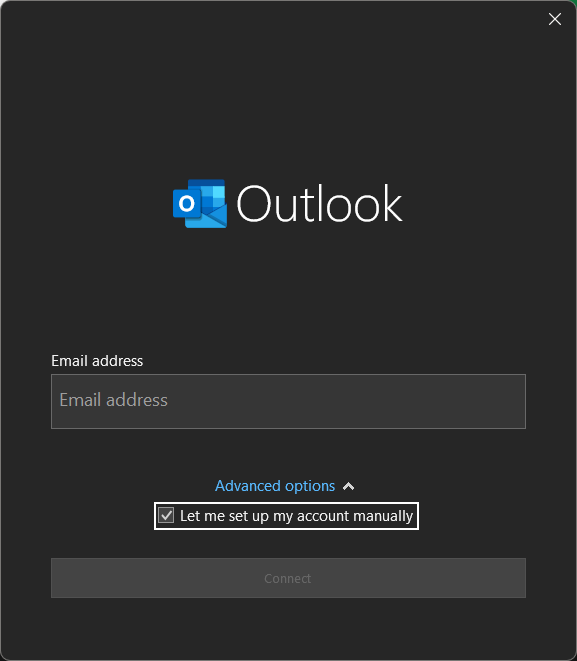
Figure 8 enter your email address in the Outlook welcome screen and tick manual setup
[](https://wiki.rackcorp.com/uploads/images/gallery/2022-06/vaSVMQb86AbWTKnP-image-1656323021228.png)
Figure 9 Choose from IMAP or POP email accounts. IMAP is recommended.
[](https://wiki.rackcorp.com/uploads/images/gallery/2022-06/H0GDu6Kuomoexlnd-image-1656323039887.png)
Figure 10 complete the email settings as illustrated, incoming and outgoing mail servers, encryption and ports
If you are using our Mongolian servers, please use **mail.mn.rackcorp.com** as the mail server.
[](https://wiki.rackcorp.com/uploads/images/gallery/2022-06/TqFsUxD2tVu5TVI3-image-1656323047556.png)
Figure 11 complete the password for your email account
[](https://wiki.rackcorp.com/uploads/images/gallery/2022-06/SgYc2eiZLSVusW5B-image-1656323056881.png)
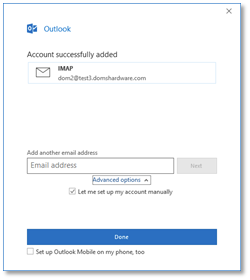
Figure 12 Outlook welcome process is a success message. There is a optional link selected by default that leads to a webpage describing how to install Outlook for mobile.
### Outlook 2019/Outlook 365 - Hosted Exchange
[](https://wiki.rackcorp.com/uploads/images/gallery/2024-03/oEJmxDZl3ZvTYkux-1-add-email.png "Add a new account to outlook. Note the exact screen varies version to version")
Figure 13. Add a new account to outlook. Note the exact screen varies version to version
[](https://wiki.rackcorp.com/uploads/images/gallery/2024-03/apkFz5x0PtNsDQBu-2-select.png)
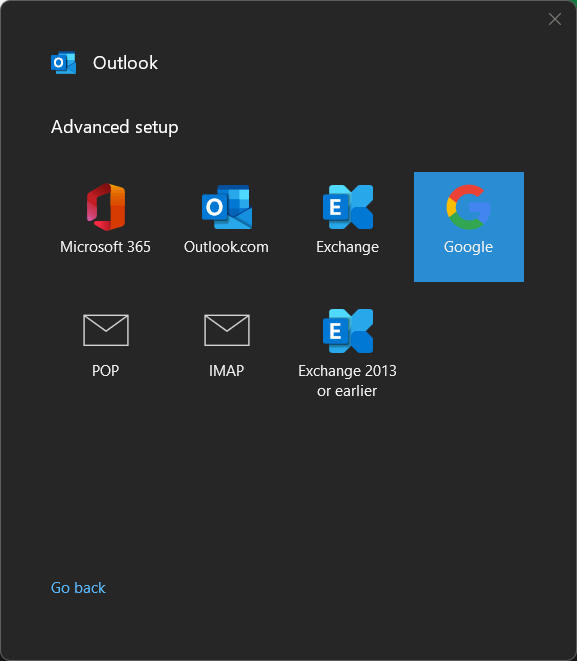
Fig 14. Choose **EXCHANGE** from the email selection
[](https://wiki.rackcorp.com/uploads/images/gallery/2024-03/uR6CKB7ySOXctZE0-3-perm.png)
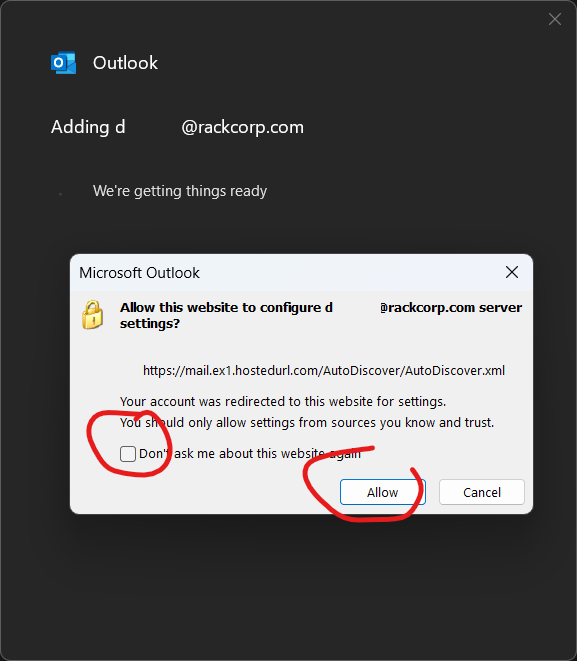
Fig 15. A permissions popup will appear soon after. Select The options circled in red as screenshot. The popup might be hidden or obscured by outlook.
[](https://wiki.rackcorp.com/uploads/images/gallery/2024-03/0ZDRqazP0i3R1zBS-4-password.png)
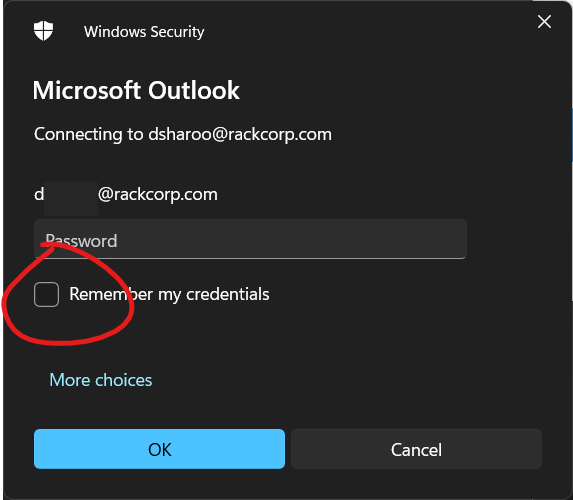
Fig 16. enter your exchange password. Selecting Remeber my Password is optional.
[](https://wiki.rackcorp.com/uploads/images/gallery/2024-03/Q1ysY9Kng87g5E8V-5-options.png)
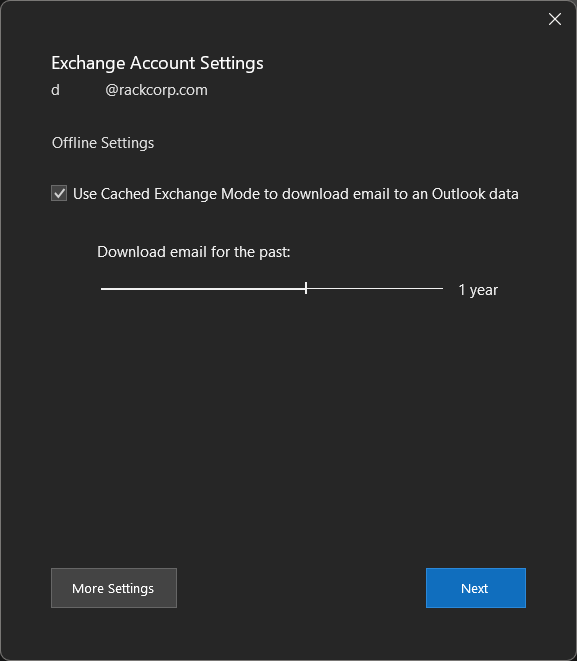
Fig 17. If your password is correct you will be presented with options. The defaults are sufficient.
[](https://wiki.rackcorp.com/uploads/images/gallery/2024-03/gB1zPTMslvCVpCsy-6-confirm.png)
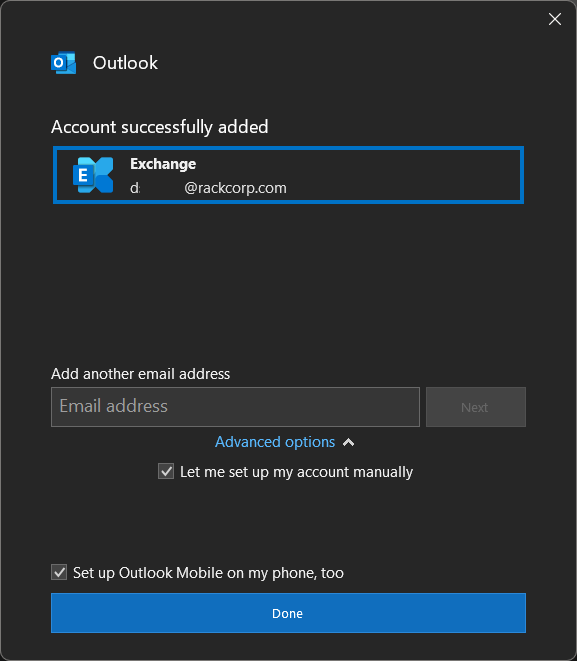
Fig 18. Final Notice of Successful Addition of account
# Mozilla Thunderbird
Email Client Setup | Mozilla Thunderbird
[](https://wiki.rackcorp.com/uploads/images/gallery/2022-06/dppihEg3U8OJyOVi-image-1656323159082.png)
Figure 20 Mozilla Thunderbird setup, choose add mail account from the dropdown and fill in the details then press continue.
[](https://wiki.rackcorp.com/uploads/images/gallery/2022-06/hvVe4Y39pylwkeXb-image-1656323168119.png)
Figure 21 Mozilla Thunderbird email setup - choose manual Config now if you wish to define your own mail server settings
[](https://wiki.rackcorp.com/uploads/images/gallery/2022-06/Qaw4b6gd51R4LcP3-image-1656323180327.png)
Figure 22 Mozilla Thunderbird setup - once the manual setup window appears, complete the mail server details, choosing IMAP or POP
If you are using our Mongolian servers, please use **mail.mn.rackcorp.com** as the mail server.
# Windows Mail
## Windows 10 Mail
### POP/IMAP manual setup
Auto discovery or manual settings can be used with Win10 Mail
[](https://wiki.rackcorp.com/uploads/images/gallery/2022-06/LTVtZSWCKLeDjdXs-image-1656323074090.png)
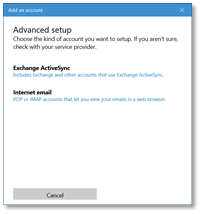
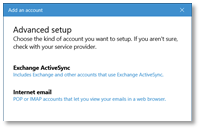
Figure 13 Windows 10 Mail setup – Click Accounts and then add account. Select Advanced setup
[](https://wiki.rackcorp.com/uploads/images/gallery/2022-06/lCVJCd239UuMXdcd-image-1656323083469.png)
Figure 14 Windows 10 mail manual setup for RackCorp POP/IMAP email - choose advanced setup
If you are using our Mongolian servers, please use **mail.mn.rackcorp.com** as the mail server.
[](https://wiki.rackcorp.com/uploads/images/gallery/2022-06/92WMSV1dsblIYAj0-image-1656323097525.png)
Figure 15 Windows 10 mail manual setup for RackCorp POP/IMAP email - choose Internet email
[](https://wiki.rackcorp.com/uploads/images/gallery/2022-06/bKrYjHWQMTI16L6n-image-1656323106891.png)
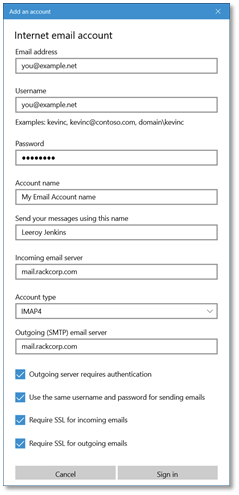
Figure 16 Windows 10 mail manual setup for RackCorp POP/IMAP email - fill in the details as illustrated, choose IMAP or POP
### Exchange
At This time, there is an issue with the latest release of the email application for Windows 10, which prevents the ‘**EXCHANGE**’ option below from being chosen, **ADVANCED SETUP** must be chosen
[](https://wiki.rackcorp.com/uploads/images/gallery/2022-06/l662do881JtIMJ15-image-1656323121981.png)
Figure 17 Windows 10 mail setup for RackCorp Hosted Exchange - choose advanced setup
[](https://wiki.rackcorp.com/uploads/images/gallery/2022-06/m9ZdTcoectgmckav-image-1656323129726.png)
Figure 18 Windows 10 mail setup for RackCorp Hosted Exchange - select Exchange ActiveSync
[](https://wiki.rackcorp.com/uploads/images/gallery/2022-06/rTvt43Hn0pqtro2z-image-1656323142986.png)
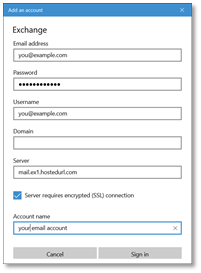
Figure 19 Windows 10 mail setup for RackCorp Hosted Exchange - fill in the details as illustrated. Domain is to be left blank.
Once you have completed **THE ADD AN ACCOUNT** form, Windows will prompt you about security policies for your computer. Select **YES. Selecting YES may strength your windows security settings such as your password strength requirements** You will then receive an **ALL FINISHED** success message.
# How to check Exchange mailbox free space
How to Check your exchange mailbox free space and avoid fake spam emails regarding your mailbox.
Regarding hosted exchange provided mailboxes, all folders within that mailbox count towards the account quota.
If the user is frequently reaching their quota we recommend keeping the Deleted Items folder empty ("emptying the trash") or locally archiving folders to a new PST folder.
There are a number of official ways to check the storage size of your hosted exchange mailbox.
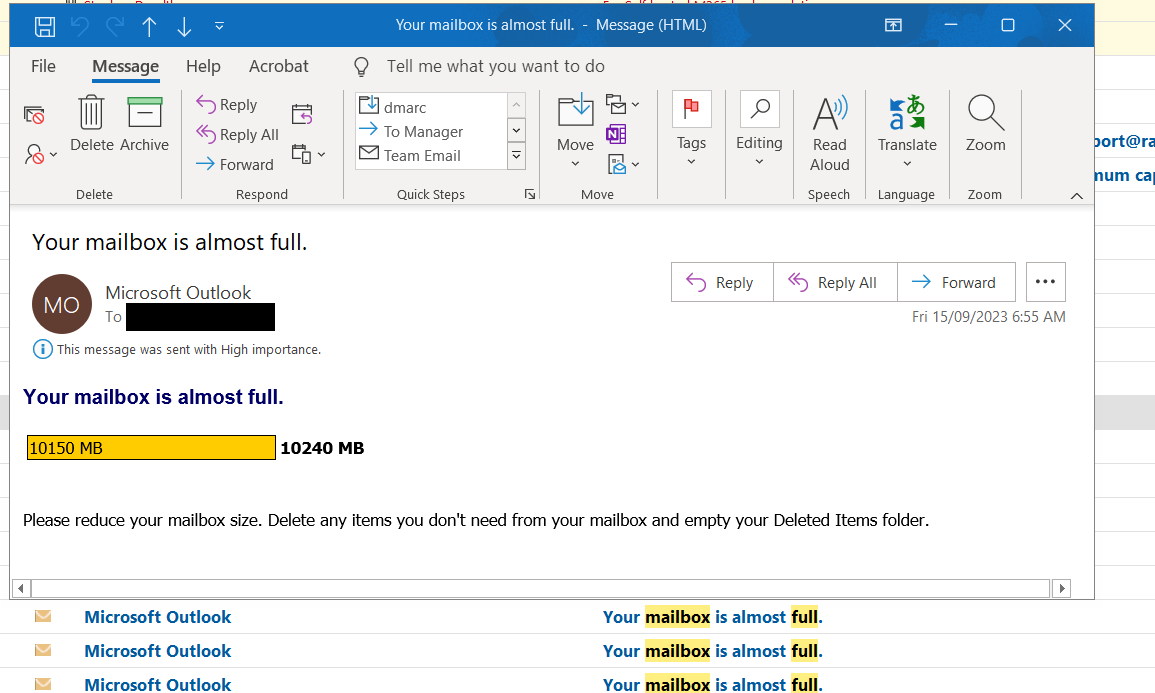
If you receive a message claiming your storage is full from or any other specific email address, or the email has a coloured box to click to resolve the issue please ignore and delete the email as it is a fake spam.
The only legitimate email alerting to a full mailbox comes from "Outlook" itself had has a Envelope Icon as below screenshot.
[](https://wiki.rackcorp.com/uploads/images/gallery/2024-03/gSlVPttqr8HJ4GJ7-owa1.PNG)
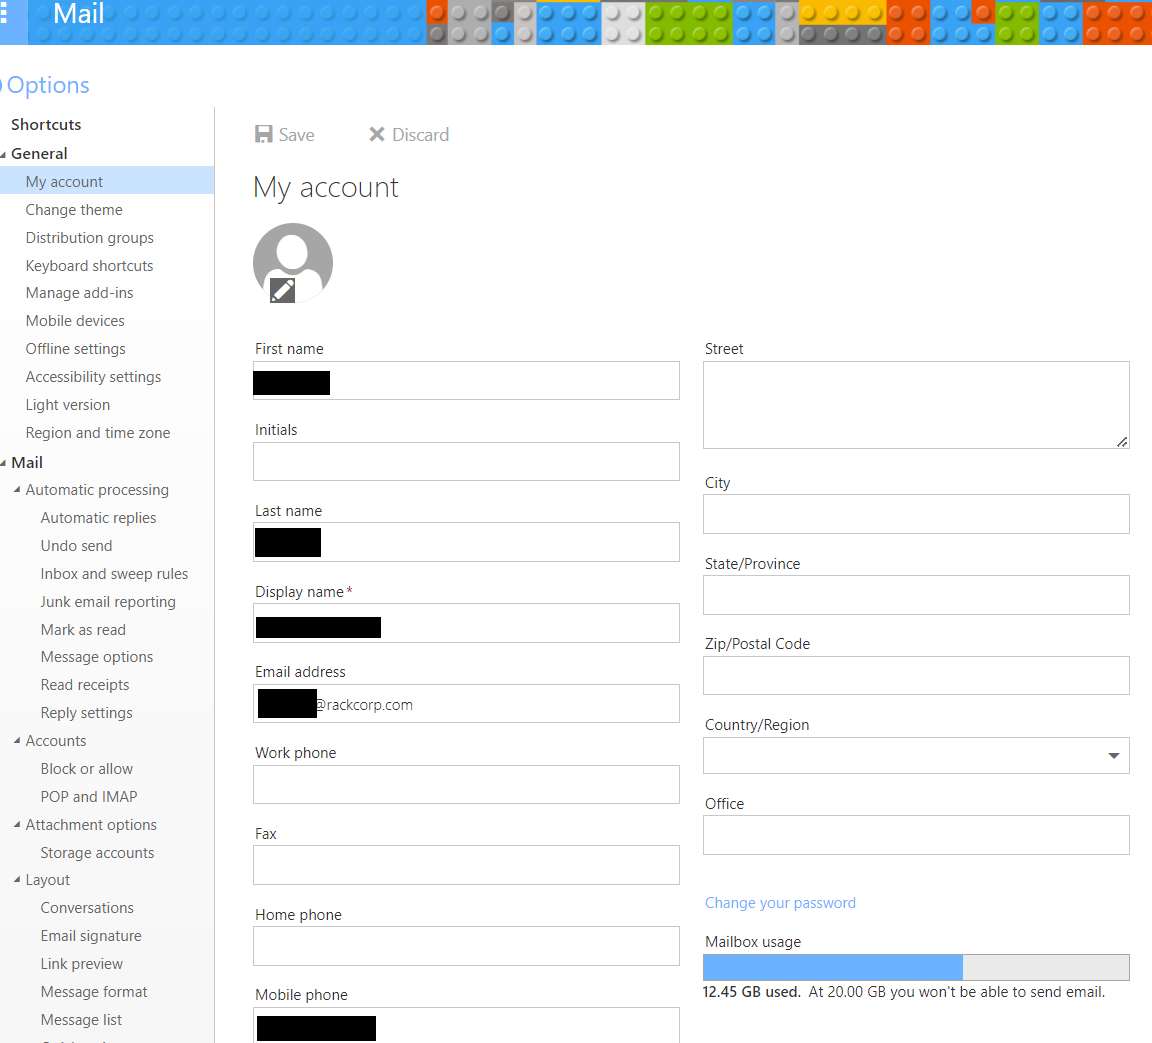
Figure 1: Outlook Web Anywhere - Click Options -> General -> My Account
[](https://wiki.rackcorp.com/uploads/images/gallery/2024-03/MgE4GYCrKAKSe6SY-owa2.PNG)
Figure 2: Microsoft Office Outlook 2021 Status bar
[](https://wiki.rackcorp.com/uploads/images/gallery/2024-03/jzZkP0FaNWfUR2nn-owa3.PNG)
Figure 3: System generated mailbox alerts. Please note the look and feel of these emails as others will be fake.