Help and Support EN
EN
- Applications
- E-mail Settings
- Android Phone and Tablets
- Apple iPhone and iPad
- Apple Mac OS
- Basic E-Mail Settings
- Microsoft Office Outlook
- Mozilla Thunderbird
- Windows Mail
- How to check Exchange mailbox free space
- Getting started with rclone for RackCorp S3 storage - Windows
- Getting started with S3 storage on RackCorp Hybrid Cloud - Windows & Mac
- Install OPNsense Firewall in the cloud
- RackCorp BGP Communities
- RackCorp Datacenter Locations and Codes
- RACKCORP REST API
- S3 Storage Settings
- Security Token How-To
- Self-Signed SSL certificates
- Update BookStack on RackCorp
- Virtual Networking - VLANs in the Cloud
- Virtual Server BGP Settings
- Windows L2TP/IPsec VPN Client Configuration
- Virtual Machine Monitoring via SNMP
- How to change Remote Desktop Protocol (RDP) port setting in Windows Server
- Getting Started with Hybrid Cloud
- Increasing and Resizing Linux Virtual Machine Disk space
- Enabling RackCorp Object Storage with Veeam Backup 12
Applications
Bind DNS
Common Issues
Issue: server booted with a time in the future, and bind / named downloaded the trust information with a future timestamp
Often you'll see this in the logs:
validating ./DNSKEY: unable to find a DNSKEY which verifies the DNSKEY RRset and also matches a trusted key for '.'
managed-keys-zone: No valid trust anchors for '.'
Solution:
1) shut down named
2) delete /var/named/dynamic/managed-keys.bind.jnl and create file just containing:
;BIND LOG V9
8
3) ensure new file is owned by the named user.
4) start up named
You'll see something like this in the logs:
Apr 28 12:49:00 XXXXXX named[4093]: managed-keys-zone: journal rollforward failed: no more
Apr 28 12:49:00 XXXXXX named[4093]: managed-keys-zone: unable to load from '/var/named/dynamic/managed-keys.bind.jnl'; renaming file to '/var/named/dynamic/jn-xMvuHJmM' for failure analysis and retransferring.
And then your dnssec should start working again...
There's probably better ways to trigger the resolution, but the above seems to work....
E-mail Settings
This chapter covers basic email settings for all platforms, as well as per platform specific guides.
Android Phone and Tablets
For Android based phones, tablets, Chromebook and IoT devices, there are a number of options of e-mail clients. Some vendors supply their own developed email client however Google’s own GMAIL client is common across all legitimate android devices and we support this client.
POP/IMAP
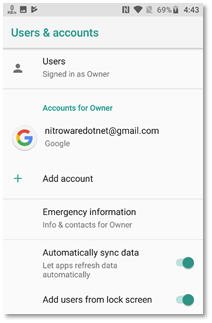
Figure 26 go to the add account function under 'Accounts' In Android settings, or Gmail
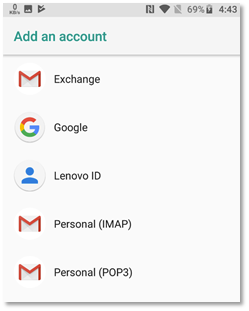
Figure 27 choose to add an IMAP account
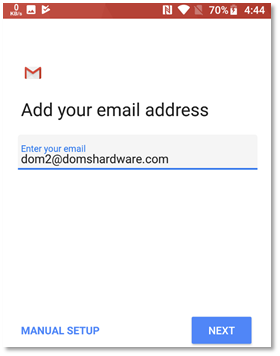
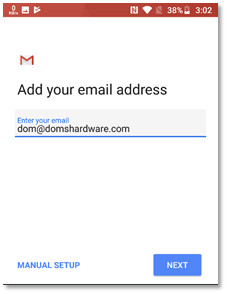
Figure 28 Once the email address is entered, Manual setup is unlocked. Choose MANUAL SETUP

Figure 29 choose IMAP account. Optionally you may choose POP3
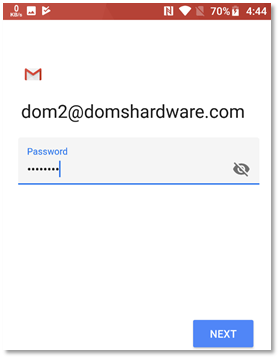
Figure 30 enter the password for the IMAP email account you wish to setup
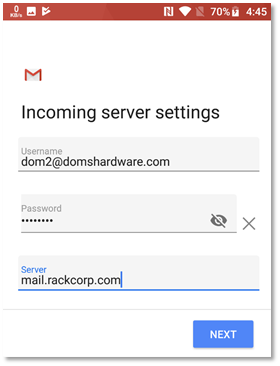
Figure 31 change the INCOMING mail server to mail.rackcorp.com
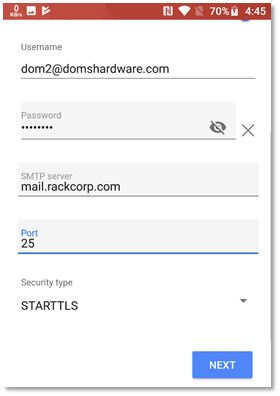
Figure 32 change the OUTGOING mail server to mail.rackcorp.com. Change the port to 25 and security to STARTTLS
If you are using our Mongolian servers, please use mail.mn.rackcorp.com as the mail server.
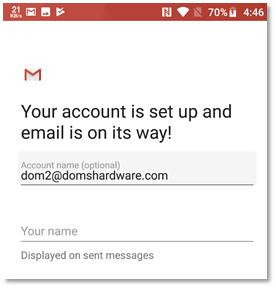
Figure 33 successful account configuration will result in a success message
Exchange

Figure 34 within GMAIL, choose add account or add another email address

Figure 35 GMAIL will present a list of account types. Choose EXCHANGE
.Figure 36 enter the email address for your EXCHANGE account at the prompt to begin the setup process

Figure 37 enter the password for your exchange account when prompted
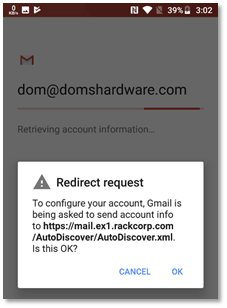
Figure 38 several prompts will be made during the exchange setup process. Agree to these by pressing OK
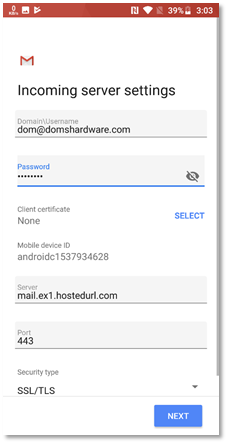
Figure 39 once your password is accepted, a further page will display a summary of your account settings. simply press NEXT
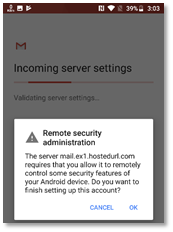
Figure 40 several prompts will be made during the exchange setup process. Agree to these by pressing OK.
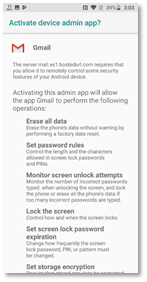
Figure 41 To add exchange accounts to a mobile device, the exchange server requires mobile device management rules as listed to be applied to your device.
Please read the above screen carefully. Changes to the security settings of your device will be made automatically and are required to add exchange mail to your device.
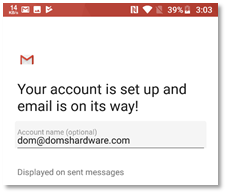
Figure 42 when the Gmail exchange setup process is complete the success message is displayed
Apple iPhone and iPad
POP/IMAP manual setup

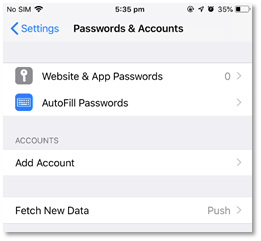
Figure 44 in the Settings -> Passwords & accounts page, hit Add Account. Fetch New Data should be Push
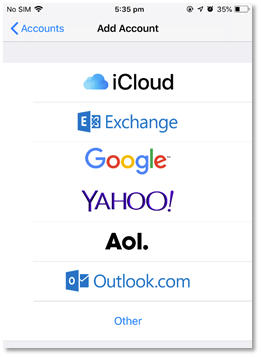
Figure 45 we are manually setting up an IMAP or POP account so choose Other
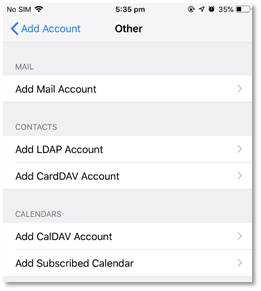
Figure 46 Under Other - Add Mail Account
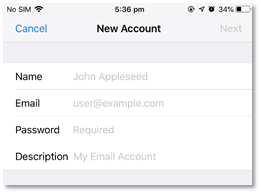
Figure 47 Fill in your email account details as requested
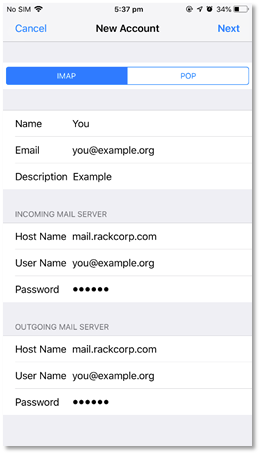
Figure 48 fill in the email account and server details as illustrated
If you are using our Mongolian servers, please use mail.mn.rackcorp.com as the mail server.
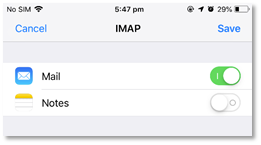
Figure 49 once your account details are saved and tested, you can choose what data to sync to the mail server, leave the default setting

Figure 50 on success your email account is now added to the account list in iOS
Exchange

Figure 51 we are setting up an EXCHANGE account
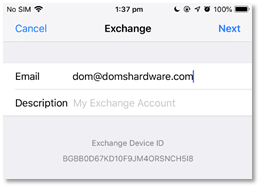
Figure 52 enter your email address for your exchange account
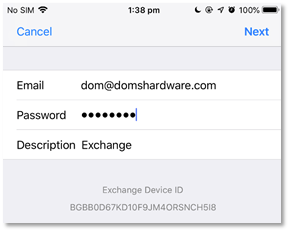
Figure 53 enter your password and create an account description
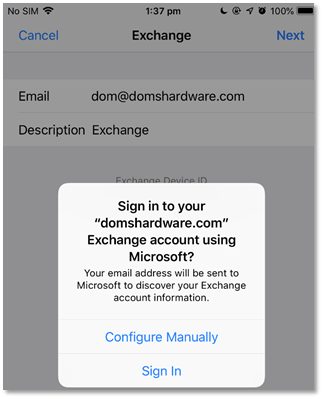
Figure 53 enter your password and create an account description

Figure 55 fill in your account details as follows
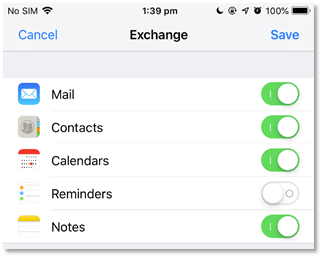
Figure 56 once your account details are confirmed and verified, you will receive a sync options screen. Choose here what options you want to sync to your device. Syncing contacts for example will overwrite your existing contacts and upload existing contacts
Apple Mac OS
Exchange setup
POP3/IMAP manual setup
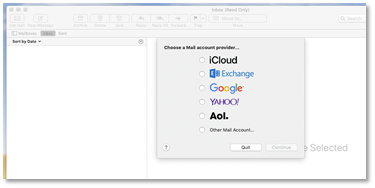
Figure 23 in Mac Mail accounts, select add other mail account
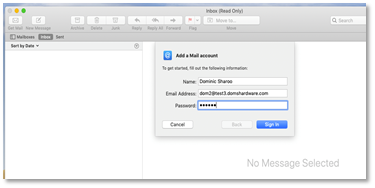
Figure 24 In the Mac Mail setup wizard, fill in your POP/IMAP account details
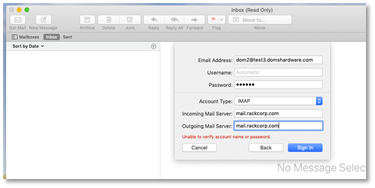
Figure 25 Mac Mail setup wizard will then request the server names. Fill in mail.rackcorp.com
If you are using our Mongolian servers, please use mail.mn.rackcorp.com as the mail server.
For Apple MacOS 14.5 sonoma and newer, the OUTGOING userid and password is set automatically by the system if you add your email via the SETTINGS->ACCOUNTS page and use Mac Mail
Basic E-Mail Settings
RackCorp supports mail auto discovery. This is a feature built into modern email clients that allows the email program to obtain the correct mail settings for a user based just on their email address and password.
This works for POP, IMAP and Exchange email options on RackCorp.
If you do not wish to use auto discovery, standard email settings are supported including optional SSL and TLS encryption between the end user and RackCorp mail servers.
Email Settings | POP/IMAP
Choose POP OR IMAP email server. IMAP is generally recommended.
POP Email downloads entire emails to your device before they can be viewed and optionally deletes them from the server.
- Pros: Useful for archival, allows inbox and mail management such as zero inbox
- Cons: not ideal for multi devices, slower to look at new emails
IMAP downloads a header of the email first so the sender, subject, date can be previewed and keeps all the mail on the server.
- Pros: Lightweight and stores mail on server, ideal for multi device use and low bandwidth
Cons: offline viewing of email depends on settings and if entire mail has been downloaded.
Global Common Settings:
|
|
|
|
Username |
|
|
Password |
your_password |
|
Incoming Server |
mail.rackcorp.com |
|
Outgoing Server |
mail.rackcorp.com |
|
Outgoing Server Type |
SMTP |
|
Outgoing Server Username |
you@example.net (or tick ‘same as incoming’) if available |
|
Outgoing server password |
your_password |
|
Webmail |
https://webmail.rackcorp.com |
You must fill in the OUTGOING username and password to be able to SEND email from our system.
For Apple MacOS 14.5 sonoma and newer, the OUTGOING userid and password is set automatically by the system if you add your email via the SETTINGS->ACCOUNTS page and use Mac Mail
USA Common Settings:
|
|
|
|
Username |
|
|
Password |
your_password |
|
Incoming Server |
mail.us.rackcorp.com |
|
Outgoing Server |
mail.us.rackcorp.com |
|
Outgoing Server Type |
SMTP |
|
Outgoing Server Username |
you@example.net (or tick ‘same as incoming’) if available |
|
Outgoing server password |
your_password |
|
Webmail |
https://webmail.us.rackcorp.com |
Mongolia Common Settings:
|
|
|
|
Username |
|
|
Password |
your_password |
|
Incoming Server |
mail.mn.rackcorp.com |
|
Outgoing Server |
mail.mn.rackcorp.com |
|
Outgoing Server Type |
SMTP |
|
Outgoing Server Username |
you@example.net (or tick ‘same as incoming’) if available |
|
Outgoing server password |
your_password |
|
Webmail |
https://webmail.mn.rackcorp.com |
Krgyz Common Settings:
|
|
|
|
Username |
|
|
Password |
your_password |
|
Incoming Server |
mail.kg.rackcorp.com |
|
Outgoing Server |
mail.kg.rackcorp.com |
|
Outgoing Server Type |
SMTP |
|
Outgoing Server Username |
you@example.net (or tick ‘same as incoming’) if available |
|
Outgoing server password |
your_password |
|
Webmail |
https://webmail.kg.rackcorp.com |
Choose a type of encryption from SSL or TLS. TLS is recommended for compatibility.
POP
|
POP with SSL |
POP with TLS or STARTTLS |
|
Incoming Server Port: 995 Outgoing Server Port: 465 |
Incoming Server Port: 143 Outgoing Server Port: 25 |
IMAP
|
IMAP with SSL |
IMAP with TLS or STARTTLS |
|
Incoming Server Port: 993 Outgoing Server Port: 465 |
Incoming Server Port: 143 Outgoing Server Port: 25 |
RackCorp global webmail for standard email is available at https://webmail.rackcorp.com
Email Settings | Exchange
To setup exchange email accounts in your client, the recommended way is to use auto discover with an exchange compatible mail client or use Outlook Web Access (OWA, Microsoft’s implementation of webmail, web based version of the Outlook email client for Exchange Email).
Supply your email address and password to the email client and it will perform the setup process. The setup process on most clients this will also setup Calendar, Tasks and Contacts. On Mobile devices, a device security policy may be applied by the setup process.
The address for OWA varies depending on the region and is available in your Outlook account information
https://mail.ex1.rackcorp.com is the global OWA system
https://mail.ex1.rackcorp.mn is the Mongolian OWA system
mail.ex1.rackcorp.com is the primary RackCorp Exchange server if manual configuration is desired

Figure 1 Outlook Web Access (OWA) webmail on RackCorp
Microsoft Office Outlook
Guide for Outlook 2010,2013,2016,2019,2022 & Office 365
Outlook 2010/2013/2016 - Standard E-Mail
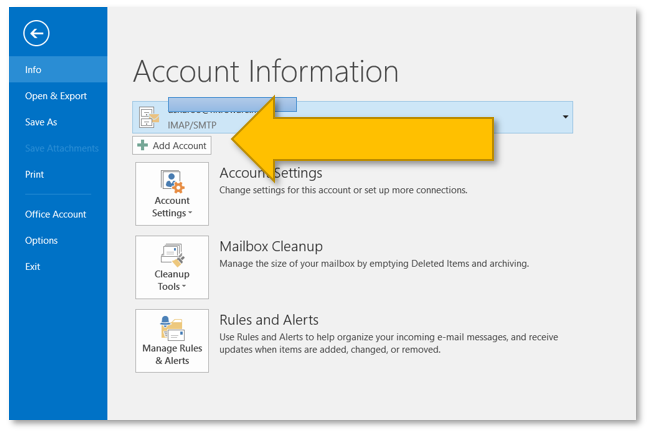
Figure 2 Microsoft Outlook account settings (File Menu)

Figure 3 Microsoft Outlook Add Account - Auto Setup

Figure 4 Enter your account password here if prompted during the auto setup process enter it. If you are also prompted to allow server settings, press allow

Figure 5 Microsoft Outlook auto account setup successful notfication

Figure 6 settings for your newly added account are available from the File menu in Microsoft Outlook and selecting the appropriate account from the drop down
Outlook 2019/Outlook 365 - Standard Email
The setup screens for both these versions vary to other versions of versions of Outlook so verbal setup instructions will not be fully applicable.

Figure 7 Microsoft Outlook account settings (File Menu)
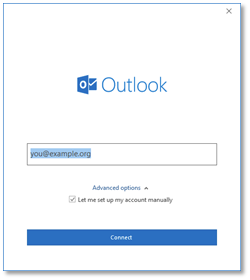
Figure 8 enter your email address in the Outlook welcome screen and tick manual setup
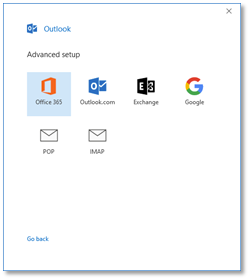
Figure 9 Choose from IMAP or POP email accounts. IMAP is recommended.
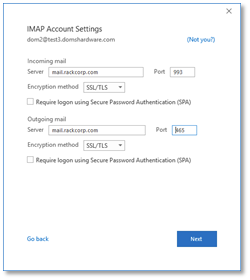
Figure 10 complete the email settings as illustrated, incoming and outgoing mail servers, encryption and ports
If you are using our Mongolian servers, please use mail.mn.rackcorp.com as the mail server.
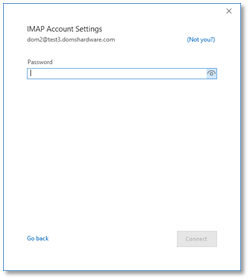
Figure 11 complete the password for your email account
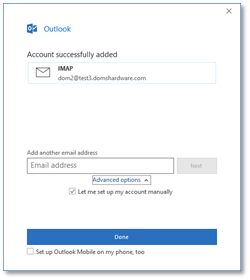
Figure 12 Outlook welcome process is a success message. There is a optional link selected by default that leads to a webpage describing how to install Outlook for mobile.
Outlook 2019/Outlook 365 - Hosted Exchange
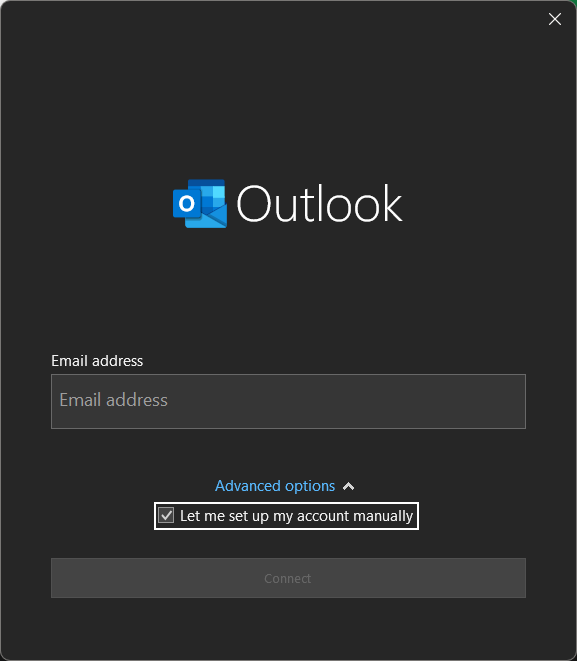
Figure 13. Add a new account to outlook. Note the exact screen varies version to version
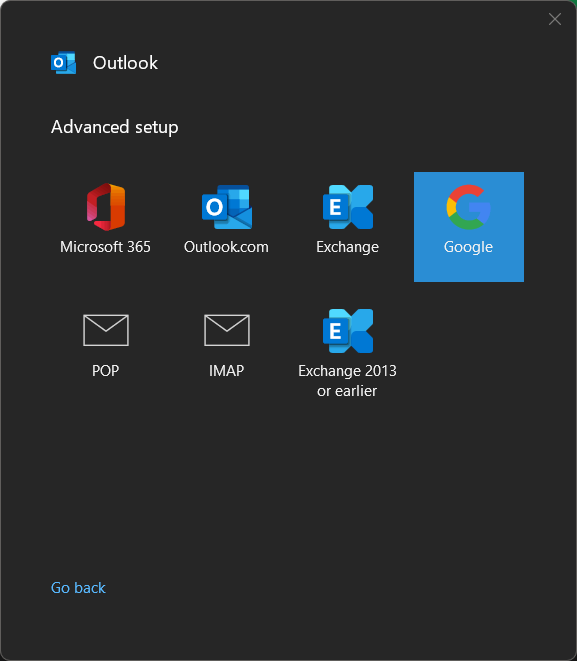
Fig 14. Choose EXCHANGE from the email selection
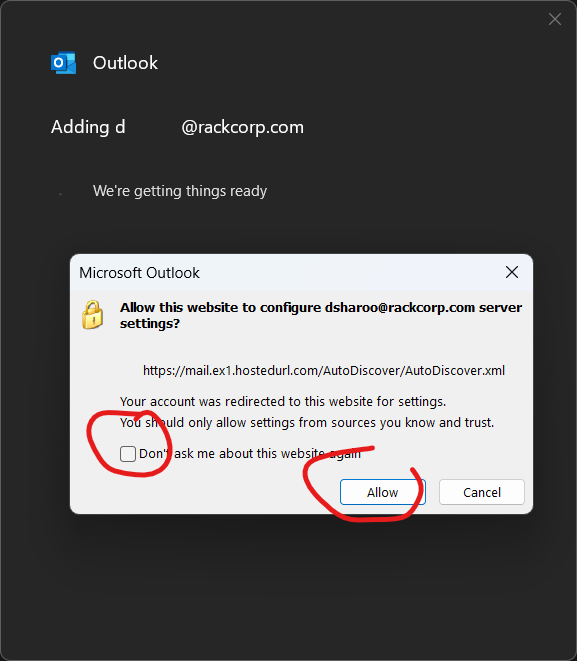
Fig 15. A permissions popup will appear soon after. Select The options circled in red as screenshot. The popup might be hidden or obscured by outlook.
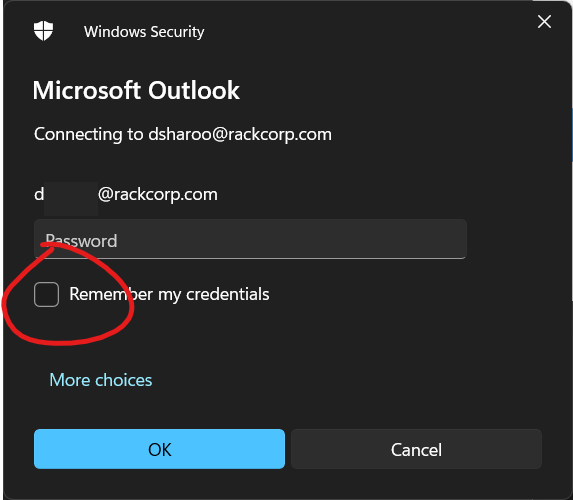
Fig 16. enter your exchange password. Selecting Remeber my Password is optional.
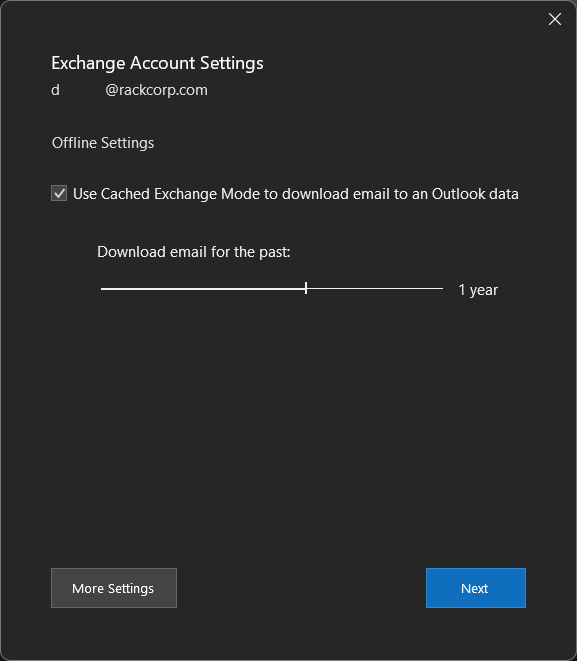
Fig 17. If your password is correct you will be presented with options. The defaults are sufficient.
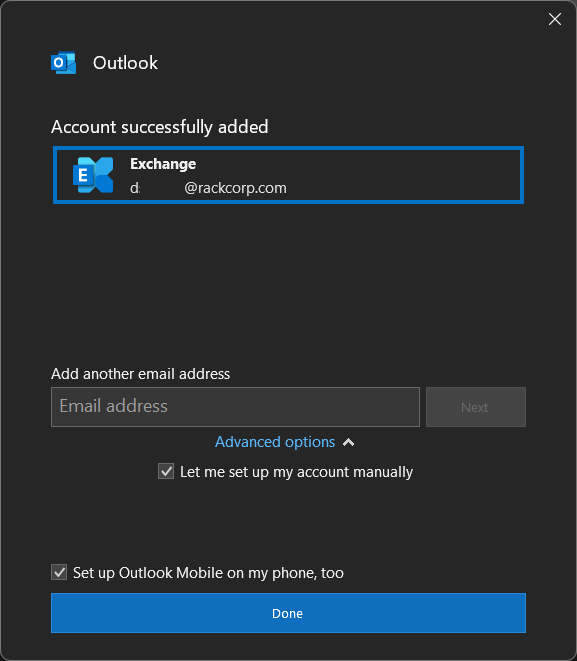
Fig 18. Final Notice of Successful Addition of account
Mozilla Thunderbird
Email Client Setup | Mozilla Thunderbird
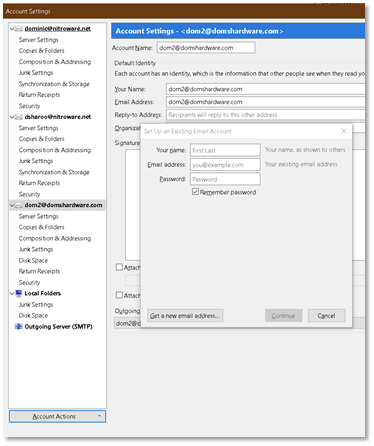
Figure 20 Mozilla Thunderbird setup, choose add mail account from the dropdown and fill in the details then press continue.
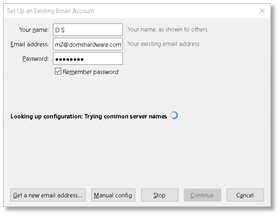
Figure 21 Mozilla Thunderbird email setup - choose manual Config now if you wish to define your own mail server settings
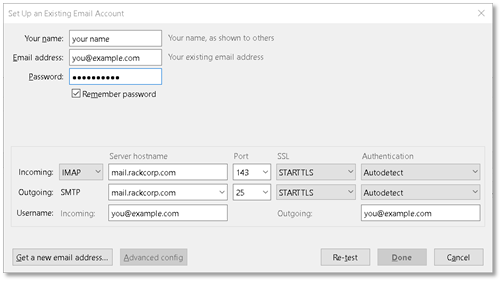
Figure 22 Mozilla Thunderbird setup - once the manual setup window appears, complete the mail server details, choosing IMAP or POP
If you are using our Mongolian servers, please use mail.mn.rackcorp.com as the mail server.
Windows Mail
Windows 10 Mail
POP/IMAP manual setup
Auto discovery or manual settings can be used with Win10 Mail
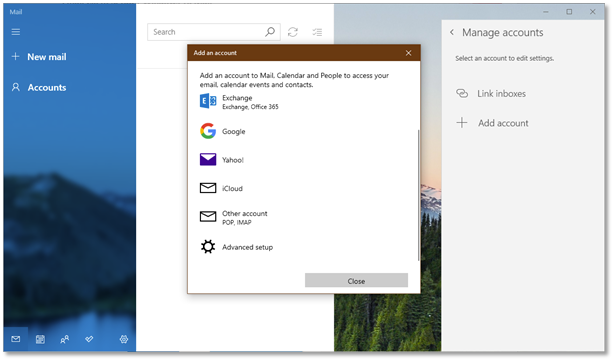
Figure 13 Windows 10 Mail setup – Click Accounts and then add account. Select Advanced setup

Figure 14 Windows 10 mail manual setup for RackCorp POP/IMAP email - choose advanced setup
If you are using our Mongolian servers, please use mail.mn.rackcorp.com as the mail server.
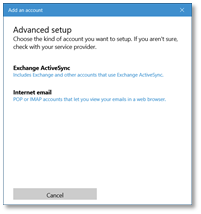
Figure 15 Windows 10 mail manual setup for RackCorp POP/IMAP email - choose Internet email
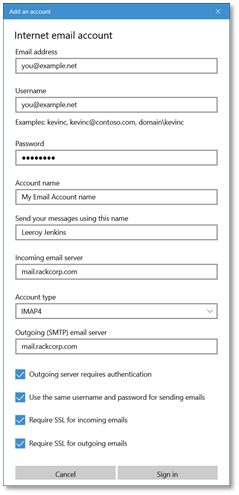
Figure 16 Windows 10 mail manual setup for RackCorp POP/IMAP email - fill in the details as illustrated, choose IMAP or POP
Exchange
At This time, there is an issue with the latest release of the email application for Windows 10, which prevents the ‘EXCHANGE’ option below from being chosen, ADVANCED SETUP must be chosen
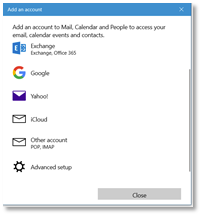
Figure 17 Windows 10 mail setup for RackCorp Hosted Exchange - choose advanced setup
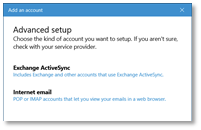
Figure 18 Windows 10 mail setup for RackCorp Hosted Exchange - select Exchange ActiveSync
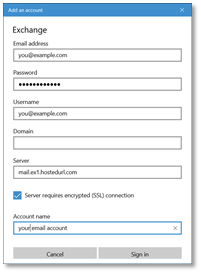
Figure 19 Windows 10 mail setup for RackCorp Hosted Exchange - fill in the details as illustrated. Domain is to be left blank.
Once you have completed THE ADD AN ACCOUNT form, Windows will prompt you about security policies for your computer. Select YES. Selecting YES may strength your windows security settings such as your password strength requirements You will then receive an ALL FINISHED success message.
How to check Exchange mailbox free space
How to Check your exchange mailbox free space and avoid fake spam emails regarding your mailbox.
Regarding hosted exchange provided mailboxes, all folders within that mailbox count towards the account quota.
If the user is frequently reaching their quota we recommend keeping the Deleted Items folder empty ("emptying the trash") or locally archiving folders to a new PST folder.
There are a number of official ways to check the storage size of your hosted exchange mailbox.
If you receive a message claiming your storage is full from sales@rackcorp.com or any other specific email address, or the email has a coloured box to click to resolve the issue please ignore and delete the email as it is a fake spam.
The only legitimate email alerting to a full mailbox comes from "Outlook" itself had has a Envelope Icon as below screenshot.
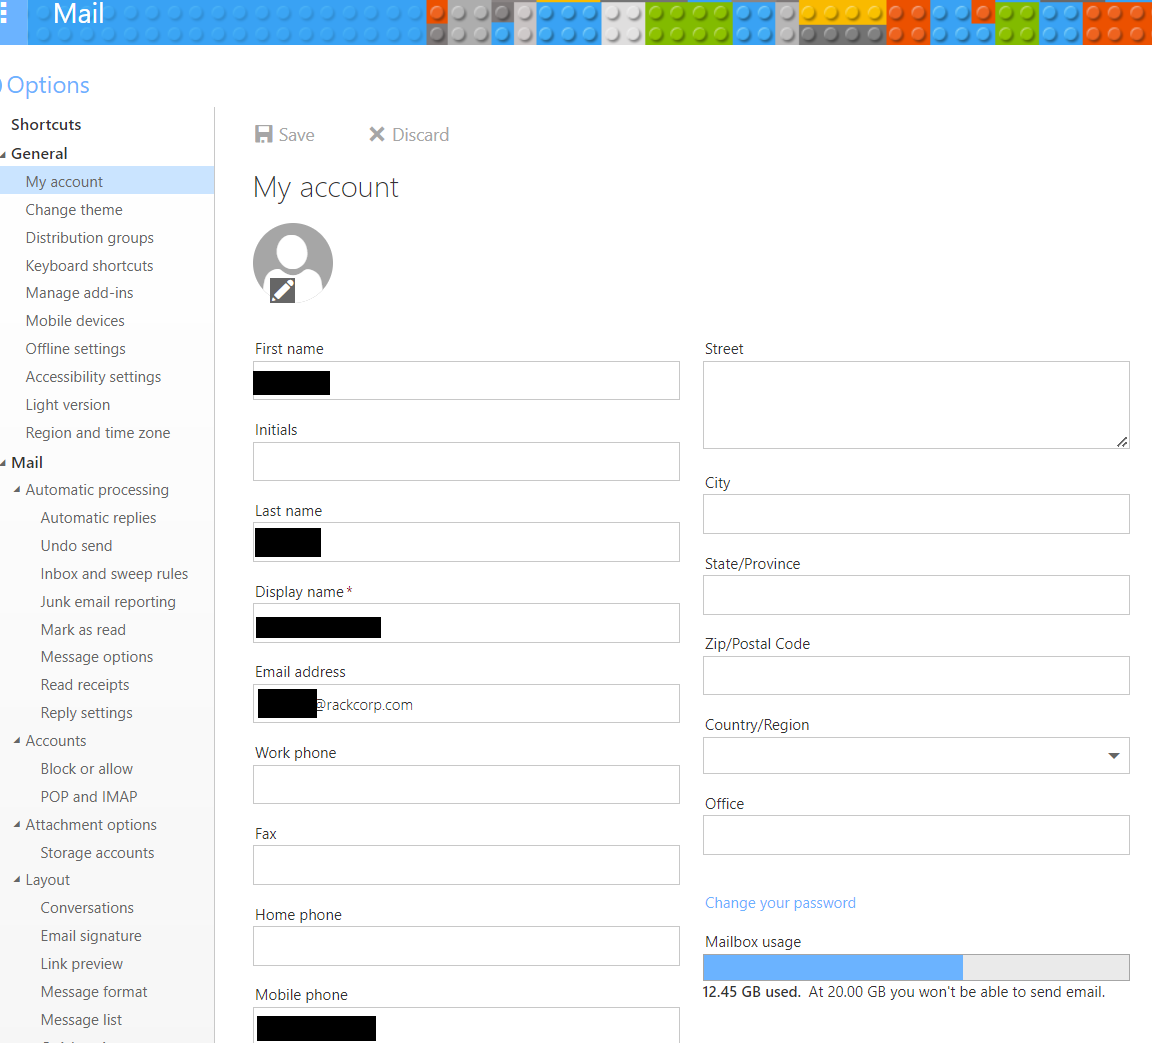
Figure 1: Outlook Web Anywhere - Click Options -> General -> My Account

Figure 2: Microsoft Office Outlook 2021 Status bar
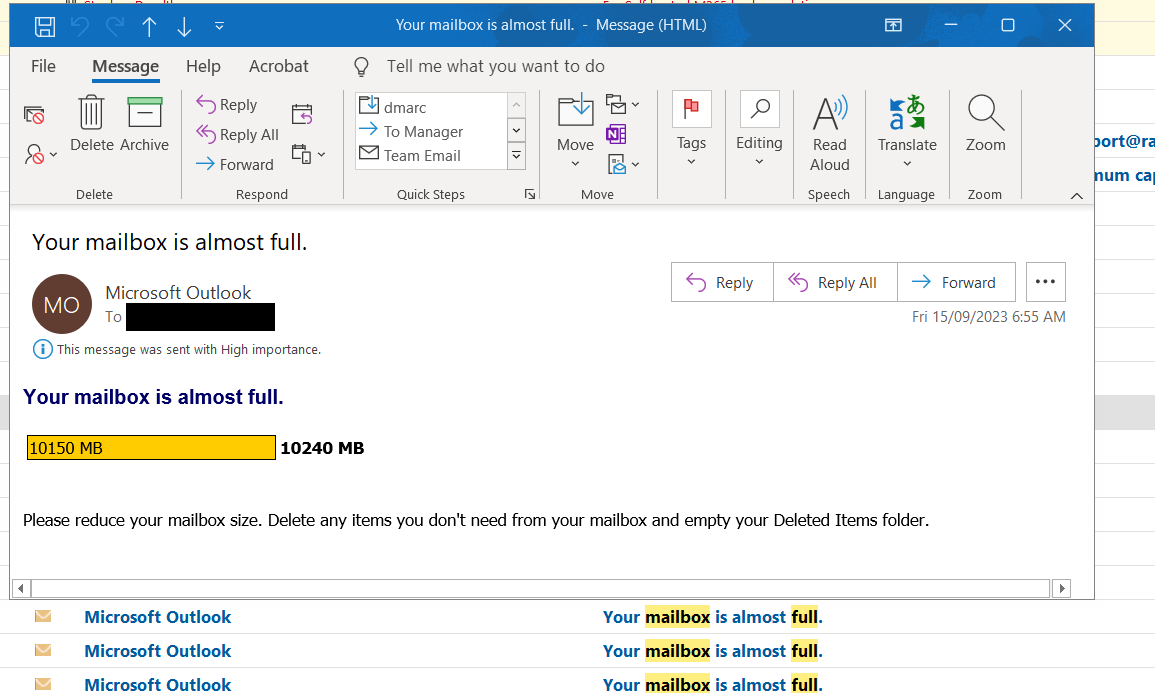
Figure 3: System generated mailbox alerts. Please note the look and feel of these emails as others will be fake.
Getting started with rclone for RackCorp S3 storage - Windows
rclone is an open source multi-platform tool for managing your cloud file storage. Multiple storage providers are supported natively including the large hyper-scalers as well as regional niche providers.
RackCorp S3 Storge is natively supported in rclone making setup straight forward.
As a command line based tool, rclone by itself is sufficent for transferring files and managing your S3 bucket on rackcorp. Integration withing the OS via a driver letter or folder-path is available via OS file system drivers. WinFSP, an optional install, enables FUSE integration with rclone to provide a drive letter or path for your S3 buckets on Windows.
Downloads
https://rclone.org/downloads/ (please download stable ver unless advised by tech support)
https://github.com/winfsp/winfsp/releases/ (optional, required for drive letter/folder function)
- Unzip rclone into a easily accessible directory
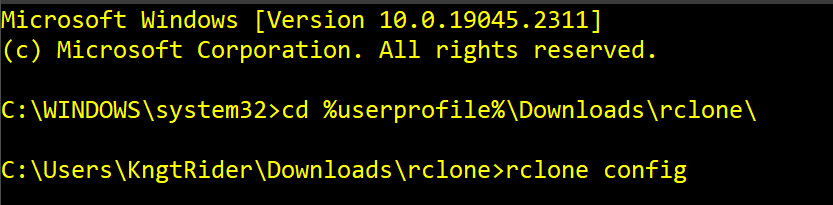
- Open a command prompt and navigate to that directory
- Run rclone config
Setup and configure rclone
Setup
C:\Users\KngtRider\Downloads\rclone>rclone config
No remotes found - make a new one
n) New remote
s) Set configuration password
q) Quit config
n/s/q>Select New Remote and give it a friendly name
Name> type "rackcorpS3" or whatever you wantChoose your storage backend type
name> rackcorps3
Option Storage.
Type of storage to configure.
Enter a string value. Press Enter for the default ("").
Choose a number from below, or type in your own value.
1 / 1Fichier
\ "fichier"
2 / Alias for an existing remote
\ "alias"
3 / Amazon Drive
\ "amazon cloud drive"
4 / Amazon S3 Compliant Storage Providers including AWS, Alibaba, Ceph, Digital Ocean, Dreamhost, IBM COS, Minio, RackCorp, SeaweedFS, and Tencent COS
\ "s3"Select Item 4, Amazon Compatible S3
Storage> 4
Option provider.
Choose your S3 provider.
Enter a string value. Press Enter for the default ("").
Choose a number from below, or type in your own value.
1 / Amazon Web Services (AWS) S3
\ "AWS"
2 / Alibaba Cloud Object Storage System (OSS) formerly Aliyun
\ "Alibaba"
3 / Ceph Object Storage
\ "Ceph"
4 / Digital Ocean Spaces
\ "DigitalOcean"
5 / Dreamhost DreamObjects
\ "Dreamhost"
6 / IBM COS S3
\ "IBMCOS"
7 / Minio Object Storage
\ "Minio"
8 / Netease Object Storage (NOS)
\ "Netease"
9 / RackCorp Object Storage
\ "RackCorp"Select item 9, Rackcorp
Choose a number from below, or type in your own value.
1 / Enter AWS credentials in the next step.
\ "false"
2 / Get AWS credentials from the environment (env vars or IAM).
\ "true"Select Item 2, Enter Credentials
Option access_key_id.
AWS Access Key ID.
Leave blank for anonymous access or runtime credentials.
Enter a string value. Press Enter for the default ("").
access_key_id>Generate and grab your credentials from the RackCorp Portal
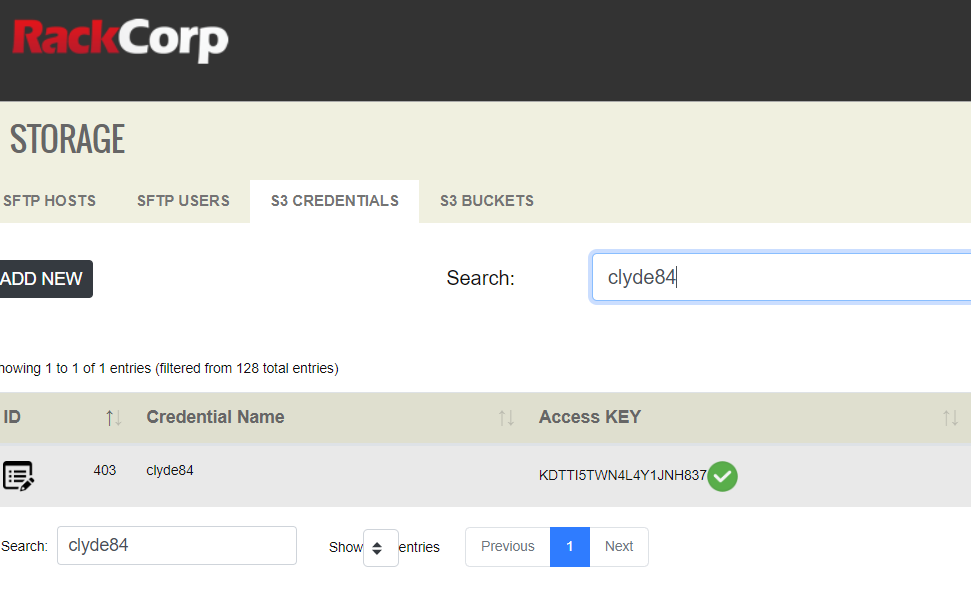
Lets enter
KDTTI5TWN4L4Y1JNH837
Option secret_access_key.
AWS Secret Access Key (password).
Leave blank for anonymous access or runtime credentials.
Enter a string value. Press Enter for the default ("").
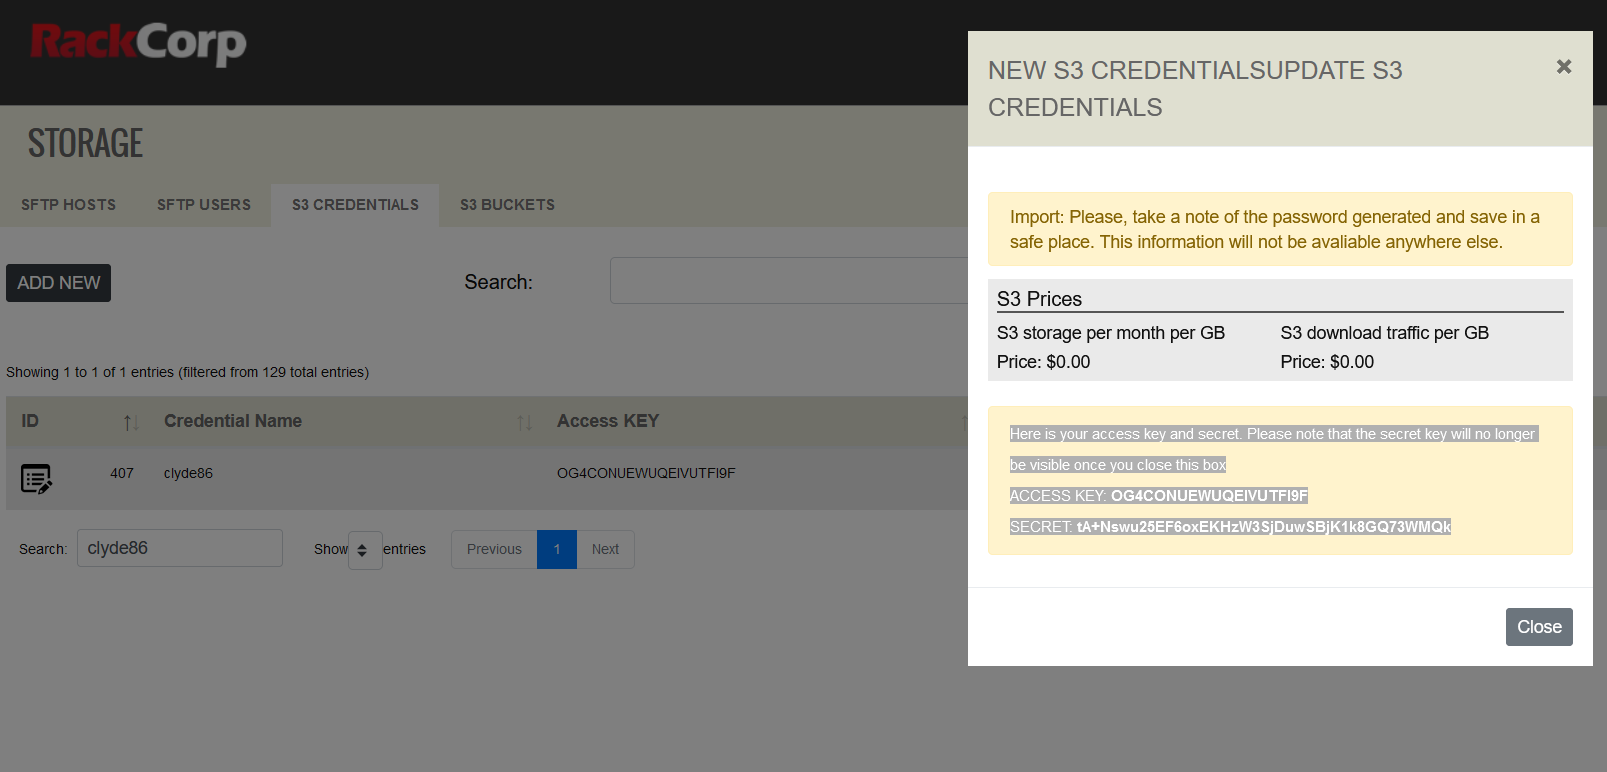
secret_access_key>Grab your key and secret from the RackCorp portal, remembering that is is a one-time-operation and your secret will no longer be available once it is first viewed
Option region.
region - the location where your bucket will be created and your data stored.
Enter a string value. Press Enter for the default ("").
Choose a number from below, or type in your own value.
1 / Global CDN (All locations) Region
\ "global"
2 / Australia (All states)
\ "au"
3 / NSW (Australia) Region
\ "au-nsw"
4 / QLD (Australia) Region
\ "au-qld"
5 / VIC (Australia) Region
\ "au-vic"
6 / Perth (Australia) Region
\ "au-wa"
7 / Manila (Philippines) Region
\ "ph"
8 / Bangkok (Thailand) Region
\ "th"
9 / HK (Hong Kong) Region
\ "hk"
10 / Ulaanbaatar (Mongolia) Region
\ "mn"
11 / Bishkek (Kyrgyzstan) Region
\ "kg"
12 / Jakarta (Indonesia) Region
\ "id"
13 / Tokyo (Japan) Region
\ "jp"
14 / SG (Singapore) Region
\ "sg"
15 / Frankfurt (Germany) Region
\ "de"
16 / USA (AnyCast) Region
\ "us"
17 / New York (USA) Region
\ "us-east-1"
18 / Freemont (USA) Region
\ "us-west-1"
19 / Auckland (New Zealand) Region
\ "nz"Choose 2, AUS
Location constraint - the location where your bucket will be located and your data stored.
Enter a string value. Press Enter for the default ("").
Choose a number from below, or type in your own value.
1 / Global CDN Region
\ "global"
2 / Australia (All locations)
\ "au"
3 / NSW (Australia) Region
\ "au-nsw"
4 / QLD (Australia) Region
\ "au-qld"
5 / VIC (Australia) Region
\ "au-vic"
6 / Perth (Australia) Region
\ "au-wa"
7 / Manila (Philippines) Region
\ "ph"
8 / Bangkok (Thailand) Region
\ "th"
9 / HK (Hong Kong) Region
\ "hk"
10 / Ulaanbaatar (Mongolia) Region
\ "mn"
11 / Bishkek (Kyrgyzstan) Region
\ "kg"
12 / Jakarta (Indonesia) Region
\ "id"
13 / Tokyo (Japan) Region
\ "jp"
14 / SG (Singapore) Region
\ "sg"
15 / Frankfurt (Germany) Region
\ "de"
16 / USA (AnyCast) Region
\ "us"
17 / New York (USA) Region
\ "us-east-1"
18 / Freemont (USA) Region
\ "us-west-1"
19 / Auckland (New Zealand) Region
\ "nz"
Choose 2, AUS
Option acl.
Canned ACL used when creating buckets and storing or copying objects.
This ACL is used for creating objects and if bucket_acl isn't set, for creating buckets too.
For more info visit https://docs.aws.amazon.com/AmazonS3/latest/dev/acl-overview.html#canned-acl
Note that this ACL is applied when server-side copying objects as S3
doesn't copy the ACL from the source but rather writes a fresh one.
Enter a string value. Press Enter for the default ("").
Choose a number from below, or type in your own value.
/ Owner gets FULL_CONTROL.
1 | No one else has access rights (default).
\ "private"
/ Owner gets FULL_CONTROL.
2 | The AllUsers group gets READ access.
\ "public-read"
/ Owner gets FULL_CONTROL.
3 | The AllUsers group gets READ and WRITE access.
| Granting this on a bucket is generally not recommended.
\ "public-read-write"
/ Owner gets FULL_CONTROL.
4 | The AuthenticatedUsers group gets READ access.
\ "authenticated-read"
/ Object owner gets FULL_CONTROL.
5 | Bucket owner gets READ access.
| If you specify this canned ACL when creating a bucket, Amazon S3 ignores it.
\ "bucket-owner-read"
/ Both the object owner and the bucket owner get FULL_CONTROL over the object.
6 | If you specify this canned ACL when creating a bucket, Amazon S3 ignores it.
\ "bucket-owner-full-control"Choose 1 For owner full control over your files with no public access
Edit advanced config?
y) Yes
n) No (default)
y/n>Choose N
Summary of settings is next displayed
[rackcorps3]
type = s3
provider = RackCorp
env_auth = false
access_key_id = OG4CONUEWUQEIVUTFI9F
secret_access_key = tA+Nswu25EF6oxEKHzW3SjDuwSBjK1k8GQ73WMQk
region = au
endpoint = au.s3.rackcorp.com
location_constraint = au-nsw
acl = private
--------------------
y) Yes this is OK (default)
e) Edit this remote
d) Delete this remotePress Y to accept changes. You are returned to the main menu.
Name Type
==== ====
rackcorps3 s3
e) Edit existing remote
n) New remote
d) Delete remote
r) Rename remote
c) Copy remote
s) Set configuration password
q) Quit config
e/n/d/r/c/s/q>Q to quit back to the command prompt.
Connect rclone to a drive letter or folder-path on the operating system
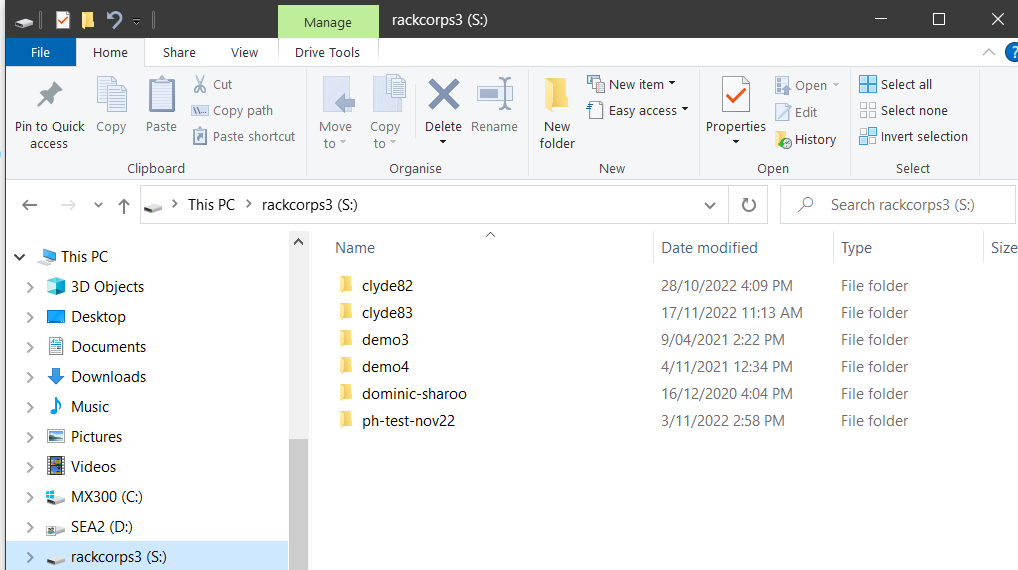
Where rackcorps3: is your friendly connection name from setup and s: can be a spare drive letter not in use by your system
C:\Users\KngtRider\Downloads\rclone>rclone mount rackcorps3: s:
The service rclone has been started.
This will launch drive letter on demand. Once the process/rclone window is closed, the drive letter will be unmounted.
Advanced Setup Topics
Autostart on Windows
The following code will establish a windows service that will mount the S3 drive letter on startup but via a context that is visible to all users of the computer
For this guidance, we assume the rclone is unzipped to c:\rclone. If you are following the above instructions, change the path for rclone to the exact path you used in those instructions, eg c:\users\yourwindowsusername\Downloads\rclone
- Open a command prompt and navigate to c:\rclone
- Execute Powershell by running powershell at the cmd prompt
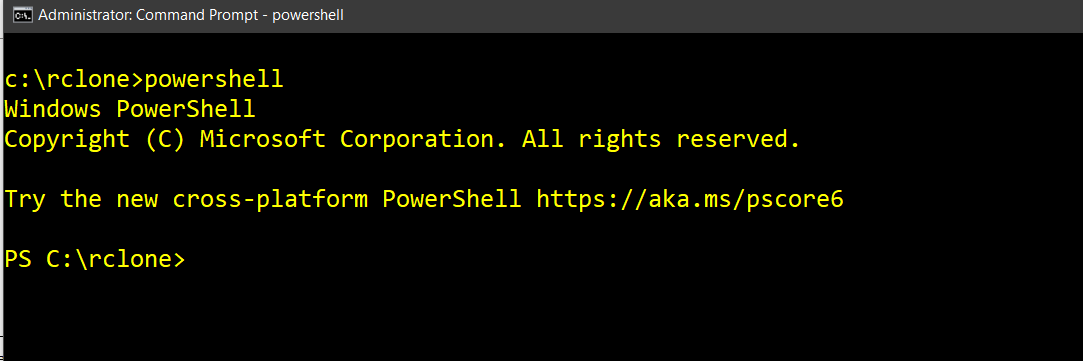
- At the powershell prompt enter this command to create the new rclone service
New-Service -Name Rclone -BinaryPathName 'c:\rclone\rclone.exe mount rackcorps3: S: --config c:\rclone\rclone.conf --log-file c:\rclone\mount.txt'
Where:
- c:\rclone\ is your path to rclone
- rackcorps3: is the friendly name for your S3 instance
- S: is the desired drive letter
Providing all the parameters are correct including keys, the service should execute as its set to automatic mode and the drive letter S: should appear.
To manually interact with the service, use 'net stop rclone' and 'net start rclone' at the windows command prompt
Getting started with S3 storage on RackCorp Hybrid Cloud - Windows & Mac
This document will cover the basics to get up and running to use RackCorp’s S3 storage service, including setting up access keys and secrets, creating buckets and transferring/manipulating your files via a number of third party client applications on Windows.
There are several ways to host your files on RackCorp S3. This document focuses on Windows Clients but most applications are also available for Mac and Linux.
- FTP style application (browser)
- Mounted Drive Letter application (drive)
- API access for modern web applications.
You are free to use a S3 compliant application of your choosing, although the following applications are validated with our service and for which we can provide limited support and assistance.
|
Windows |
MAC |
LINUX |
|
FileZilla Pro Payware |
FileZilla Pro Payware |
FileZilla Pro Payware |
|
Cyberduck (Browser) Free |
Cyberduck (Browser) Free |
rclone |
|
Mountain Duck (Drive) Trial |
Mountain Duck (Drive) Trial |
|
|
CloudBerry MSP360 Explorer Free |
Cloudberry MSP360 Explorer Free |
|
|
rclone |
rclone |
|
|
TNT Drive Trial |
Mountain Duck | |
|
Expan Drive |
Expan Drive | |
|
S3Browser Freeware |
||
| WinSCP | ||
OBJECT STORAGE
- S3 compatible object storage contains one or more storage buckets; each bucket contains a number of widgets.
- Each widget has a unique ID.
- Each widget has some meta data describing attributes of the object such as dates or revisions
- Inside each widget is some data we want to access.
- We are able to sort through the widgets that are in these buckets until we find the one we are looking for.
1. Create your S3 credentials in RackCorp Portal.
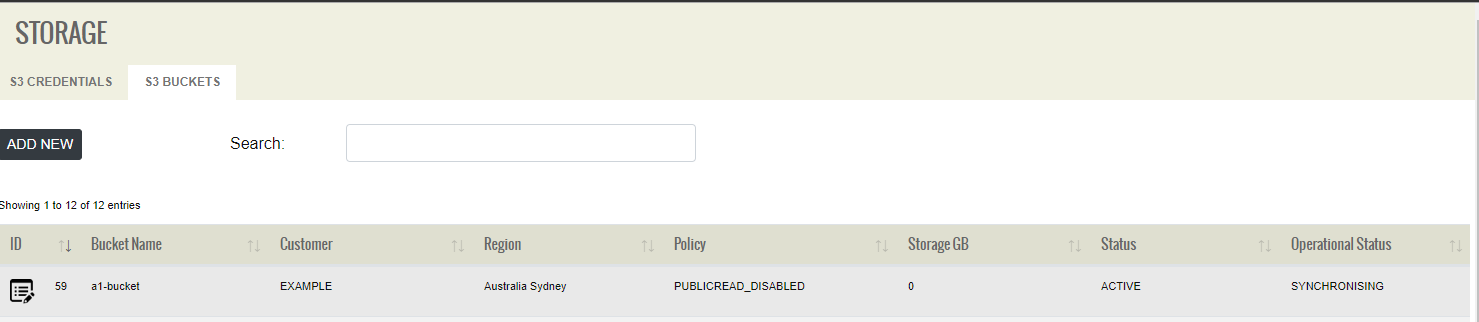
The Storage tab in RackCorp Portal manages your CREDENTIALS and BUCKETS
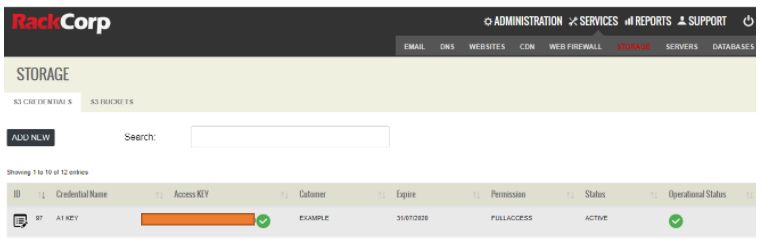
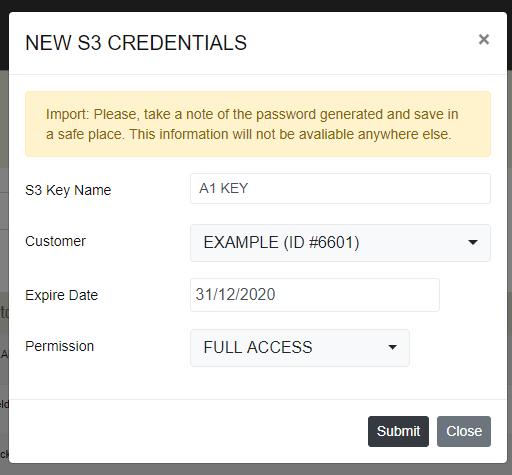
1.1 Start by adding a new credential. Give your new key a descriptive name, e.g. Employee name, Client or contractor name. Try to keep this distinct compared to what you name your buckets later.
Think of your access key as your username
Think of your ‘secret’ key as your password.
1.2 Choose the customer in the dropdown field. This would be either your company/client name or a sub-customer/sub-client. You would have originally setup any sub-customers in the RackCorp portal under the Customers section.
1.3 Define an optional expiry date for the key. If you are going to be issuing an amount of keys this is a good way to track of authorised access.
1.4 Define the Read/Write Permission for the credential. This is ideal if you would like to create a credential for someone that you would like to share files with, or to freeze files.
Once you have created or updated your key, a summary result is displayed. A progress spinner is displayed while your keys are generated and a green tick means they are ready to view.
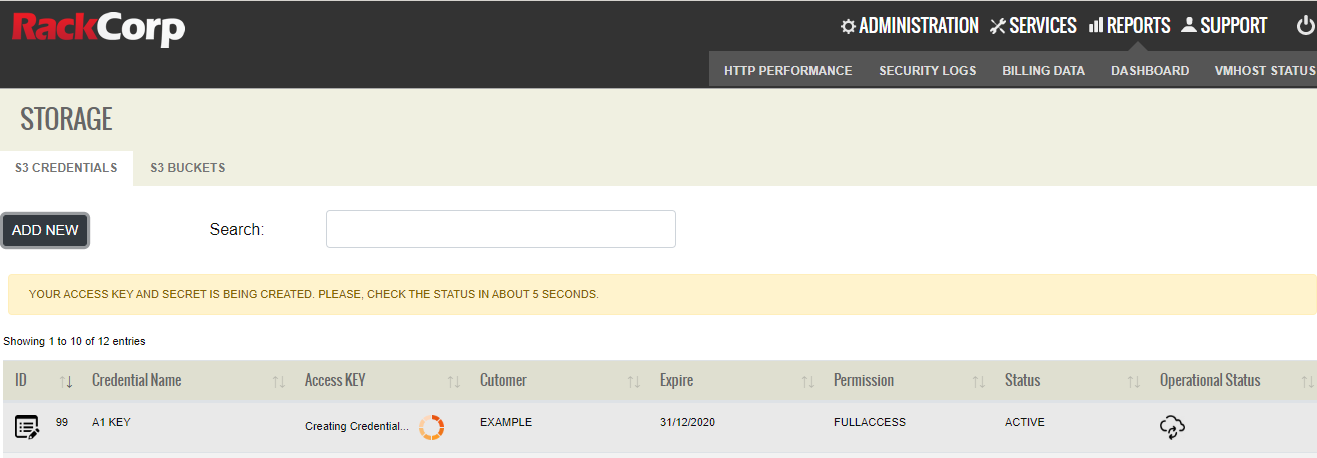

Click on the access key to retrieve your access key and secret. This is a ONE-TIME PROCESS.
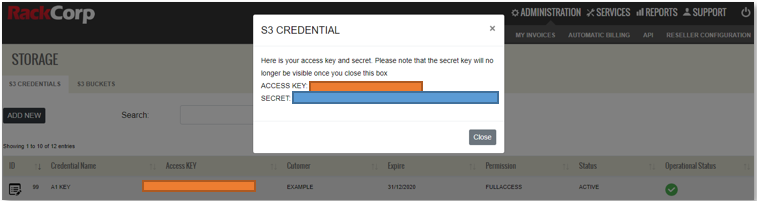
TAKE A NOTE OF YOUR ‘SECRET’ DISPLAYED IN THIS POPUP.
It is NOT retrievable.
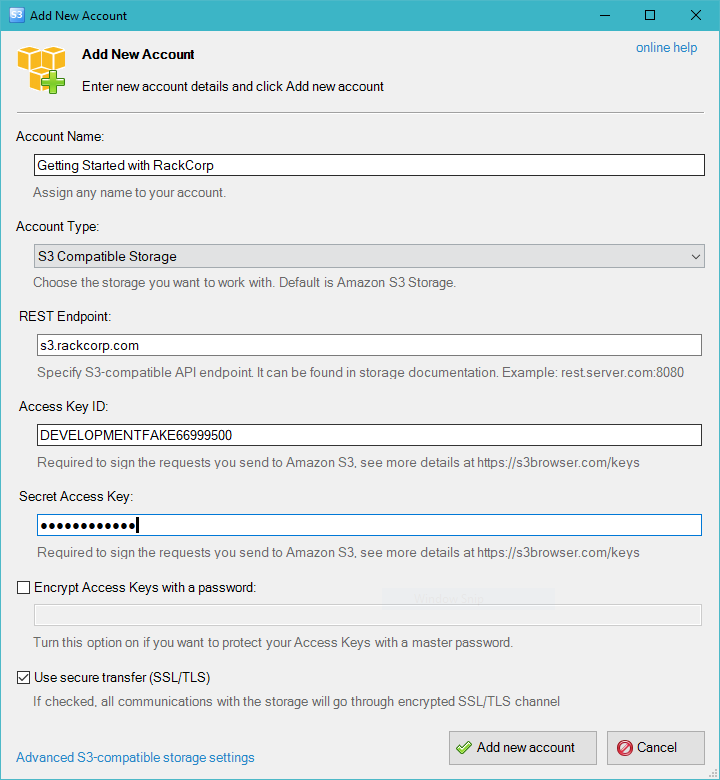
You now have the three elements needed to securely access your files in RackCorp S3
- Your endpoint URL: For some of our customers we will setup a custom URL, In this document we will use s3.rackcorp.com as an example.
- Your ACCESS KEY : Retrievable from the portal
- Your SECRET : A one-time code displayed in the portal
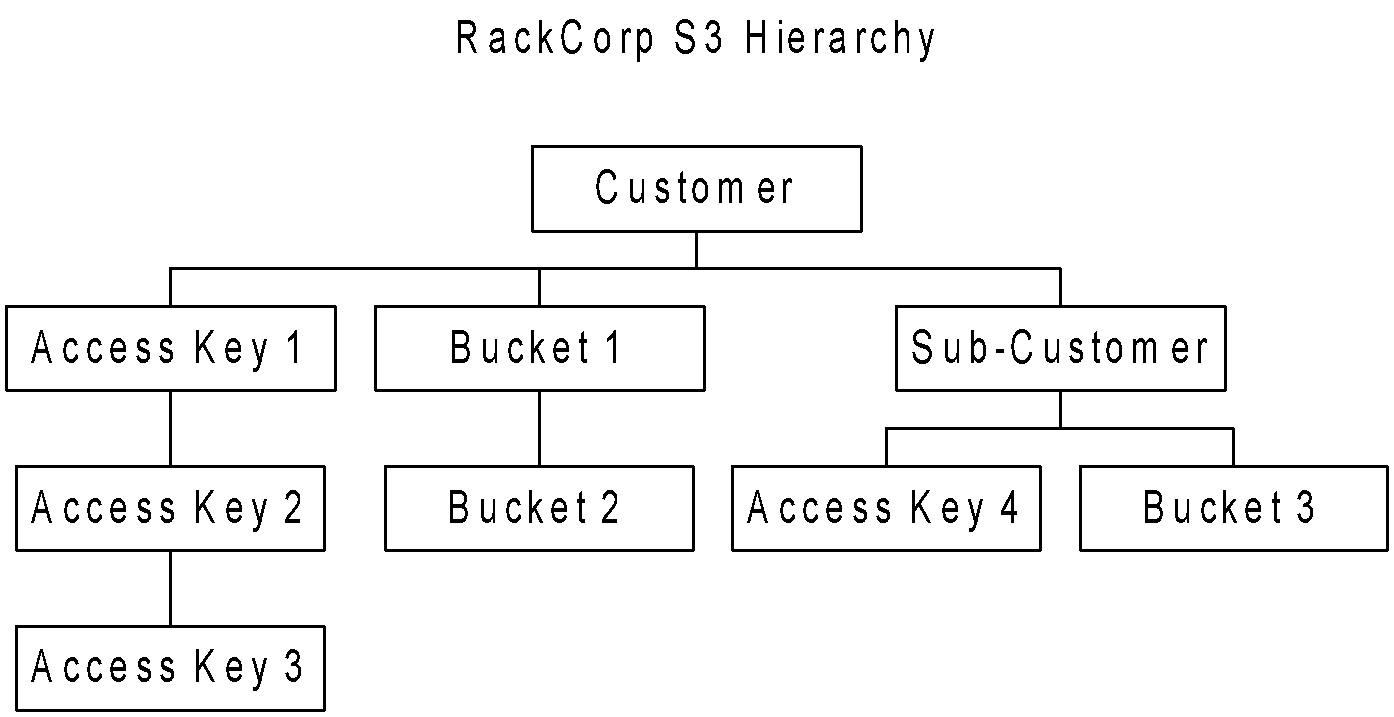
In RackCorp S3, there is a many to many relationships between access keys and buckets. This means all keys created under a customer can access all the buckets created under that customer.
2. Create your S3 buckets.
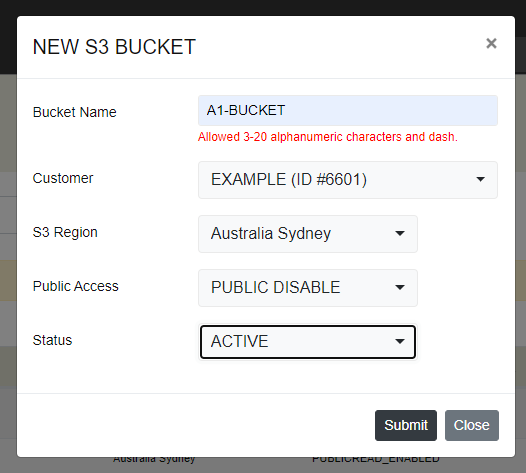
2.1 Define a descriptive name for your bucket. The name should reflect what the bucket’s purpose is. Such as `TropicalHolidayProject` or ‘a1bucket’ in our example.
For bucket names please use alphanumeric characters, dash and no spaces.
2.2 Choose the customer in the dropdown field. This would be either your company/client name or a sub-customer/sub-client. You would have originally set up any sub-customers in the RackCorp portal under the Customers section.
2.3 Choose the region for where you would like to store your buckets. In this drop-down we list common regional options and these options may vary per customer. If these do not suit you contact our support department who can define manual region rules for you. An example S3 Region might be “Australia”, which would encompass several physically distinct data storage locations; “Australia - East” for NSW and Victoria or “Philippines and Hong Kong”. The field has been pre-populated with two of our NSW datacentres, a Sydney region covering both as well as Thailand.
2.4 Access Policy determines whether your access key is required to access this bucket. You could typically use this option to enable public web content
PUBLIC ENABLE = No key is required to access the bucket.
PUBLIC DISABLE = Access key is required to access the bucket.
2.5 Status is simply an enable/on-off toggle for the container.
2.6 Wait for your bucket to be added.
3. Configure your S3 application with your credentials.
We will demonstrate two types of windows applications as client examples for RackCorp S3. A ‘FTP’ style application and a drive-letter type app, where buckets are mounted as windows drive letters, allowing files to be natively accessed by windows applications without having to GET or PUT them from the S3 server first.
|
S3 Applications |
|
|
FileZilla Pro Payware |
|
|
Cyber Duck (Browser) Freeware |
https://cyberduck.io/ |
|
Mountain Duck (Drive) Trial |
|
|
CloudBerry MSP360 Explorer Freeware |
|
|
CloudBerry MSP360 Drive Trial |
|
|
TNT Drive Trial |
|
|
S3Browser Freeware |
|
|
WinSCP |
https://winscp.net/eng/index.php |
|
rclone |
https://rclone.org/downloads/ |
|
Expan Drive |
https://www.expandrive.com/ |
WINDOWS
3.1 FTP Style S3 Client
These require your files to be downloaded to your computer and then uploaded back to the server when needed.
These types of clients are ideal for managing files that are not often edited and for which you may require additional features to manipulate your files and buckets.
3.1.1 S3 Browser freeware
Accounts -> Add New Account to setup your keys in the client
For ‘S3 Browser’, simply drag and drop your files between your PC and your bucket.
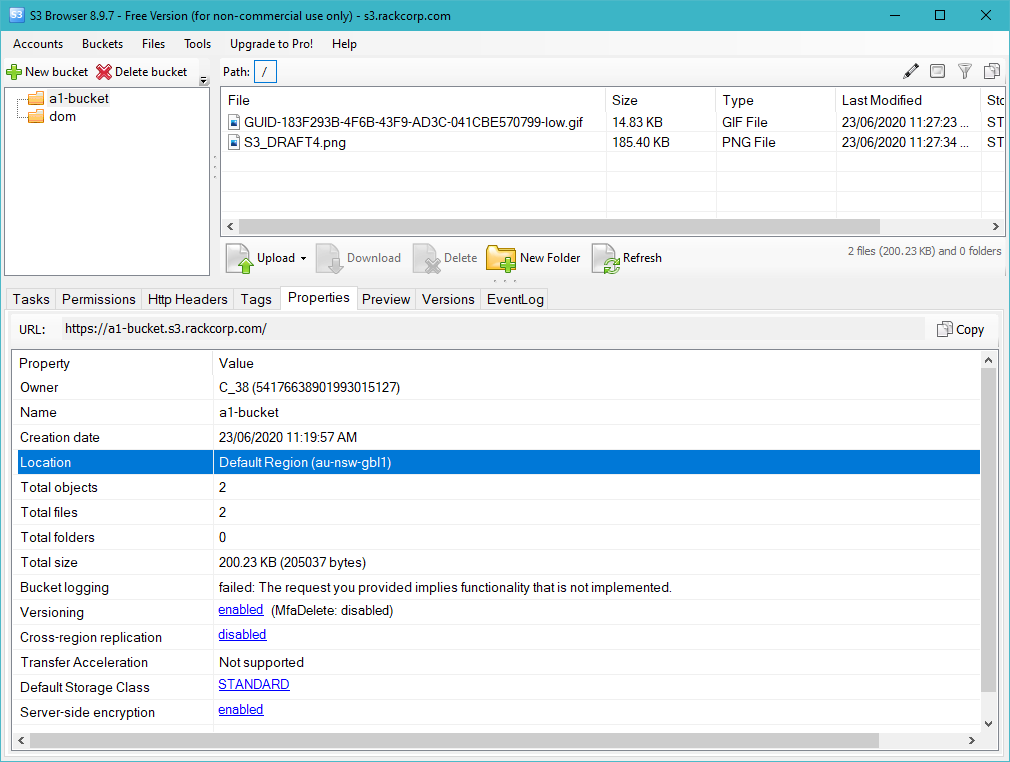
We can see here that our credential has access to two buckets as that’s what we created in the portal.
3.1.2 Cloudberry Explorer for Windows
Please add a 'S3 Compatible' Connection
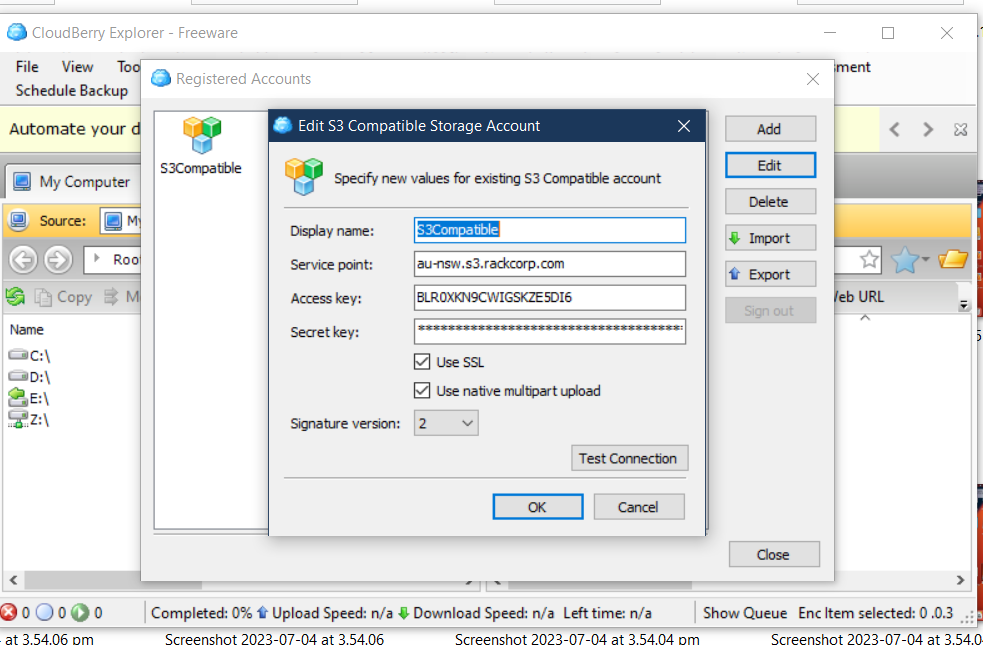
Choose your S3 Source either in the left or right pane of the application

3.2 Drive Letter mount clients
These applications mount each bucket a driver letter in windows explorer, allowing you to manage your files as if they are native in your windows system. Downloads/uploads occur when you copy files to/from that particular drive letter/bucket.
These are better for managing large numbers of content rich files that would be edited by the end user such as photos text or video, and for those who would like ease of use.
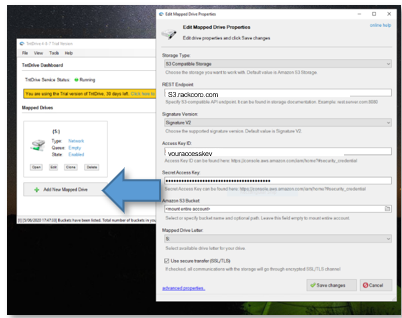
3.2.1 TNT drive trial

MAC OS
FTP-Style
We recommend Cyberduck for those who would like get/put style of application.
Drive-Mount
We have tested and validated both Mountain Duck (from the developer of Cyber Duck) as well as Cloud Mounter against MacOS Ventura. These S3 clients will give you folder/drive mount access for your S3 Buckets.
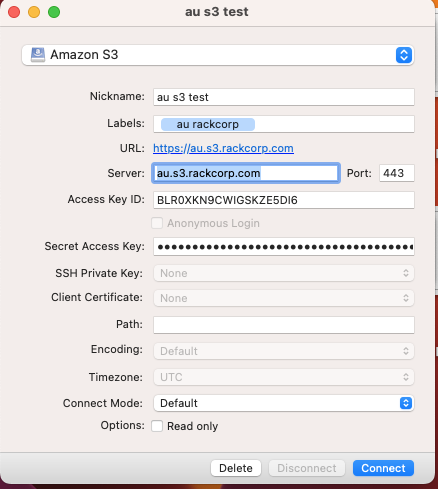
Mountain Duck
Please add a "amazon s3' type connection configurator, using the endpoint of your choice
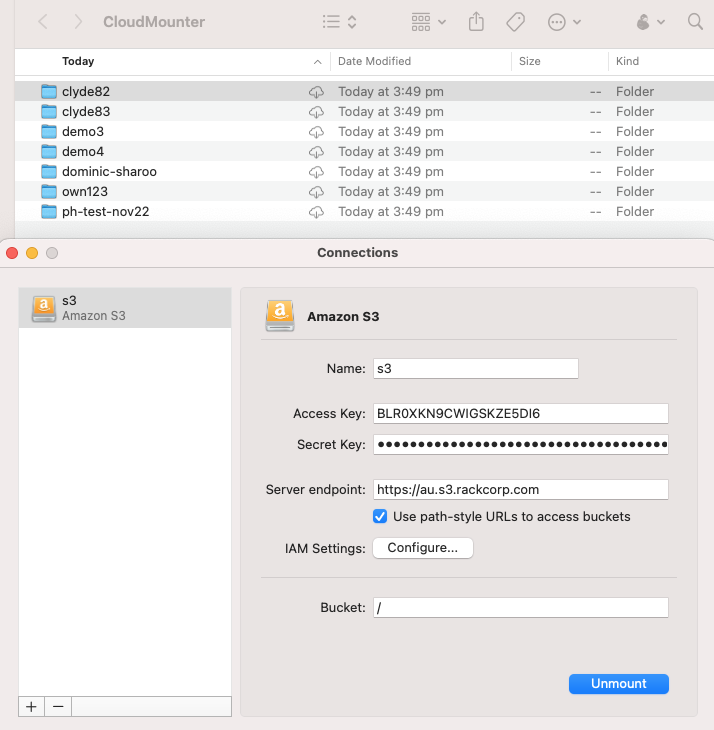
CloudMounter
Please update to the latest version For Ventura Support and follow the below settings example to setup Cloud Mounter.
Add a "amazon s3' connection and fill in the details per rackcorp portal. Substitute the Server Endpoint for the one of your choosing eg AU or AU-NSW or S3 regions s per our S3 settings page.

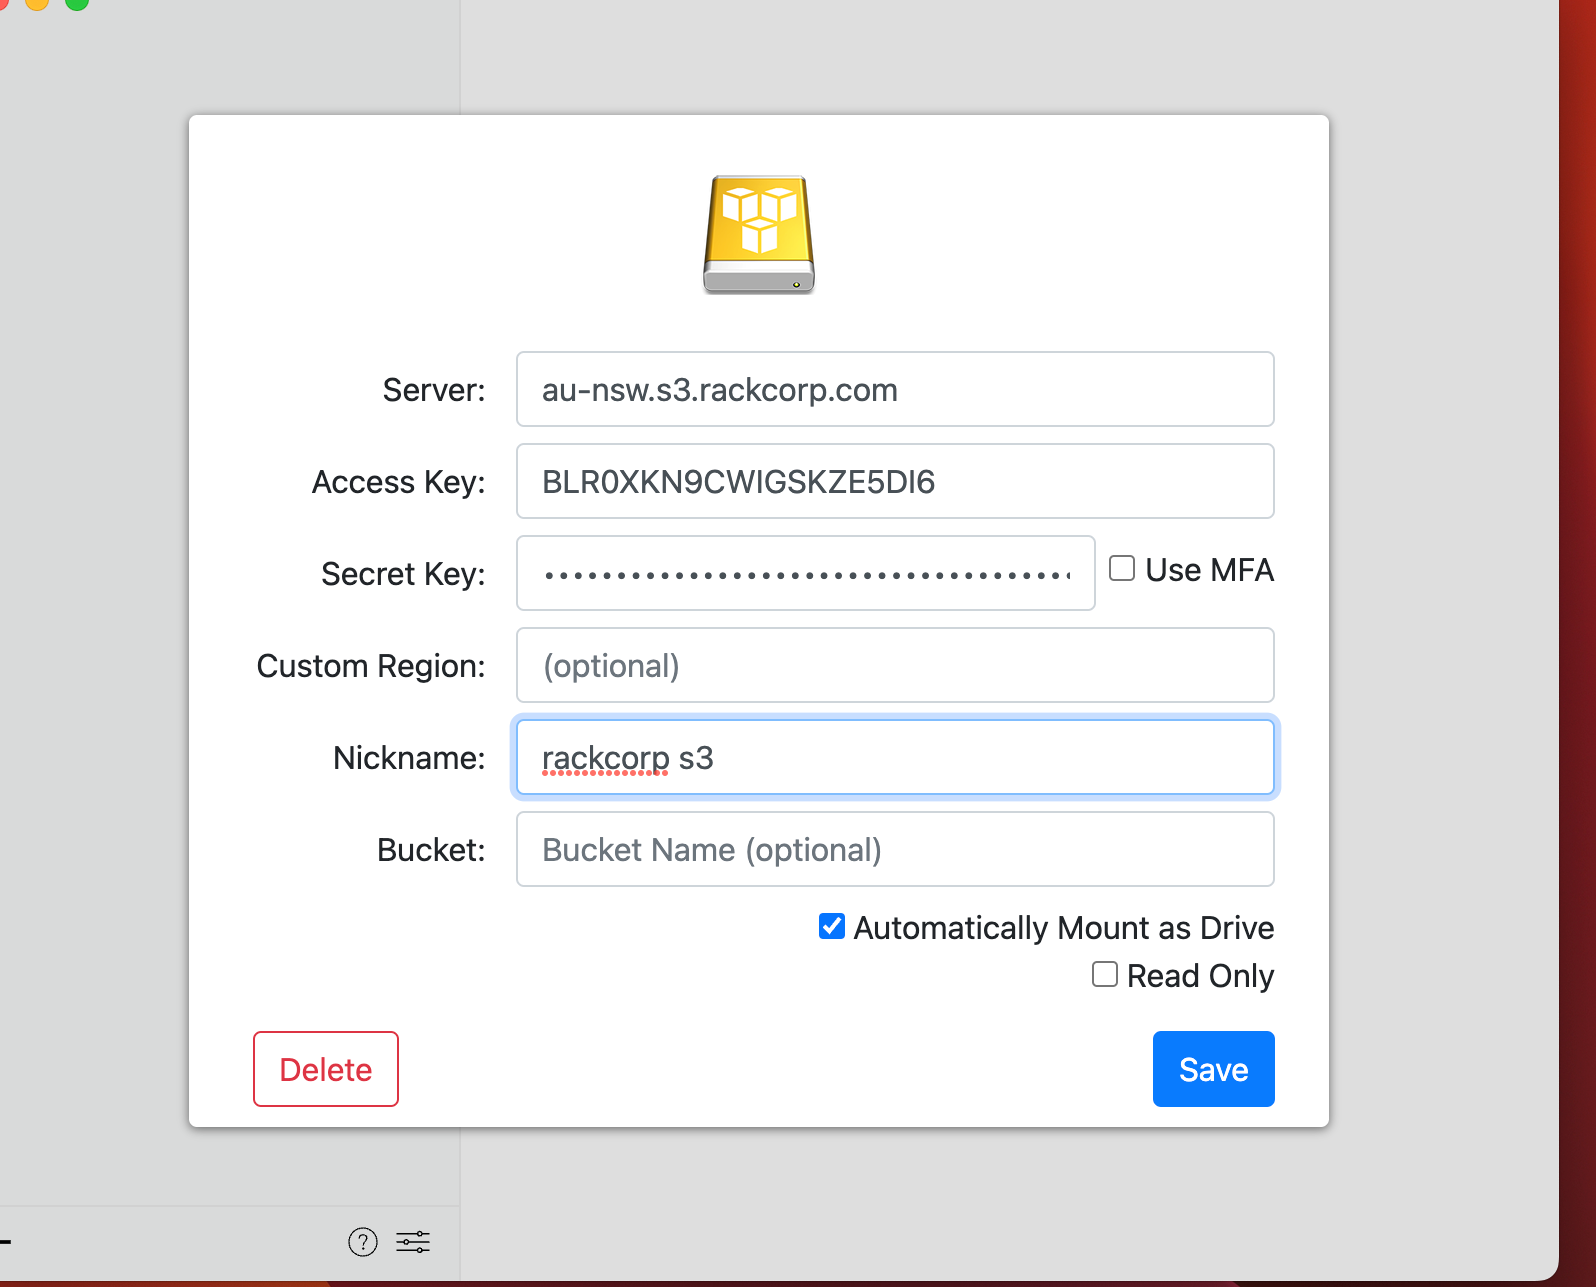
Expan Drive
For ExpanDrive please add a "Amazon S3" Connection

4. Advanced Features
This document is intended to get you up and running with the RackCorp S3 Storage service using popular Windows client applications.
To use advanced features like file versioning, encryption, Access Control Lists, cross-region replication, Transfer Acceleration, bucket logging and API access, please contact your account manager for additional information. These features may require specific settings or regions to work.
Document History:
008: Add Mac/Windows Expan Drive, Cloudberry for Windows
007: Added Mountain Duck and Cloud Mounter for Mac OSX Ventura
006: Added WinSCP and rclone
005: Multi Language support
004: Add support and usage guidance for Cyber Duck and Mountain Duck from iterate GmbH
Install OPNsense Firewall in the cloud
OPNsense 20.x setup workflow for RackCorp Hybrid cloud
Summary:
Setting up OPNsense is easy if one has direct access bare metal, or has a desktop virtualisation where one can define internal NICs/networks, which can be used for the LAN side management.
However, since we are setting up in a hybrid public/private cloud, without a management terminal (VM) setup on the same subnet as the LAN network, we will not be able to manage and configure the OPNsense since the locked down WAN interface is the one exposed to the outside world. Additionally, limited configuration is provided through its’s terminal shell.
We want to have some management ports (properly secured) exposed to the Internet.
For our hybrid cloud, we shall swap the public and private interfaces in OPNsense
This is the reverse of the expected setup flow. We do this because the LAN interface has a preset ‘allow all’ rule which lets us login to its management portal.
This will allow us to easily configure the system remotely via web browser and then we will change the settings back to the Public IP being on the WAN interface and private IP on the LAN interfaces.
The general steps to get OPNsense 20 running on RackCorp Hybrid are as follows:
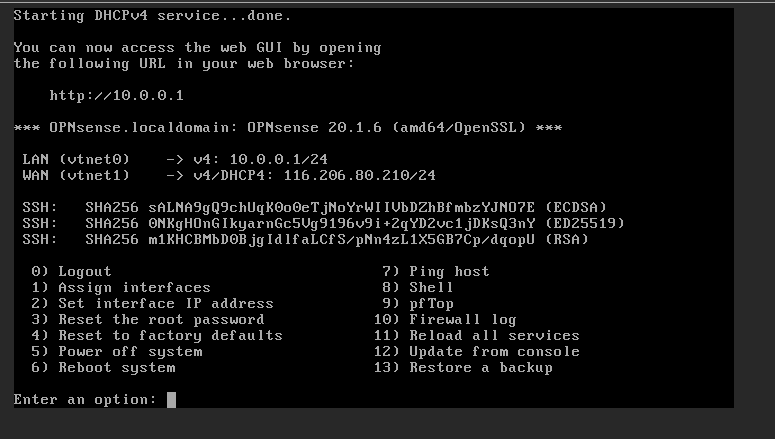
Install ISO
Get access to Web GUI
Make firewall rule on WAN interface for remote management
Reassign/swap the LAN/WAN interfaces
Rekey in the correct IP address for the LAN/WAN interfaces
The WAN IP included in this guide is for example only. Please replace it with the one we have provided you
1. Install ISO
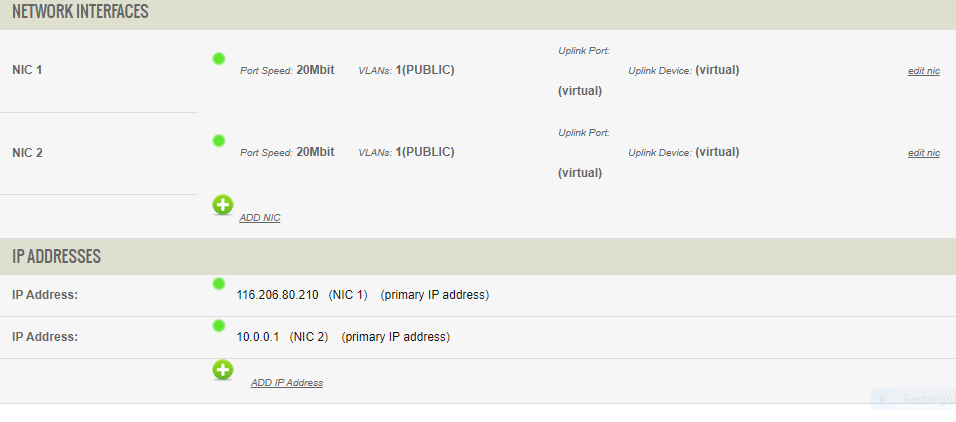
OPNsense assigns its Interfaces to NICs in the order they are assigned to in the RackCorp Portal, starting with LAN interface.
So let’s ‘swap’ the interfaces so we can login to the management webpage:
1. Start off with the following configuration for the RackCorp Portal and OPNsense in your RackCorp VM
| RackCorp vNIC ID | RackCorp vNIC Label | IP | VLAN | OPNsense Interface |
| NIC 1 | Public | 116.206.80.210 /27 | <your assigned VLAN> Public VLAN1 for Demo |
LAN (vtnet0) |
| NIC 2 | Private | 10.0.0.1 /24 | <your assigned VLAN> Public VLAN1 for Demo | WAN (vtnet1) |
Rackcorp portal will display green lights when the configuration is correct.
Setup your RackCorp VM with the networking from the above table.
- Don’t forget to add the VLANs
- For demonstration, we have left the default vNIC labels. If the vNIC labels are confusing you could define them based on the interface, e.g. Private or Public combined with the end of the vNIC MAC address e.g. 33 or 34.
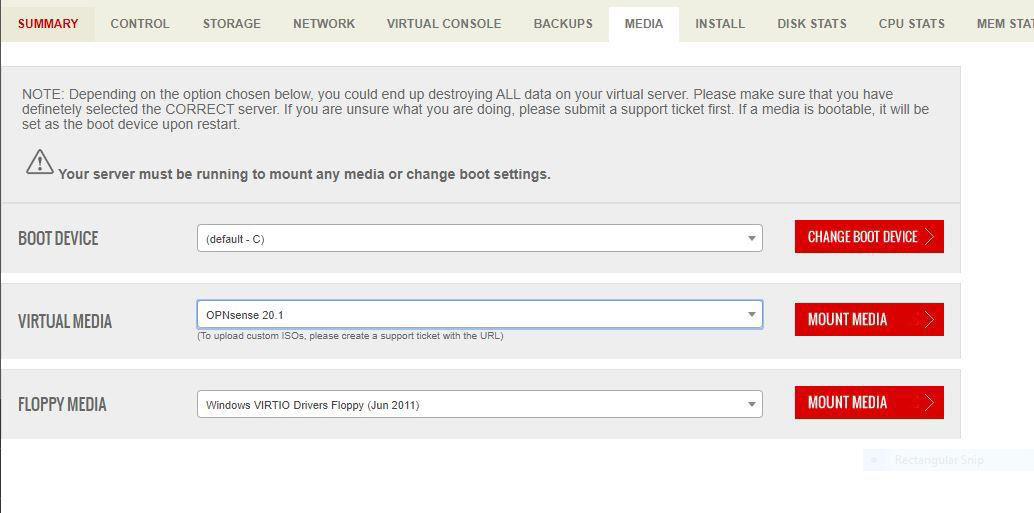
2. Follow the boot and installation instructions for the OPNsense 20.x using the ISO image file.
2.1 Mount the OPNsense Installer ISO in RackCorp and then boot the VM.
2.2 A live environment is booted with optional installation.
Do not run interface assignment during boot if you are going to install to HD.
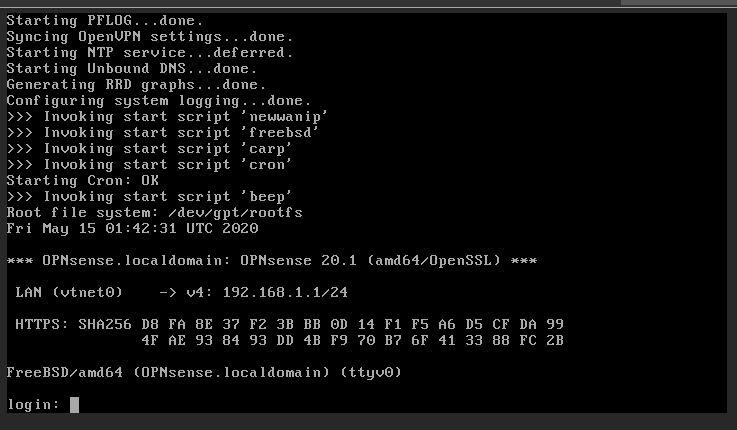
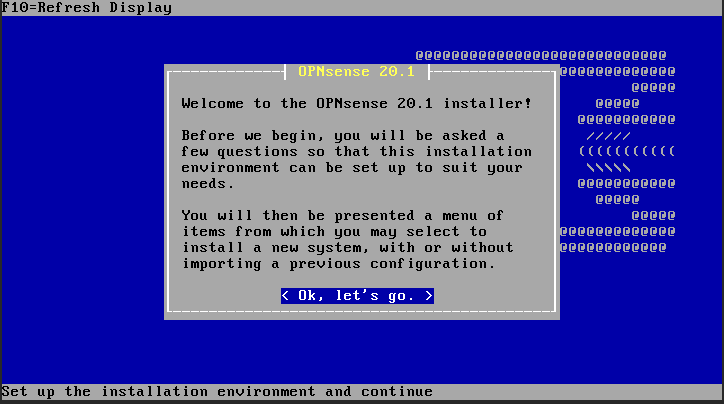
2.3 Once booted, install the system to disk using the following
Login: installer password: opnsense
Follow the guided instructions to install to HDD. The defaults are fine for a single disk install. Once complete, follow the prompt to reboot the OPNsense install and EJECT the ISO from the RackCorp portal.
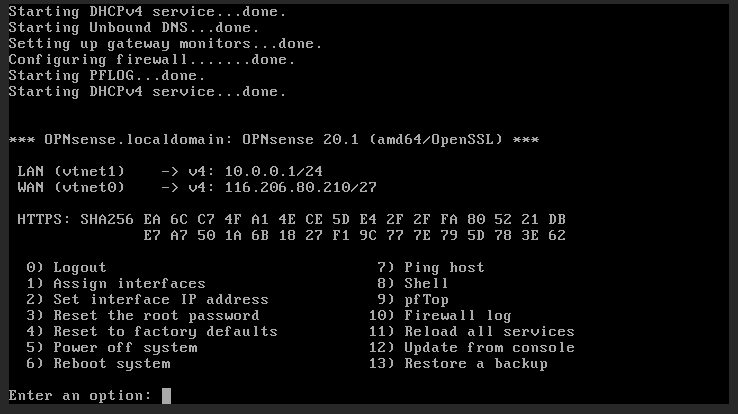
2. Get access to Web GUI
3. Opnsense has a built in wizard in the console menu that aids the user to setup their LAN NIC, WAN NIC, any tertiary NIC such as a DMZ or management NIC as well as IPv4/6 addressing and DHCP. Your Opnsense will have booted to this menu after install.
3.1 SET INTERFACE IP for WAN
Select NONE, this will clear the interface and let us re-assign.
3.2 SET INTERFACE IP for LAN
Select 116.206.80.210/27 as per table.
Since this example uses a 27 bit subnet, our gateway is .193 and our maximum host is .223.
For DNS use RackCorp NS1 110.232.116.249 or Google DNS 8.8.8.8
| Interface | LAN |
| DHCP | No |
| New LAN IP | 116.206.80.210 |
| Subnet | 27 |
| Gateway | 116.206.80.193 |
| Gateway as name server | No |
| IPv4 Name server | 8.8.88 |
| IPv6 LAN Interface via WAN Tracking: | No |
| IPv6 LAN Interface via DHCP: | No |
| IPv6 Address: | <enter> for none |
| LAN DHCP Server: | n |
| HTTP fallback for web GUI | n |
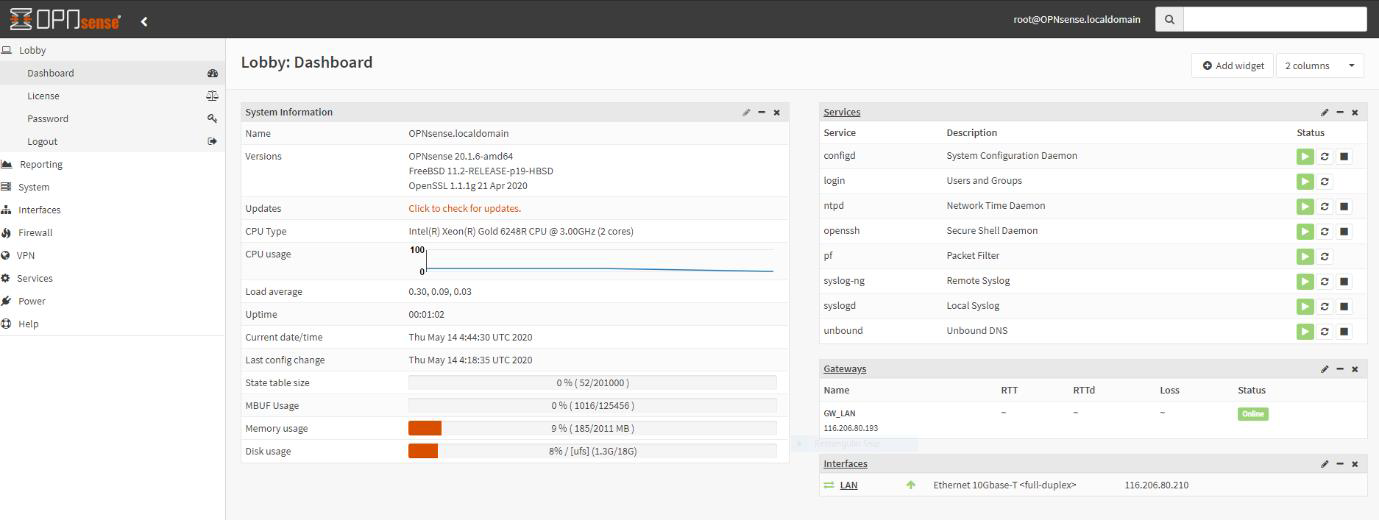
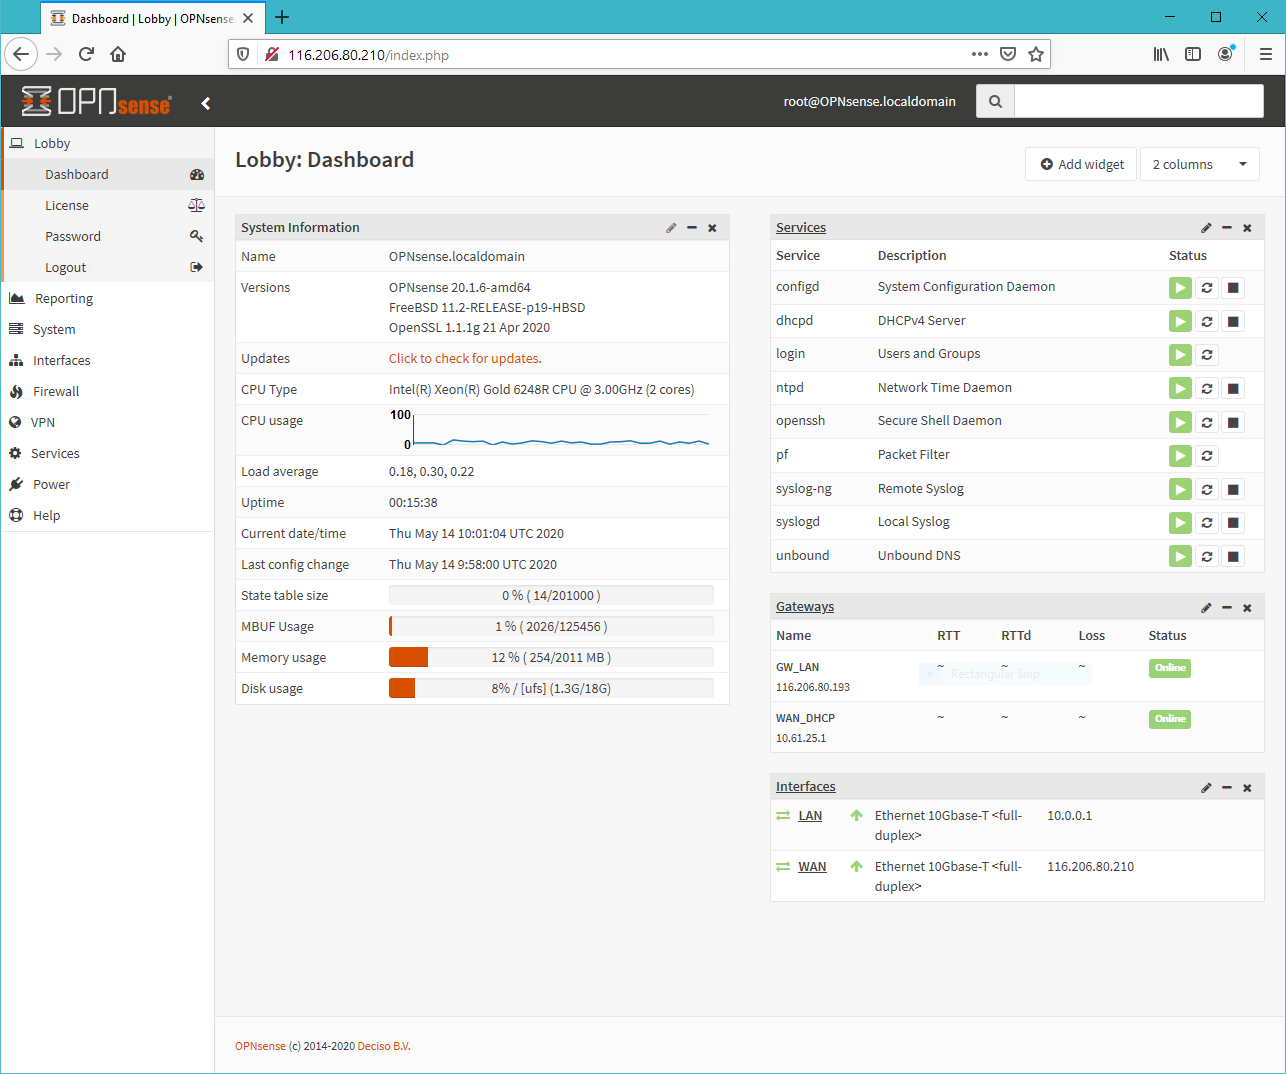
4. Once you have keyed in the LAN IP address, you should be able to access it via web browser. There will be an introductory setup wizard but be sure to skip the WAN setup page. Login to OPNsense web page. Click logo top left to skip configuration wizard.
Once we have logged into the OPNsense management page, this is verification that we can access the system
3. Make firewall rule on WAN interface for remote management
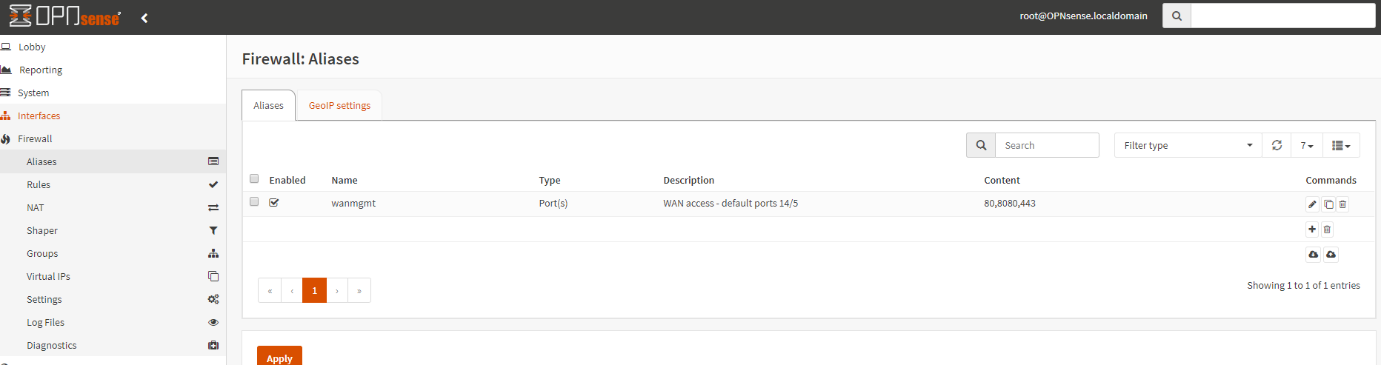
5. Add an alias to define management ports. Firewall-> Aliases. We use ports 80, 443, 8080 in this example.
[Save]. [Apply]
6. Add WAN port forward rule to Firewall -> Rules -> WAN.
| Protocol: | TCP |
| Source Port: | Any |
| Destination port range Start: | <Your alias name> Scroll UP in the list to find it. |
| Destination port range End: | <Your alias name> Scroll UP in the list to find it. |
| Log Packets: | Enabled |
[Save]. [Apply].

4. Reassign/swap the LAN/WAN interfaces
7. Interfaces-> Assignments. Compare the settings here versus Rackcorp portal
Where are we now: a LAN Interface with public IP set in OPNsense and WAN interface with no WAN IP set.
Since our Port Forward that will allow us to access management interface externally is now defined, we can swap the interfaces. You need to swap both the interfaces in OPNsense portal.
7.1 In OPNense portal, (Interfaces->Assignments) Swap so that
(LAN) -> VTNET1 RackCorp NIC 2
(WAN) -> VTNET0 RackCorp NIC 1
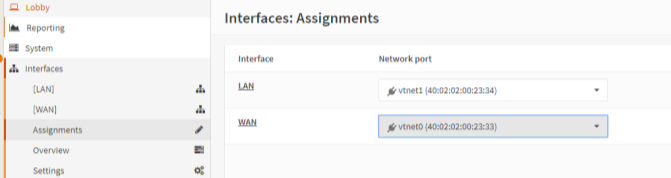
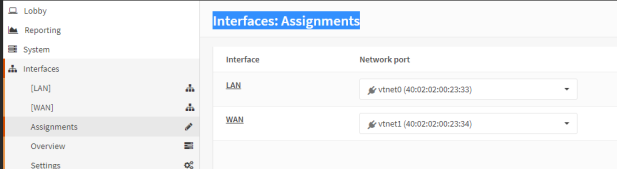
[SAVE]
5. Rekey in the correct IP address for the LAN/WAN interfaces
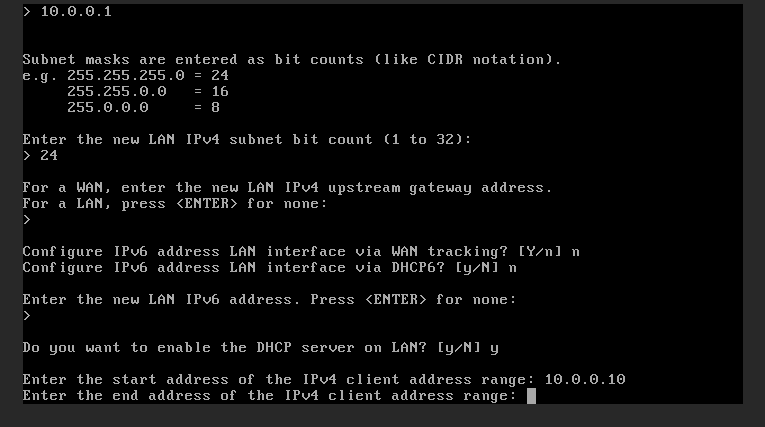
8. Once you have swapped, OPNsense might forget the IP subnets and we need to re-key them into the console.
Re-key in the IP/subnets using option 2. Clear them if necessary with <ENTER NONE>
| Interface | LAN |
| Configure via DHCP | No |
| New LAN IP | 10.0.0.1 |
| Subnet | 24 |
| Gateway | <enter> for none |
| IPv6 LAN Interface via WAN Tracking: | N |
| IPv6 LAN Interface via DHCP6: | N |
| IPv6 Address: | <enter for none |
| LAN DHCP Server: | Y |
| SDHCP End Address: | 10.0.0.20 |
| Revert to HTTP as web GUI protocol | N |
| Interface | WAN |
| Configure via DHCP | N |
| New WAN IP | 116.206.80.210 |
| Subnet | 27 |
| Gateway | 116.206.0.193 |
| Gateway as name server | no |
| IPv4 Name server | 8.8.8.8 |
| IPv6 WAN Interface via DHCP6: | N |
| IPv6 Address: | <enter> for none |
| Revert to HTTP as web GUI protocol | N |
9. Once both LAN and WAN have been rekeyed, you should be able to log in to the OPNsense management portal via its WAN address and RackCorp vNIC status lights turn green.
10. Follow our additional tasks for further configuration as required.
11. If you have problems with this procedure, select (4) Reset Factory Settings in the console menu. The OPNsense will reset itself, then shutdown. Restart the VM from RackCorp and try again. 11) Reload all services can also help
ADDITIONAL TASKS
Once your basic setup is running, it can be further configured to suit your requirements.
Consult your security policy on how to handle such appliance management.
Things to consider can be, of which many are industry best practice
- Considering adding a management network or 1 or more DMZ networks to the firewall for added functionality
- Use VPN functionality for management login instead of HTTP/S ports.
- Use VPN functionality for remote workers to be able to access enterprise content.
- If HTTP/S ports are desired for management via WAN/Internet, consider changing the port numbers and or whitelisting the OPNsense IP/URL to particular authorised management systems.
- Configure and test SSH access if necessary, bound by whitelisting, management interface or VPN tunnel.
- Install additional plugins, such as Wireguard VPN or other utilities via the plugins page to enhance the functionality of the firewall.
RackCorp BGP Communities
RackCorp is currently undergoing a transition to our BGP model globally. If you notice a combination of communities is not working as you expect, please raise a support ticket as our team as it may be our issue
BGP Looking Glass URL
(RackCorp is currently undergoing testing on this service and it is not currently publicly available)
https://lg.rackcorp.com/
Transit Management (outbound)
(Please note while we try to pass on these communities, upstream networks may still advertise to these providers)
56038:283 Don't advertise to CoreIX (AS31708)
56038:284 Don't advertise to Hurricane Electric (AS6939)
56038:285 Don't advertise to Constant (AS20473)
56038:297 Don't advertise to NTT (AS2914)
56038:279 Don't advertise to Vocus (AS4826)
56038:286 Don't advertise to IPTransit (AS64098)
56038:287 Don't advertise to Indonet (AS9340)
56038:288 Don't advertise to Voxility (AS3223)
56038:289 Don't advertise to China Telecom (AS58453)
56038:290 Don't advertise to Aknet (AS12764)
56038:291 Don't advertise to Cogent (AS174)
56038:292 Don't advertise to Mongolia National DC (AS56301)
56038:293 Don't advertise to Gemnet (AS45204)
Peering Management (outbound)
(Please note while we try to pass on these communities, upstream networks may still advertise to peering exchanges)
56038:300 Don't advertise to WA-IX AU
56038:301 Don't advertise to NSW-IX AU
56038:302 Don't advertise to VIC-IX AU
56038:303 Don't advertise to QLD-IX AU
56038:310 Don't advertise to Megaport WA IX AU
56038:311 Don't advertise to Megaport NSW IX AU
56038:312 Don't advertise to Megaport VIC IX AU
56038:313 Don't advertise to Megaport QLD IX AU
56038:320 Don't advertise to DEC-IX DE
Global Management (outbound)
56038:666 Blackhole prefix wherever possible (only IPv4 /32 or IPv6 /128 allowed)
56038:777 Do not advertise outside of local city (Useful if deploying anycast and utilising other vendors besides RackCorp)
56038:888 Attempt to pad announcements globally with prefixes for optimal anycast traffic
56038:8880 Attempt to pad announcements globally with prefixes for optimal anycast traffic (identical to :888)
56038:8881 Attempt to pad announcements globally with prefixes for optimal anycast traffic +1
56038:8882 Attempt to pad announcements globally with prefixes for optimal anycast traffic +2
56038:8883 Attempt to pad announcements globally with prefixes for optimal anycast traffic +3
56038:8889 Do not advertise
56038:2000 Do not advertise by default (Use specific keyed communities)
Cloud Users next-hop (outbound)
You can use 110.232.119.254 as your next-hop. Our systems will automatically assign your VM primary IP as the next hop.
Keyed Management (outbound)
(Please note while we try to pass on these communities, upstream networks may still advertise at these locations)
A: 1=Dont Advertise, 2=Advertise no padding, 3=Advertise pad x1, 4=Advertise pad x2, 5=Advertise pad x3, 6=Advertise no-export
B: 0=Transit + Peering, 1=Transit Only, 2=Peering Only
56038:1AB00 Global
56038:1AB21 AU Brisbane
56038:1AB01 AU Sydney GlobalSwitch
56038:1AB26 AU Sydney Equinix
56038:1AB02 AU Melbourne
56038:1AB03 AU Perth
56038:1AB09 DE FRA8
56038:1AB08 HK
56038:1AB14 IN
56038:1AB13 JP
56038:1AB19 MN MNDC1
56038:1AB20 MN GEMNET1
56038:1AB12 NL Amsterdam
56038:1AB11 NZ
56038:1AB17 TH BKK1
56038:1AB18 TH BKK2
56038:1AB06 UK London
56038:1AB04 US Fremont
56038:1AB05 US Chicago
56038:1AB15 US Los Angeles, CA
56038:1AB16 US Reston VA
56038:1AB07 SG
56038:1AB22 KG NSP1
56038:1AB23 PH Carmona
56038:1AB24 PH Makati
56038:1AB25 ID Jakarta
56038:5070 Force local-pref 70
56038:5080 Force local-pref 80 (Default)
56038:5090 Force local-pref 90
56038:5095 Force local-pref 95
Informational Communities (inbound)
56038:3000 Received via local
56038:3001 Received via transit
56038:3002 Received via peering
56038:3003 Received via customer
BGP Internal Distancing (inbound)
RackCorp uses a private AS65001 to represent some internal connectors in the BGP router path and is used to indicate distance between datacenters/cities. You can make use of these internally if you wish in calculating optimal routing
RackCorp Datacenter Locations and Codes
Datacenter Codes and Test IPs
The codes below identify the locations of servers both at order time and on billing information
| DC Code | DC Description | Test IP v4 | Test IP v6 |
| RC-AU-NEXTDCB2 | AU Brisbane NextDC B2 | 185.207.10.109 | |
| RC-AU-VOCUS530 | AU Melbourne Vocus 530 | 103.233.30.118 | |
| RC-AU-VOCUSPER03 | AU Perth Vocus PER03 PerthIX | 103.233.31.38 | |
| RC-AU-GLOBESW1 | AU Sydney GlobalSwitch | 116.206.80.238 | 2406:4a00:1::feed |
| RC-AU-EQX1 | AU Sydney Equinix SYD4 | 103.43.116.87 | |
| RC-DE-FRANKFURT2 | DE Frankfurt FRA8 | 103.43.118.76 | |
| RC-HK-EQXHK2 | HK Hong Kong EQXHK2 | 116.206.82.37 | |
| RC-ID-DCI1 | ID Jakarta DCI1 | 185.207.9.5 | |
| RC-ID-AREA31 |
ID Jakarta Area31 |
103.69.75.46 | |
| RC-KG-NSP1 | KG Kyrgyzstan NSP1 | 137.83.12.36 | |
| RC-KG-DATA1 | KG Kyrgyzstan DataTime1 | 137.83.12.138 | |
| RC-MN-GEM1 | MN Gemnet1 | 116.206.83.60 | |
| RC-MN-MNDC1 | MN National DC1 | 103.43.117.37 | |
| RC-MN-MGL1 |
MN Mogul DC1 |
114.129.42.2 | |
| RC-MN-SSYS1 |
MN SSystems DC1 |
103.43.118.196 | |
| RC-NZ-SH1 | NZ Auckland SH1 | 120.138.21.118 | |
| RC-PH-CRM1 | PH Philippines Carmona | 45.250.158.14 | |
| RC-PH-MAK1 | PH Philippines Makati | 103.219.70.176 | |
| RC-TH-BKK2 | TH Thailand NTT BKK2 | 116.206.81.103 |
|
| RC-TH-TCC1 | TH Thailand TCC DC1 | 185.207.8.36 | |
| RC-UK-MEMACO1 | UK Memaco House | 103.69.74.41 | 2406:4a00:1f00::4 |
| RC-US-VA1 | USA Virgina CoreSite VA1 | 103.69.73.4 | |
| RC-US-LA2 | USA Los Angeles LA2 | 103.69.72.4 |
RackCorp IP Address Allocations
IPv4
185.207.8.0/22
103.69.72.0/22
110.232.116.0/22
103.43.116.0/22
103.233.30.0/23
137.83.12.0/24
116.206.80.0/22
IPv6
2406:4a00::/32
RACKCORP REST API
RACKCORP REST API
Rackcorp has migrated many of its functionalities to work with REST API architecture to modernize and make easy the process to get data through HTTP protocol. Every month we are adding new services through REST API. It is important you follow us to get the last updates and the last version of our API.
API Information:
Current Version: v2.8
API URL: https://www.rackcorp.net/api/v2.8
Before you start to create any code or connect through our API, you need to create an API Key access which allows your code to make HTTPS requests to our services and be authorized to get data for your services. We will explain here how you add this API Key in your code.
To create API credentials, goto ADMINISTRATION -> API in our portal. URL: https://portal.rackcorp.com/index.php?cmd=api
Then, you click ADD, type a name for this new Key and a secret ( password ) and SAVE.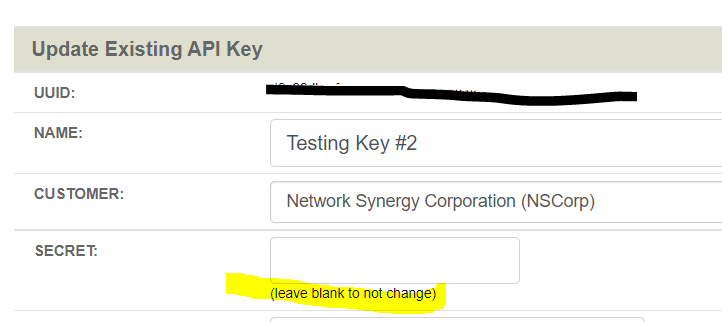
Make sure to record your SECRET phrase somewhere safe. It is required for API access and cannot be retrieved, It can only reset via the API portal key details page
API Standards:
As described in our article REST API Architecture and Standards, there is no definitive standard patterns that all engineers/devs should follow to create REST API for their app. In Rackcorp we keep things simple. The main structure for our REST API follows the patterns below:
version: v2.8
main URL: https://api.rackcorp.net/api
object data: customers | dc | network | api | dns | device
URL format: https://api.rackcorp.net/api/+version+/object data/+ID item
Example GET all data: https://api.rackcorp.net/api/v2.8/device
Example GET one Item: https://api.rackcorp.net/api/v2.8/device/1
Bellow is some example code which you can use as example to implement your first REST API connection to our platform:
We strongly recommend that you only make REST API calls from your back-end code. Be careful when using javascript code to call a REST API url. Never add your credentials in front-end code. Speak to our team if unsure.
In this simple introduction to code REST API, we will use PHP and PYTHON programming language.
PHP:
In the sample bellow we add a dummy API KEY and API SECRET. Please, change this data accordingly with your data
<?php
// Simple example to get a list of all datacenters
$version = 'v2.8';
$url = "https://api.rackcorp.net/api/". $version . "/dc";
$query = ["cmd"=>"dc.getall"];
$query['APIUUID'] = ""; // No authetnication required for getting datacenter list
$query['APISECRET'] = "";
$curl = curl_init($url);
curl_setopt($curl, CURLOPT_POSTFIELDS, json_encode($query));
curl_setopt($curl, CURLOPT_RETURNTRANSFER, true);
$response = curl_exec($curl);
if($response) {
return json_decode($response, true);
}
return false;
?>PYTHON:
import json
import logging
import sys
import os
import glob
import re
from bson import json_util
from flask.helpers import make_response
from flask import request, jsonify
version = 'v2.8'
apiurl = 'https://api.rackcorp.net/api'+version+'/'+dc
setheaders = {
'content-type': 'application/json',
'User-Agent': 'Mozilla',
'jwt': jwt
}
data = {}
data['APIUUID'] = ''
data['APISECRET'] = ''
apiresp = None
apiresp = requests.get(self.apiurl+'/sessions/logout',data=self.rcdata,headers=setheaders)As you can see in both examples, the logic to connect through our API is quite simple. You just need the URL, the APIUUID and APISECRET as part of the object or array that gets passed to the API.
Below you can find links with more advanced docs to use our API. Also, the complete list of REST API services (urls) explaining the query data and the expected response data for each situation.
REST API GibHub Docs:
Link: https://github.com/RackCorpCloud/rackcorp-api/wiki/RACKCORP-REST-API
Swagger RACKCORP REST API:
Swagger is a suite of API developer tools from SmartBear Software and a former specification upon which the OpenAPI Specification is based. This platform displays in simple layout all REST API functions allowing you visualize what your code should expect as response for each call (GET, PUT, PUSH, DELETE).
You can see through this platform the schema for each function and also, the expected JSON format response. You can also make tests to connect through your services in our servers using your real APIUUID and APISECRET.
It is good for testing staging environments and make sure that your call will receive exactly what your code expects.
Dont forget to select which url path API you wanna use for tests. In Swagger page you can see in Server three options. The first one is a swagger mocking URL which is not for tests. The second one is the RACKCORP Production REST API Core (please be careful to use this URL ). The third one is the RACKCORP Staging REST API which should be used for tests.
Link: https://app.swaggerhub.com/apis/RackCorp/Rackcorp-REST-API/2.8
RACKCORP REST API EXAMPLES
Reference material:
Swagger App: https://app.swaggerhub.com/apis-docs/RackCorp/Rackcorp-REST-API/2.8
Rackcorp REST API docs: https://wiki.rackcorp.com/books/help-and-support-en/page/rest-api-architecture-and-standards
PHP Code:
Simple server creation:
<?php
// IMPORTANT - as described in our documentation, Rackcorp follows the REST API standards
and each function must be requested with the correct METHOD (GET, POST, PUT, DELETE).
Pay attention to this detail when create your code to use CURL
function rackcorpAPI($action, $request) {
$URL = 'https://api.rackcorp.net/api/v2.8'+$action;
$request["APIUUID"] = "";
$request["APISECRET"] = "";
$curl = curl_init($URL);
curl_setopt($curl, CURLOPT_POST, true);
curl_setopt($curl, CURLOPT_POSTFIELDS, json_encode($request));
curl_setopt($curl, CURLOPT_RETURNTRANSFER, true);
$response = curl_exec($curl);
curl_close($curl);
if ( !$response ) {
return Array("code" => "FAULT", "message" => "API Error");
}
return json_decode($response, true);
}
$customerID = 1000; // Change this to your customer ID (available in portal under ADMINISTRATION -> MY DETAILS)
// locations are defined here: https://wiki.rackcorp.com/books/help-and-support-en/page/rackcorp-datacenter-locations-and-codes
$neworder = "data": [
"customerid": $customerID,
"currency": "AUD",
"servicebilltag": "CLOUDSERVER",
"productdetails": [
"BILLINGMODEL": "monthly",
"NOINSTANCES": 1,
"HOSTNAME": "Test Machine",
"CLOUDTYPE": "public",
"DCID": "89",
"OS": "OS-ALMALINUX-16.1",
"VMHID": "",
"CPU": 2,
"MEMORYGB": 4,
"STORAGEGB": 20,
"IPV6": 0,
"IPV4": 1,
"NT-SPEED": "NT-SPEED100",
"TRAFFICGB": "TRAFFICGB-100",
"BKP": "BKP-FREE",
"SUPPORT": "SUPPORT-STD",
"DDOS": "",
"SECURITY":[]
]
];
// Lodge the order (this just locks pricing in for up to 72 hours but doesnt actually create any resources)
// IMPORTANT - method POST
$response = rackcorpAPI("/order/create/server", $neworder);
var_dump($response);
// You can look up the order if you want:
// IMPORTANT - method GET
$response = rackcorpAPI("/order/"+$response['data']["orderid"]);
var_dump($response);
// Then confirm the order to start provisioning:
// IMPORTANT - method GET
$response = rackcorpAPI("/order/confirm/server/"+$response['data']["orderid"]);
var_dump($response);
?>Starting a server using cloud-init:
After creating a server, you can also choose to start it using cloud-init with your own custom code:
$cloudInitStartupData = Array(
"cloudInit" => Array(
"volumeName" => "config-2",
"userData" => "#cloud-config
ssh_pwauth: True
users:
- default
- name: user1
groups: sudo
shell: /bin/bash
sudo: ['ALL=(ALL) NOPASSWD:ALL']
plain_text_passwd: testtest888
lock_passwd: false
",
"metaData" => "instance-id: ServerTest9999
local-hostname: MyServerHostname9999
"
)
);
$serverIDToStart = 9999;
$tx = Array ("objId"=>$serverIDToStart, "objType"=>"DEVICE", "type"=>"STARTUP", "data"=>json_encode($cloudInitStartupData));
// See earlier example for rackcorpAPI function
$response = rackcorpAPI("rctransaction.create", $tx);
var_dump($response);
?>S3 Storage Settings
S3 Storage Regions
| Region | Area Code |
|---|---|
| Australia GlobalSwitch DC1 | au-nsw-gbl1 |
| Australia Equinix SYD4 | au-nsw-eqx4 |
| Australia Sydney | au-nsw |
| Thailand Bangkok NTT DC1 | th-bkk |
| Mongolia Ulaanbaatar | mn |
| Mongolia Ulaanbaatar GEMNET DC1 | mn-gem1 |
| Hong Kong | hk |
| Hong Kong Equinix HK2 | hk-eqx2 |
| Philippines | ph |
| Philippines Carmona DC1 | ph-crm1 |
| Kyrgyzstan | kg |
| Kyrgyzstan - NSP DC1 | kg-nsp1 |
| Indonesia | id |
| Indonesia - Area31 DC1 | id-area31 |
| Australia LEDC NSW Datacenters | au-nsw-ledc |
| Australia NSW Newcastle | au-nsw-ledc-ncle1 |
| Australia NSW Dubbo | au-nsw-ledc-dbo1 |
WHERE S3 ENDPOINT URL is
areacode.s3.rackcorp.com
EG au-nsw-ledc-ncle1.s3.rackcorp.com to force data to newcastle data center, Australia
How to install s3cmd for RackCorp
INSTALL PACKAGES
CentOS 8+ / Rocky Linux / RPM-based Linux
yum install s3cmd
Debain / Ubuntu / .deb based linux
apt install s3cmd
CONFIGURATION
Demo Read-Only Access Key / Secret
Access Key: F4LV2SVMHUOL1UOD2LLF Secret Key: plax+zs9eSmvLVl2E7Wc8fRyv+cyuq7vYgQi7E/6 Default Region: US S3 Endpoint: s3.rackcorp.com DNS Template (if required): %(bucket)s.s3.rackcorp.com
(You can create your own inside our portal SERVICES -> STORAGE -> S3 CREDENTIALS / S3 BUCKETS)
[demo@demohost demo]# s3cmd --configure
Enter new values or accept defaults in brackets with Enter. Refer to user manual for detailed description of all options.
Access key and Secret key are your identifiers for Amazon S3. Leave them empty for using the env variables. Access Key: F4LV2SVMHUOL1UOD2LLF Secret Key: plax+zs9eSmvLVl2E7Wc8fRyv+cyuq7vYgQi7E/6 Default Region [US]:
Use "s3.amazonaws.com" for S3 Endpoint and not modify it to the target Amazon S3. S3 Endpoint [s3.amazonaws.com]: s3.rackcorp.com
Use "%(bucket)s.s3.amazonaws.com" to the target Amazon S3. "%(bucket)s" and "%(location)s" vars can be used if the target S3 system supports dns based buckets. DNS-style bucket+hostname:port template for accessing a bucket [%(bucket)s.s3.amazonaws.com]: %(bucket)s.s3.rackcorp.com
Encryption password is used to protect your files from reading by unauthorized persons while in transfer to S3 Encryption password: Path to GPG program [/bin/gpg]:
When using secure HTTPS protocol all communication with Amazon S3 servers is protected from 3rd party eavesdropping. This method is slower than plain HTTP, and can only be proxied with Python 2.7 or newer Use HTTPS protocol [Yes]:
On some networks all internet access must go through a HTTP proxy. Try setting it here if you can't connect to S3 directly HTTP Proxy server name:
New settings: Access Key: F4LV2SVMHUOL1UOD2LLF Secret Key: plax+zs9eSmvLVl2E7Wc8fRyv+cyuq7vYgQi7E/6 Default Region: US S3 Endpoint: s3.rackcorp.com DNS-style bucket+hostname:port template for accessing a bucket: %(bucket)s.s3.rackcorp.com Encryption password: Path to GPG program: /bin/gpg Use HTTPS protocol: True HTTP Proxy server name: HTTP Proxy server port: 0
Test access with supplied credentials? [Y/n] Y Please wait, attempting to list all buckets... Success. Your access key and secret key worked fine :-)
Now verifying that encryption works... Not configured. Never mind.
Save settings? [y/N] YConfiguration saved to '/home/demo/.s3cfg'
Recommended Client Software
While there is no formal (RFC documented) 'S3 Protocol', the RackCorp S3 storage platform supports largely conforms to what the industry largely follow, that being the protocol implemented by Amazon. This means that most client software that has 'native S3' or 'AWS S3' support, will typically work with RackCorp S3, given the correct configuration.
If you experience issues with any particular functionality or client software that you believe should work, please feel free to raise a support ticket and we will investigate.
S3 Security Considerations
There are many use-cases for S3 storage, one of which is hosting of static web content. This requires your bucket to have 'PUBLIC READ ENABLED' permissions selected in the bucket configuration. This means that anyone with a URL to a resource stored in your bucket will be able to access it without requiring any credentials or authentication. This is perfect for static images and other content, for use behind a CDN or for objects in-bedded into your website/mobile application.
If you are not using your bucket for hosting of static web content, you must ensure that the 'PUBLIC READ DISABLED' permissions are selected. This ensures that only valid users with an access + secret keypair can access resources in your bucket.
Additionally, you can use a 'Presigned URL' for both uploading and accessing of data in buckets, in the same way that you would here: (AWS S3 - presigned urls). This is the preferred approach for all common use cases as it reduces any potential exposure of data stored in your buckets.
For assistance on the points above, please feel free to raise a support request for clarifications.
S3 Storage White-label Partner Services
RackCorp also extends all of the above S3 Storage Regions to our white-label partner programme where you assign your s3.<yourhostname> nameservers to RackCorp hosted DNS. Please contact sales@rackcorp.com for further information.
Security Token How-To
1. Choose user
Log into the portal using your username and password and navigate to ADMINISTRATION -> MY DETAILS

Click on MY DETAILS. The CLIENTS AND USERS PAGE is displayed.
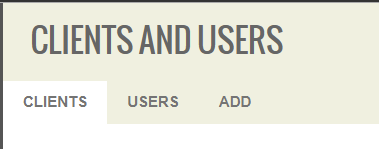
Click USERS to display the assigned users under your CLIENT (customer) account, and select a USER to edit

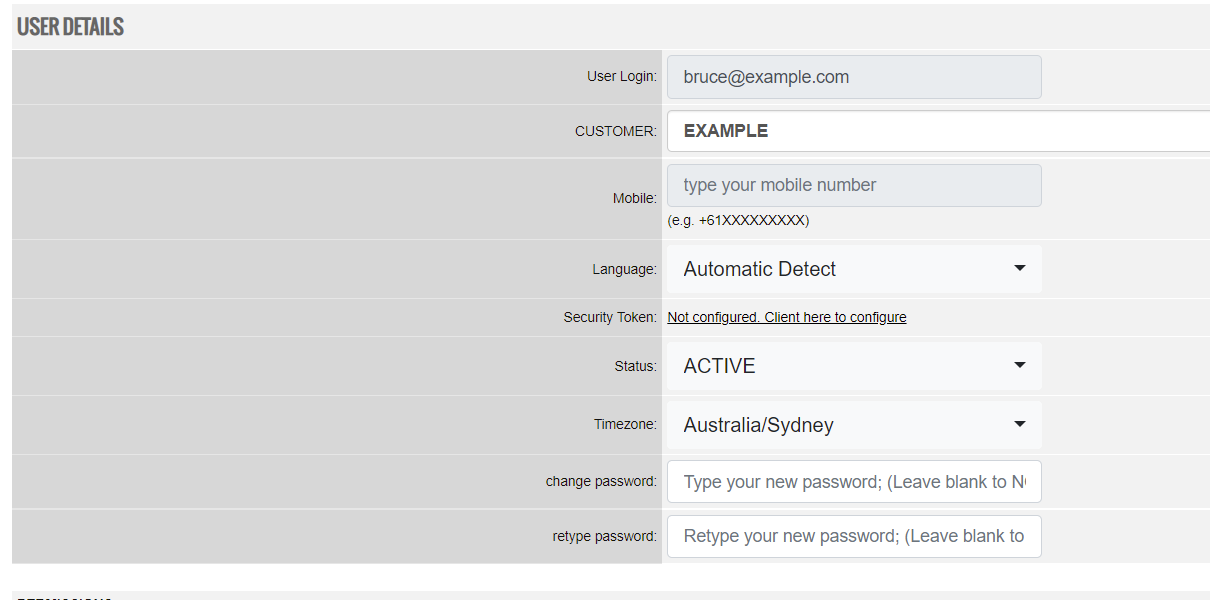
2. Find token link
Note your user details, there should be a SECURITY TOKEN link visible ready to be used for the first time.
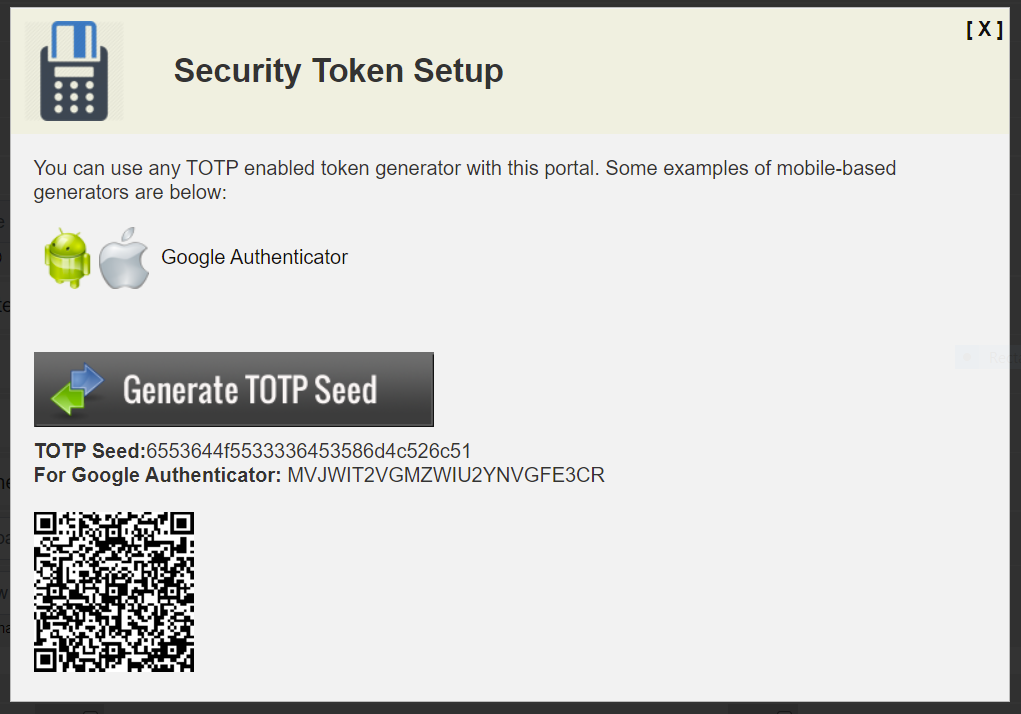
3. Security token setup
The security token setup window is displayed where you can generate your key to add to your desired authenticator application.
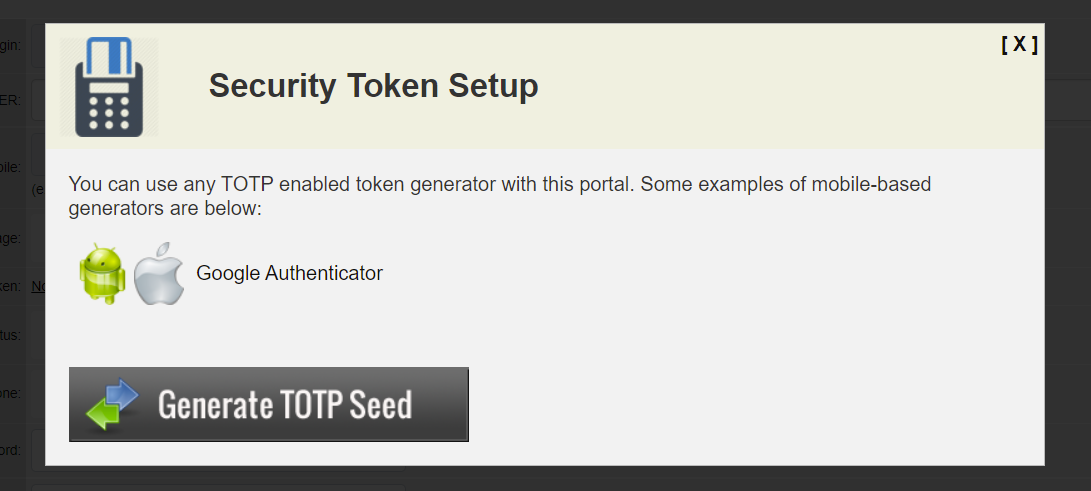
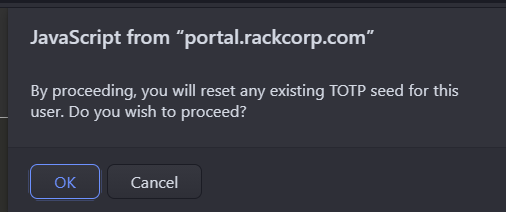
4. Connect TOTP Seed
Once the Generate button is pressed, a TOTP Seed key and a Google Authenticator key are displayed. For convivence, a QR code is generated that can be scanned by an authenticator app.
We strongly recommend that a separate physical device such as a phone, tablet or hardware key be used for multi factor authentication.
Google authenticator for mobile devices can scan the generated QR code using the device camera to retrieve the token key and setup your authentication.
For desktop authenticators such as a YubiKey hardware key, a screen capture function is available where it can capture the generated displayed QR code from the screen.
Otherwise for applications such as WinAuth you will need to copy and paste the URL to the QR code image or manually input the key code into the authenticator.
Once the key generator window is closed, your keys are no longer accessible using this function and need to be regenerated and you are returned to your user details.
5. Performance check
Once your authenticator is setup, it is advisable to test it before setting your user preferences to enforce Two-Factor Authentication on login, should the key be wrong technical support will need to reset the users access.
You are returned to the RackCorp portal login at portal.rackcorp.com or your company's white label link
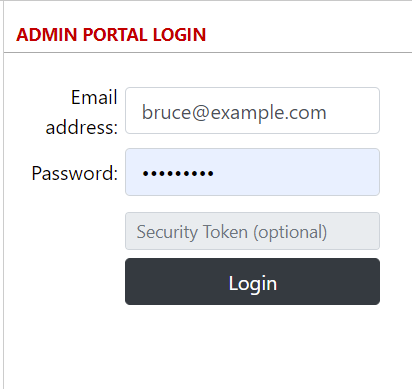
At this step, using your new authenticator to generate the Security Token and input it into the field and login, log back into the portal.
Should this be successful progress to step 6. otherwise check your authenticator for most current code or contact RackCorp Technical Support.
6. Configure security token for a user
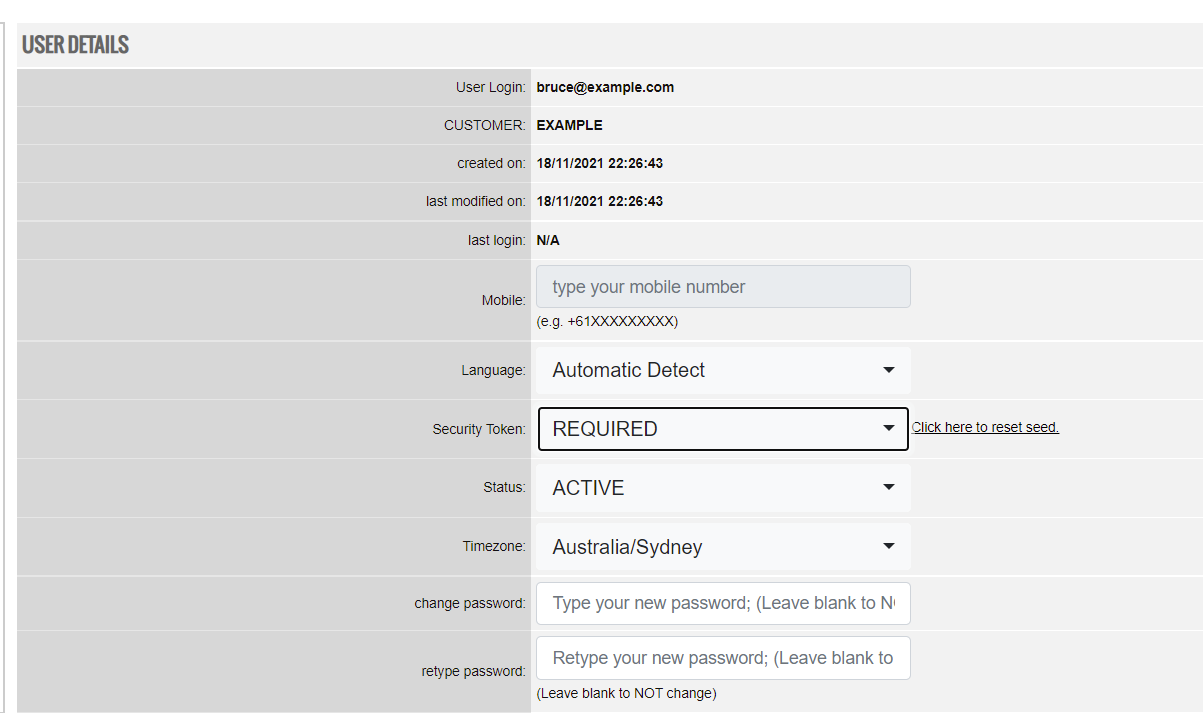
Should you login successfully after configuring 2FA, The final step to Security Token setup is to select whether two factor authentication is mandatory required or not on login by selecting REQUIRED or NOT REQUIRED.
7. Final test
Perform a final test of your new 2FA settings. As per step 5, log out of the RackCorp Portal and then login using your newly setup Two Factor Authentication in addition to your username and password.
You should have be able to login successfully and can continue using our services.
Self-Signed SSL certificates
https://en.rakko.tools/tools/46/
Update BookStack on RackCorp
- For RackCorp Web Hosting Platform Only -
1. Login to the hosted website shell using a local user, NOT a super user. the PHP version gets misdetected as superuser
2. cd /httpdocs/Bookstack
3. ls to verify folder contents. note artisan, composer.*, composer.phar
-bash-4.4$ ls -l
total 2900
-rw-r--r-- 1 12425 12425 1186 Nov 7 07:04 LICENSE
drwxr-xr-x 20 12425 12425 4096 Dec 20 06:38 app
-rwxr-xr-x 1 12425 12425 1685 Nov 7 07:04 artisan
drwxr-xr-x 3 12425 12425 4096 Dec 20 06:38 bootstrap
-rw-r--r-- 1 12425 12425 57721 Nov 7 07:06 composer-setup.php
-rw-r--r-- 1 12425 12425 3353 Dec 20 06:38 composer.json
-rw-r--r-- 1 12425 12425 397702 Dec 20 06:38 composer.lock
-rw-r--r-- 1 12425 12425 2286233 Nov 7 07:11 composer.phar
-rw-r--r-- 1 12425 12425 200 Nov 7 07:04 crowdin.yml
drwxr-xr-x 5 12425 12425 4096 Dec 20 06:38 database
drwxr-xr-x 5 12425 12425 4096 Nov 7 07:04 dev
-rw-r--r-- 1 12425 12425 1292 Nov 7 07:04 docker-compose.yml
-rw-r--r-- 1 12425 12425 112666 Dec 20 06:38 package-lock.json
-rw-r--r-- 1 12425 12425 1420 Dec 20 06:38 package.json
-rw-r--r-- 1 12425 12425 452 Dec 20 06:38 phpstan.neon.dist
-rw-r--r-- 1 12425 12425 2610 Dec 20 06:38 phpunit.xml
drwxr-xr-x 5 12425 12425 4096 Dec 20 06:38 public
-rw-r--r-- 1 12425 12425 14715 Dec 20 06:38 readme.md
drwxr-xr-x 7 12425 12425 4096 Nov 7 07:04 resources
drwxr-xr-x 2 12425 12425 4096 Dec 20 06:38 routes
-rw-r--r-- 1 12425 12425 552 Nov 7 07:04 server.php
drwxr-xr-x 8 12425 12425 4096 Dec 20 06:38 storage
drwxr-xr-x 13 12425 12425 4096 Dec 20 06:38 tests
drwxr-xr-x 2 12425 12425 4096 Nov 7 07:04 themes
drwxr-xr-x 43 12425 12425 4096 Nov 7 07:11 vendor
-rw-r--r-- 1 12425 12425 9 Dec 20 06:38 version4. git pull origin release && php composer.phar install --no-dev && php artisan migrate
this is different to the web instructions, we add the php runtime and .phar due to the environment, otherwise command wont work
5. should see GIT run and do its changes, and then composer run and do its package installs. Any errors mean the command line is wrong for the environment, or the web documentation command line was used.
remote: Total 1799 (delta 1140), reused 1153 (delta 1137), pack-reused 635
Receiving objects: 100% (1799/1799), 634.53 KiB | 0 bytes/s, done.
Resolving deltas: 100% (1523/1523), completed with 453 local objects.
From https://github.com/BookStackApp/BookStack
* branch release -> FETCH_HEAD
01cdbdb..009212a release -> origin/release
Updating 01cdbdb..009212a
Fast-forward
.env.example.complete | 7 +-
.github/translators.txt | 10 +
.github/workflows/phpstan.yml | 41 +
.github/workflows/phpunit.yml | 8 +-
.github/workflows/test-migrations.yml | 6 +-
.gitignore | 3 +-
app/Actions/Activity.php | 2 +-
app/Actions/ActivityService.php | 13 +-
app/Actions/Comment.php | 2 +
app/Actions/CommentRepo.php | 5 +-
app/Actions/Tag.php | 9 +
app/Actions/TagRepo.php | 53 +-
app/Api/ApiDocsGenerator.php | 21 +-
app/Api/ApiToken.php | 2 +-
app/Api/ApiTokenGuard.php | 4 +-
app/Auth/Access/ExternalBaseUserProvider.php | 19 +-
app/Auth/Access/Guards/LdapSessionGuard.php | 2 +-
app/Auth/Access/Ldap.php | 19 +-
app/Auth/Access/LdapService.php | 2 +-
Installing dependencies from lock file
Verifying lock file contents can be installed on current platform.
Package operations: 16 installs, 33 updates, 6 removals
Cannot create cache directory /home/httpd/vhostmounts/local/2425/.composer/cache/files/, or directory is not writable. Proceeding without cache
- Downloading composer/package-versions-deprecated (1.11.99.4)
- Downloading voku/portable-ascii (1.5.6)
- Downloading phpoption/phpoption (1.8.1)
- Downloading graham-campbell/result-type (v1.0.4)
Package manifest generated successfully.
58 packages you are using are looking for funding.
Use the `composer fund` command to find out more!
> @php artisan cache:clear
Application cache cleared!
> @php artisan view:clear
Compiled views cleared!
**************************************
* Application In Production! *
**************************************
Do you really wish to run this command? (yes/no) [no]:
> yes
Nothing to migrate.
6. If the above commands generate an error an do no execute with a result similar to the example above, run the following commands to diagnoise the issue.
-bash-4.4$ php composer.phar diagnose
Checking composer.json: WARNING
require.ssddanbrown/symfony-mailer : exact version constraints (6.4.x-dev) should be avoided if the package follows semantic versioning
Checking platform settings: OK
Checking git settings: OK
Checking http connectivity to packagist: OK
Checking https connectivity to packagist: OK
Checking github.com rate limit: OK
Checking disk free space: OK
Checking pubkeys: FAIL
Missing pubkey for tags verification
Missing pubkey for dev verification
Run composer self-update --update-keys to set them up
Checking composer version: You are not running the latest stable version, run `composer self-update` to update (2.1.11 => 2.8.4)
Composer version: 2.1.11
PHP version: 8.1.0 - Package overridden via config.platform, actual: 8.1.19
PHP binary path: /usr/local/PACKAGES/php-8.1.19-std/bin/php
OpenSSL version: OpenSSL 1.1.1k FIPS 25 Mar 2021
cURL version: 7.61.1 libz 1.2.11 ssl OpenSSL/1.1.1k
zip: extension present, unzip present, 7-Zip not available
Typically the PHP composer is out of date as shown
-bash-4.4$ php composer.phar self-update
Upgrading to version 2.8.4 (stable channel).
Use composer self-update --rollback to return to version 2.1.11
Re-run the diagnostic and it should pass
-bash-4.4$ php composer.phar diagnose
Checking composer.json: WARNING
require.ssddanbrown/symfony-mailer : exact version constraints (6.4.x-dev) should be avoided if the package follows semantic versioning
Checking composer.lock: OK
Checking platform settings: OK
Checking git settings: WARNING
Your git version (2.9.5) is too old and possibly will cause issues. Please upgrade to git 2.24 or above
Checking http connectivity to packagist: OK
Checking https connectivity to packagist: OK
Checking github.com rate limit: OK
Checking disk free space: OK
Checking pubkeys:
Tags Public Key Fingerprint: 57815BA2 7E54DC31 7ECC7CC5 573090D0 87719BA6 8F3BB723 4E5D42D0 84A14642
Dev Public Key Fingerprint: 4AC45767 E5EC2265 2F0C1167 CBBB8A2B 0C708369 153E328C AD90147D AFE50952
OK
Checking Composer version: OK
Checking Composer and its dependencies for vulnerabilities: OK
Composer version: 2.8.4
PHP version: 8.1.0 - Package overridden via config.platform, actual: 8.1.19
PHP binary path: /usr/local/PACKAGES/php-8.1.19-std/bin/php
OpenSSL version: OpenSSL 1.1.1k FIPS 25 Mar 2021
curl version: 7.61.1 libz 1.2.11 ssl OpenSSL/1.1.1k
zip: extension present, unzip present, 7-Zip not available
Re-run the installer as per step 4 , you should see it download and install new packages without error
-bash-4.4$ php composer.phar install --no-dev
> @php -r "!file_exists('bootstrap/cache/services.php') || @unlink('bootstrap/cache/services.php');"
Installing dependencies from lock file
Verifying lock file contents can be installed on current platform.
Package operations: 6 installs, 84 updates, 6 removals
- Downloading aws/aws-crt-php (v1.2.7)
- Downloading dasprid/enum (1.0.6)
- Downloading bacon/bacon-qr-code (v3.0.1)
- Downloading psr/log (3.0.2)
- Downloading doctrine/event-manager (2.0.1)
- Downloading doctrine/deprecations (1.1.4)
- Downloading doctrine/dbal (3.9.3)
- Downloading doctrine/lexer (3.0.1)
- Downloading masterminds/html5 (2.9.0)
- Downloading symfony/polyfill-mbstring (v1.31.0)
- Downloading sabberworm/php-css-parser (v8.7.0)
- Downloading dompdf/php-svg-lib (1.0.0)
- Downloading dompdf/php-font-lib (1.0.1)
- Downloading dompdf/dompdf (v3.0.2)
- Downloading symfony/polyfill-ctype (v1.31.0)
- Downloading dragonmantank/cron-expression (v3.4.0)
- Downloading symfony/polyfill-php83 (v1.31.0)
- Downloading symfony/deprecation-contracts (v3.5.1)
- Downloading symfony/http-foundation (v6.4.16)
- Downloading guzzlehttp/promises (2.0.4)
- Downloading symfony/polyfill-php80 (v1.31.0)
- Downloading intervention/gif (4.2.0)
- Downloading intervention/image (3.10.2)
- Downloading symfony/process (v6.4.15)
- Downloading knplabs/knp-snappy (v1.5.0)
- Downloading symfony/polyfill-intl-normalizer (v1.31.0)
- Downloading symfony/polyfill-intl-grapheme (v1.31.0)
- Downloading symfony/string (v6.4.15)
- Downloading symfony/service-contracts (v3.5.1)
- Downloading symfony/console (v6.4.17)
- Downloading voku/portable-ascii (2.0.3)
- Downloading phpoption/phpoption (1.9.3)
- Downloading graham-campbell/result-type (v1.1.3)
- Downloading vlucas/phpdotenv (v5.6.1)
- Downloading symfony/css-selector (v6.4.13)
- Downloading tijsverkoyen/css-to-inline-styles (v2.3.0)
- Downloading symfony/var-dumper (v6.4.15)
- Downloading symfony/polyfill-uuid (v1.31.0)
- Downloading symfony/uid (v6.4.13)
- Downloading symfony/routing (v6.4.16)
- Downloading symfony/polyfill-intl-idn (v1.31.0)
- Downloading symfony/mime (v6.4.17)
- Downloading symfony/event-dispatcher-contracts (v3.5.1)
- Downloading symfony/event-dispatcher (v6.4.13)
- Downloading egulias/email-validator (4.0.3)
- Downloading ssddanbrown/symfony-mailer (6.4.x-dev 0497d6e)
- Downloading symfony/error-handler (v6.4.17)
- Downloading symfony/http-kernel (v6.4.17)
- Downloading symfony/finder (v6.4.17)
- Downloading ramsey/collection (2.0.0)
- Downloading brick/math (0.12.1)
- Downloading ramsey/uuid (4.7.6)
- Downloading nunomaduro/termwind (v1.17.0)
- Downloading symfony/translation-contracts (v3.5.1)
- Downloading symfony/translation (v6.4.13)
- Downloading nesbot/carbon (2.72.6)
- Downloading monolog/monolog (3.8.1)
- Downloading league/mime-type-detection (1.16.0)
- Downloading league/flysystem (3.29.1)
- Downloading league/flysystem-local (3.29.0)
- Downloading nette/utils (v4.0.5)
- Downloading nette/schema (v1.3.2)
- Downloading dflydev/dot-access-data (v3.0.3)
- Downloading league/commonmark (2.6.1)
- Downloading laravel/serializable-closure (v1.3.7)
- Downloading laravel/prompts (v0.1.25)
- Downloading laravel/framework (v10.48.25)
- Downloading paragonie/constant_time_encoding (v3.0.0)
- Downloading phpseclib/phpseclib (3.0.43)
- Downloading psr/http-factory (1.1.0)
- Downloading guzzlehttp/psr7 (2.7.0)
- Downloading guzzlehttp/guzzle (7.9.2)
- Downloading league/oauth1-client (v1.11.0)
- Downloading firebase/php-jwt (v6.10.2)
- Downloading laravel/socialite (v5.16.1)
- Downloading nikic/php-parser (v5.4.0)
- Downloading psy/psysh (v0.12.7)
- Downloading laravel/tinker (v2.10.0)
- Downloading mtdowling/jmespath.php (2.8.0)
- Downloading aws/aws-sdk-php (3.336.8)
- Downloading league/flysystem-aws-s3-v3 (3.29.0)
- Downloading league/oauth2-client (2.8.0)
- Downloading robrichards/xmlseclibs (3.1.3)
- Downloading onelogin/php-saml (4.2.0)
- Downloading pragmarx/google2fa (v8.0.3)
- Downloading predis/predis (v2.3.0)
- Downloading socialiteproviders/manager (v4.8.0)
- Downloading socialiteproviders/microsoft-azure (5.2.0)
- Downloading socialiteproviders/twitch (5.4.0)
- Downloading ssddanbrown/htmldiff (v1.0.4)
- Removing symfony/polyfill-php81 (v1.29.0)
- Removing symfony/polyfill-php72 (v1.29.0)
- Removing phenx/php-svg-lib (0.5.2)
- Removing phenx/php-font-lib (0.5.6)
- Removing barryvdh/laravel-snappy (v1.0.2)
- Removing barryvdh/laravel-dompdf (v2.0.1)
- Upgrading aws/aws-crt-php (v1.2.4 => v1.2.7): Extracting archive
- Upgrading dasprid/enum (1.0.5 => 1.0.6): Extracting archive
- Upgrading bacon/bacon-qr-code (2.0.8 => v3.0.1): Extracting archive
- Upgrading psr/log (3.0.0 => 3.0.2): Extracting archive
- Upgrading doctrine/event-manager (1.2.0 => 2.0.1): Extracting archive
- Upgrading doctrine/deprecations (1.1.3 => 1.1.4): Extracting archive
- Upgrading doctrine/dbal (3.8.2 => 3.9.3): Extracting archive
- Upgrading doctrine/lexer (2.1.1 => 3.0.1): Extracting archive
- Upgrading masterminds/html5 (2.8.1 => 2.9.0): Extracting archive
- Upgrading symfony/polyfill-mbstring (v1.29.0 => v1.31.0): Extracting archive
- Upgrading sabberworm/php-css-parser (v8.5.1 => v8.7.0): Extracting archive
- Installing dompdf/php-svg-lib (1.0.0): Extracting archive
- Installing dompdf/php-font-lib (1.0.1): Extracting archive
- Upgrading dompdf/dompdf (v2.0.4 => v3.0.2): Extracting archive
- Upgrading symfony/polyfill-ctype (v1.29.0 => v1.31.0): Extracting archive
- Upgrading dragonmantank/cron-expression (v3.3.3 => v3.4.0): Extracting archive
- Installing symfony/polyfill-php83 (v1.31.0): Extracting archive
- Upgrading symfony/deprecation-contracts (v3.0.2 => v3.5.1): Extracting archive
- Upgrading symfony/http-foundation (v6.0.20 => v6.4.16): Extracting archive
- Upgrading guzzlehttp/promises (2.0.2 => 2.0.4): Extracting archive
- Upgrading symfony/polyfill-php80 (v1.29.0 => v1.31.0): Extracting archive
- Installing intervention/gif (4.2.0): Extracting archive
- Upgrading intervention/image (2.7.2 => 3.10.2): Extracting archive
- Upgrading symfony/process (v6.0.19 => v6.4.15): Extracting archive
- Upgrading knplabs/knp-snappy (v1.4.4 => v1.5.0): Extracting archive
- Upgrading symfony/polyfill-intl-normalizer (v1.29.0 => v1.31.0): Extracting archive
- Upgrading symfony/polyfill-intl-grapheme (v1.29.0 => v1.31.0): Extracting archive
- Upgrading symfony/string (v6.0.19 => v6.4.15): Extracting archive
- Upgrading symfony/service-contracts (v3.0.2 => v3.5.1): Extracting archive
- Upgrading symfony/console (v6.0.19 => v6.4.17): Extracting archive
- Upgrading voku/portable-ascii (2.0.1 => 2.0.3): Extracting archive
- Upgrading phpoption/phpoption (1.9.2 => 1.9.3): Extracting archive
- Upgrading graham-campbell/result-type (v1.1.2 => v1.1.3): Extracting archive
- Upgrading vlucas/phpdotenv (v5.6.0 => v5.6.1): Extracting archive
- Upgrading symfony/css-selector (v6.0.19 => v6.4.13): Extracting archive
- Upgrading tijsverkoyen/css-to-inline-styles (v2.2.7 => v2.3.0): Extracting archive
- Upgrading symfony/var-dumper (v6.0.19 => v6.4.15): Extracting archive
- Upgrading symfony/polyfill-uuid (v1.29.0 => v1.31.0): Extracting archive
- Upgrading symfony/uid (v6.0.19 => v6.4.13): Extracting archive
- Upgrading symfony/routing (v6.0.19 => v6.4.16): Extracting archive
- Upgrading symfony/polyfill-intl-idn (v1.29.0 => v1.31.0): Extracting archive
- Upgrading symfony/mime (v6.0.19 => v6.4.17): Extracting archive
- Upgrading symfony/event-dispatcher-contracts (v3.0.2 => v3.5.1): Extracting archive
- Upgrading symfony/event-dispatcher (v6.0.19 => v6.4.13): Extracting archive
- Upgrading egulias/email-validator (3.2.6 => 4.0.3): Extracting archive
- Upgrading ssddanbrown/symfony-mailer (6.0.x-dev 2219dcd => 6.4.x-dev 0497d6e): Extracting archive
- Upgrading symfony/error-handler (v6.0.19 => v6.4.17): Extracting archive
- Upgrading symfony/http-kernel (v6.0.20 => v6.4.17): Extracting archive
- Upgrading symfony/finder (v6.0.19 => v6.4.17): Extracting archive
- Upgrading ramsey/collection (1.3.0 => 2.0.0): Extracting archive
- Upgrading brick/math (0.11.0 => 0.12.1): Extracting archive
- Upgrading ramsey/uuid (4.7.5 => 4.7.6): Extracting archive
- Upgrading nunomaduro/termwind (v1.15.1 => v1.17.0): Extracting archive
- Upgrading symfony/translation-contracts (v3.0.2 => v3.5.1): Extracting archive
- Upgrading symfony/translation (v6.0.19 => v6.4.13): Extracting archive
- Upgrading nesbot/carbon (2.72.3 => 2.72.6): Extracting archive
- Upgrading monolog/monolog (2.9.2 => 3.8.1): Extracting archive
- Upgrading league/mime-type-detection (1.15.0 => 1.16.0): Extracting archive
- Upgrading league/flysystem (3.24.0 => 3.29.1): Extracting archive
- Upgrading league/flysystem-local (3.23.1 => 3.29.0): Extracting archive
- Upgrading nette/utils (v4.0.4 => v4.0.5): Extracting archive
- Upgrading nette/schema (v1.2.5 => v1.3.2): Extracting archive
- Upgrading dflydev/dot-access-data (v3.0.2 => v3.0.3): Extracting archive
- Upgrading league/commonmark (2.4.2 => 2.6.1): Extracting archive
- Upgrading laravel/serializable-closure (v1.3.3 => v1.3.7): Extracting archive
- Installing laravel/prompts (v0.1.25): Extracting archive
- Upgrading laravel/framework (v9.52.16 => v10.48.25): Extracting archive
- Upgrading paragonie/constant_time_encoding (v2.6.3 => v3.0.0): Extracting archive
- Upgrading phpseclib/phpseclib (3.0.36 => 3.0.43): Extracting archive
- Upgrading psr/http-factory (1.0.2 => 1.1.0): Extracting archive
- Upgrading guzzlehttp/psr7 (2.6.2 => 2.7.0): Extracting archive
- Upgrading guzzlehttp/guzzle (7.8.1 => 7.9.2): Extracting archive
- Upgrading league/oauth1-client (v1.10.1 => v1.11.0): Extracting archive
- Installing firebase/php-jwt (v6.10.2): Extracting archive
- Upgrading laravel/socialite (v5.12.1 => v5.16.1): Extracting archive
- Upgrading nikic/php-parser (v5.0.1 => v5.4.0): Extracting archive
- Upgrading psy/psysh (v0.12.0 => v0.12.7): Extracting archive
- Upgrading laravel/tinker (v2.9.0 => v2.10.0): Extracting archive
- Upgrading mtdowling/jmespath.php (2.7.0 => 2.8.0): Extracting archive
- Upgrading aws/aws-sdk-php (3.300.6 => 3.336.8): Extracting archive
- Upgrading league/flysystem-aws-s3-v3 (3.24.0 => 3.29.0): Extracting archive
- Upgrading league/oauth2-client (2.7.0 => 2.8.0): Extracting archive
- Upgrading robrichards/xmlseclibs (3.1.1 => 3.1.3): Extracting archive
- Upgrading onelogin/php-saml (4.1.0 => 4.2.0): Extracting archive
- Upgrading pragmarx/google2fa (v8.0.1 => v8.0.3): Extracting archive
- Upgrading predis/predis (v2.2.2 => v2.3.0): Extracting archive
- Upgrading socialiteproviders/manager (v4.5.1 => v4.8.0): Extracting archive
- Upgrading socialiteproviders/microsoft-azure (5.1.0 => 5.2.0): Extracting archive
- Upgrading socialiteproviders/twitch (5.3.1 => 5.4.0): Extracting archive
- Upgrading ssddanbrown/htmldiff (v1.0.2 => v1.0.4): Extracting archive
Generating optimized autoload files
> Illuminate\Foundation\ComposerScripts::postAutoloadDump
> @php artisan package:discover --ansi
INFO Discovering packages.
laravel/socialite ........................................................................................................................... DONE
laravel/tinker .............................................................................................................................. DONE
nesbot/carbon ............................................................................................................................... DONE
nunomaduro/termwind ......................................................................................................................... DONE
socialiteproviders/manager .................................................................................................................. DONE
59 packages you are using are looking for funding.
Use the `composer fund` command to find out more!
> @php artisan cache:clear
INFO Application cache cleared successfully.
> @php artisan view:clear
INFO Compiled views cleared successfully.
migrate the database as per step 4 if you have not already run it above.
7. The install ends with caches being cleared, lets run them again according to the instructions
-bash-4.4$ php artisan cache:clear
Application cache cleared!
-bash-4.4$ php artisan config:clear
Configuration cache cleared!
-bash-4.4$ php artisan view:clear
Compiled views cleared!
-bash-4.4$
8. Verify version in application
Virtual Networking - VLANs in the Cloud
RackCorp’s Cloud platform supports fully customisable interworking for your virtual machines; with regards to customisable VLANs both tagged and untagged, and definable IPv4 and IPv6 subnets.
Since the RackCorp cloud platform supports a ‘many customers can have many sub customers hierarchy, as a reseller or system manager can define custom networks for each customers private clouds very easily.
Once your VLANs and IP subnets are setup, these can be tied into your VMs via up to 3 virtual NICs. No end user software environment configuration is necessary.

VLAN and IP subnets are accessed via the SERVICES -> NETWORK menu
Add a new VLAN
Click Add New on the VLANs tab an fill in the form appropriately.
Leave LAN ID field blank unless you have been given a specific LAN ID to use by RackCorp support
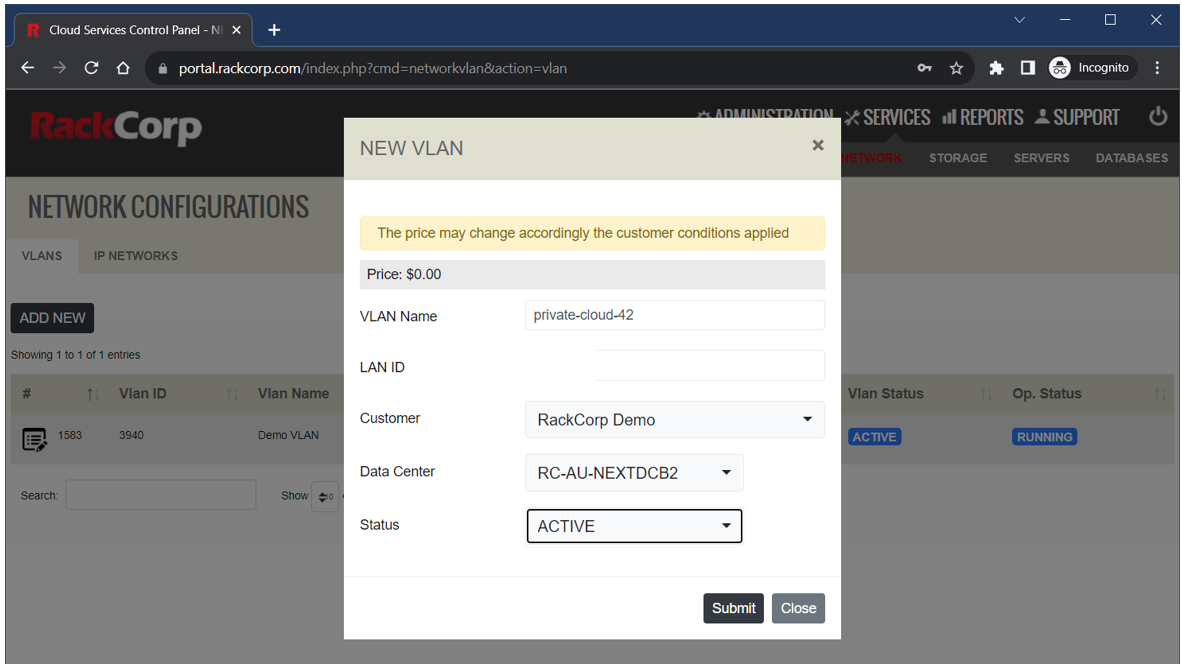

Add a new IP Network
Next, use the Add new IP network to add a new subnet to your account. Take care to assign it to your newly created desired VLAN.

You now have a newly defined Private VLAN and IP subnet.

Next, we assign these newly created resources to a virtual machine.
Adding Virtual NICs to Virtual Machines
Select your VM from the SERVICES-> SERVERS list in your RackCorp Portal Account. Click on the NETWORK tab.
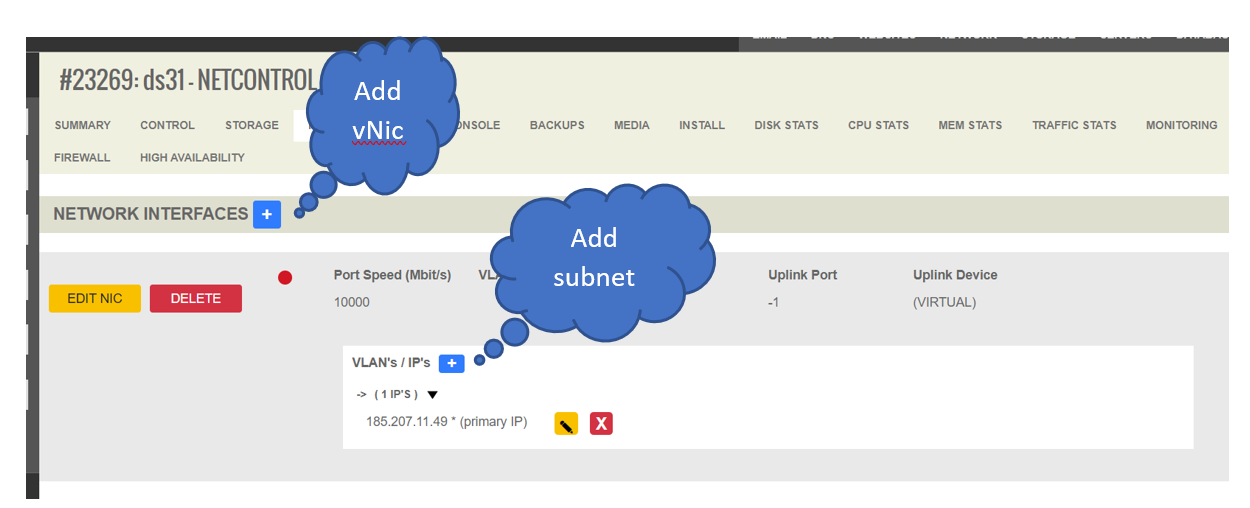
For this example demonstration we will add a 2nd private vNIC to the default configuration, preserving NIC1 which is the default PUBLIC vNIC that was configured when ordering the virtual machine.
1. Add a new PRIVATE NIC and select the desired VLAN and tagged/untagged.
2. Review any advanced settings, leave as default if unsure:
· DRIVER - Our vNIC are configured to use the RedHat virtio paravirtual driver by default. If you are using an older operating system you may select Intel E1000
· ALLOW DHCP SERVER – select if this NIC will be running a DHCP server
· ONLY ALLOW REGISTERED IPs - If selected, traffic leaving this server from IPs other than that registered in the portal will be blocked. NOTE: firewalls and routers will regularly pass such traffic so you should leave this unticked for such devices.
· NIC PASSTHROUGH - allows all traffic to pass through the NIC and disables stateful tracking of traffic


3. The new vNIC has been created successfully. Next, add the particular subnet to the vNIC

Upon selection of your new VLAN, the associated subnet is pre-populated. Enter your desired host IP address for the 2nd vNIC under IP or use auto select, then press VALAIDATE IP to check your configuration.


Further Reading
See our OPNSENSE firewall setup guide for further examples on how to use virtual NICs and VLANs with RackCorp Hybrid Cloud
https://wiki.rackcorp.com/books/help-and-support-en/page/install-opnsense-firewall
Virtual Server BGP Settings
BGP Configuration for RackCorp AS56038
All RackCorp VMs globally are capable of advertising prefixes via BGP at no extra cost. The following instructions relate to customers with virtual servers who wish to advertise their public IP addresses.
1) Preparation:
Submit a support ticket via the support portal with the following information:
- Your AS (if you have one, otherwise we will advertise your IPs under AS56038). We can also accept an AS-SET.
- Any prefixes you wish to advertise. If we should render this via IRR, we can also do this.
Please ensure you add the following to your whois data for your AS (RPSL):
import: from AS56038 accept ANY
export: to AS56038 announce ASXXXXXXXX
where ASXXXXXXXX is your ASN
2) Set up a bgp service on your VM. We recommend using bird, however you can use any daemon you wish. BGP Sessions are made to 110.232.119.251 and 110.232.119.252 regardless of your VM location in the world.
3) Note that it may initially take up to 24 hours for some of our upstreams to pick up and start carrying your prefixes.
Also consider:
RackCorp BGP Communities - LINK
Particularly if you're using Anycast as RackCorp takes great care to try to give a globally balanced anycast network, so consider using 56038:888 community if you're using RackCorp for Anycast BGP services.
Example BGP Configurations
Bird BGP v2 example configuration
Under Centos 8 / Rocky 8 Linux:
yum install epel-release
yum install bird
cat /etc/bird.conf
log syslog all;
router id YOURSERVERIPADDRESS;
protocol device {
scan time 5;
}
protocol direct {
interface "dummy*";
ipv4;
ipv6;
}
protocol bgp rackcorpannounce1
{
local as 56038;
source address YOURSERVERIPADDRESS;
neighbor 110.232.119.251 as 56038;
ipv4 {
import none;
export all;
};
}
protocol bgp rackcorpannounce2
{
local as 56038;
source address YOURSERVERIPADDRESS;
neighbor 110.232.119.252 as 56038;
ipv4 {
import none;
export all;
};
}
protocol static {
ipv4;
# ignore the fact that it says reject, this is where your IP prefixes go
route X.X.X.X/32 reject;
}Windows L2TP/IPsec VPN Client Configuration
For Windows 8, 10, 11
1. Open Control panel and select Network and Sharing center.
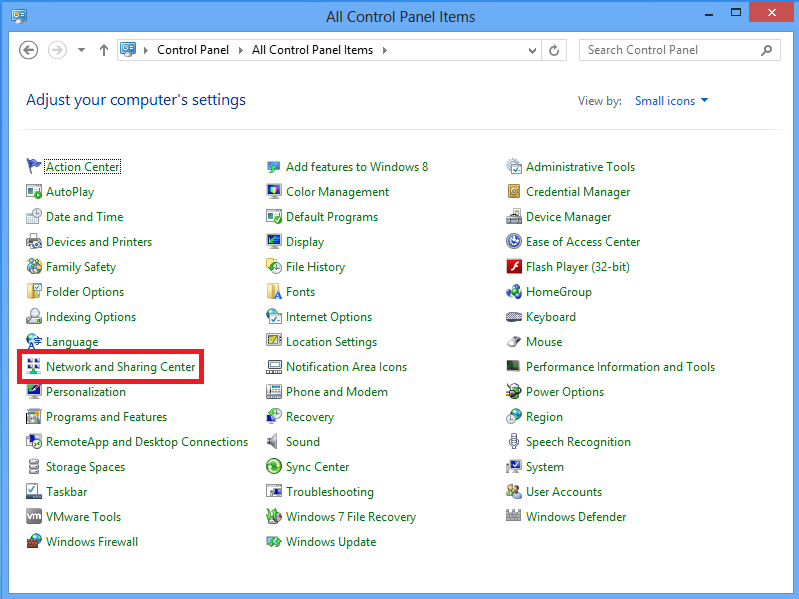
2. Choose Set up a new connection or network option.
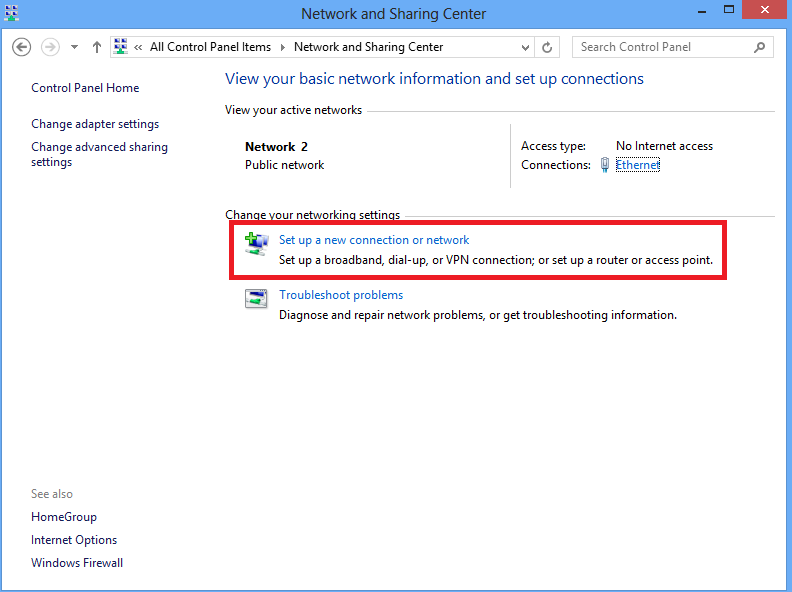
3. Choose Connect to a workplace option and click Next.
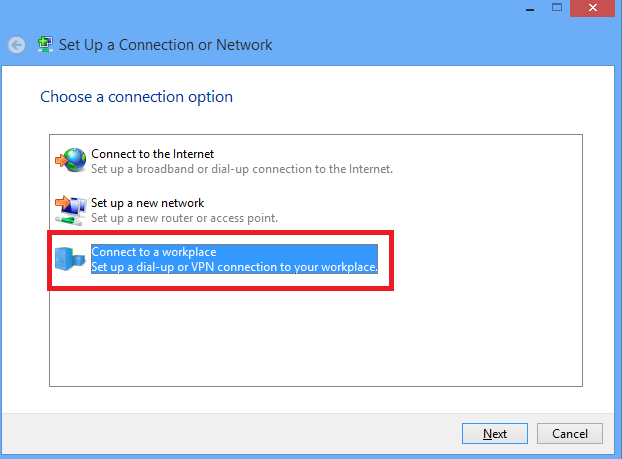
4. Click Use my Internet connection (VPN) option.

5. Enter IP address of ASA's WAN interface or FQDN and any name for VPN adapter which is locally significant and click Create.
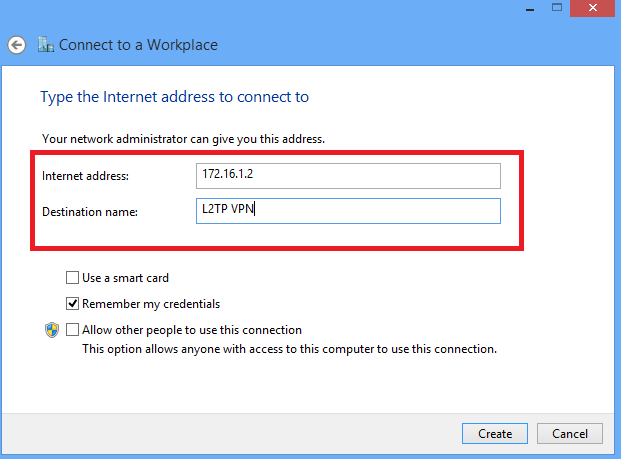
6. On Network and Sharing Center, choose Change adapter settings option on the left pane of the window.
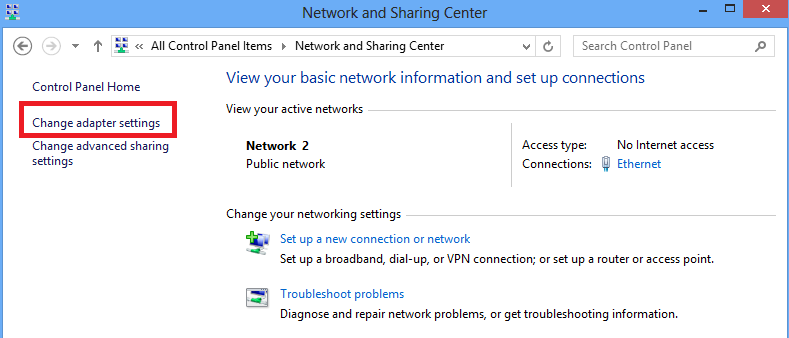
7. Right click the recently created adapterfor L2TP VPN and choose Properties.
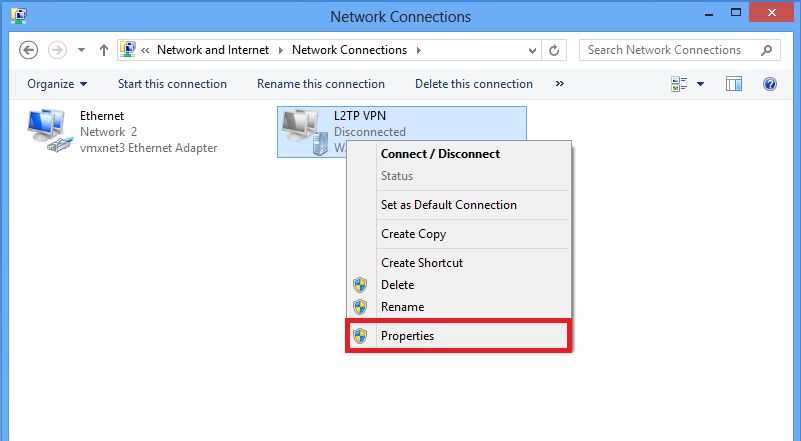
8. Navigate to Security tab, choose the Type of VPN as Layer 2 Tunneling Protocol with IPsec (L2TP/IPsec) and then click on Advanced settings.
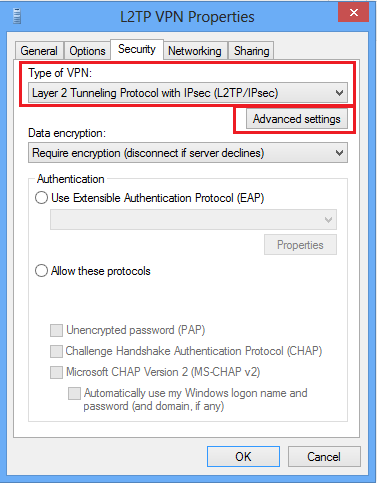
9. Enter the preshared key as the same mentioned in tunnel-group DefaultRAGroup and click OK. In this example, C!sc0@123 is used as the pre-shared key.
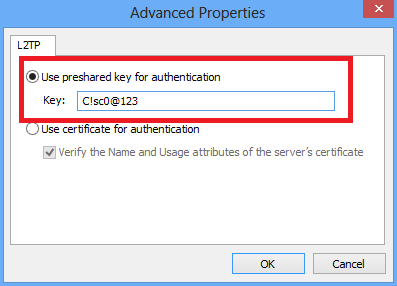
10. Choose the authentication method as Allow these protocols and ensure that only
"Microsoft CHAP Version 2 (MS-CHAP v2) checkbox is checked and click OK.
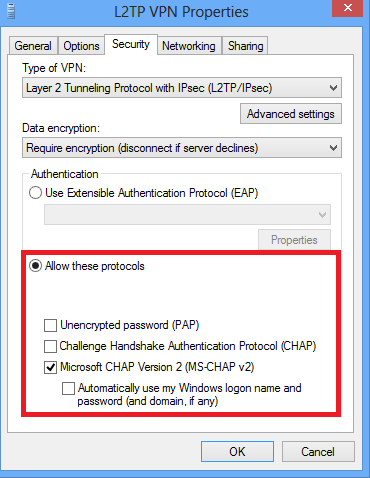
11. Under network connections, right click on L2TP VPN adapter and choose Connect/Disconnect.
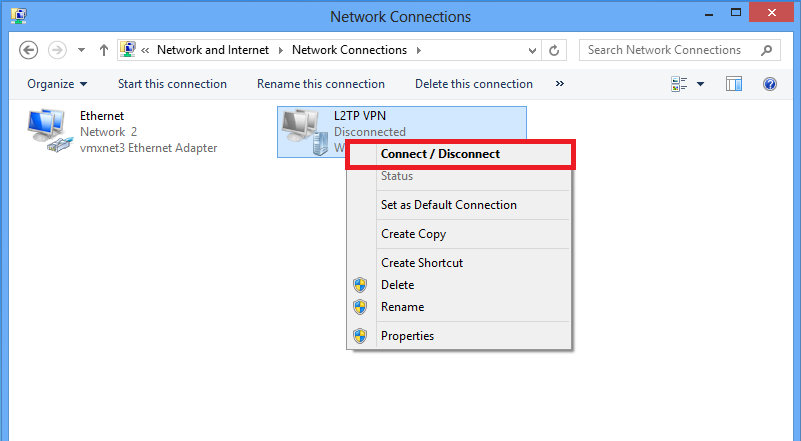
12. Networks icon will pop up and click Connect on L2TP VPN connection.

13. Enter the user credentials and click OK.
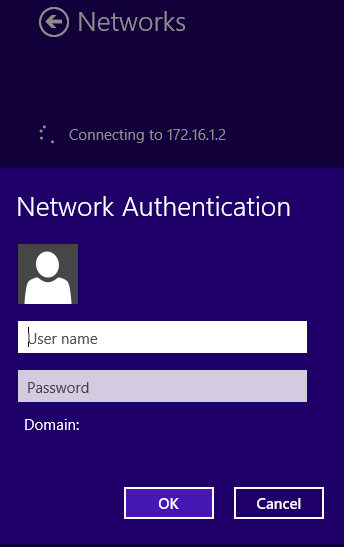
Virtual Machine Monitoring via SNMP
To monitor parameters from within your windows virtual machines you will require two items to be installed:
a. Monitoring server
A virtual machine deployed on the VMhosts dedicated for internal monitoring for each of the clients. This will be connected to the same VLAN as the client.
Example specifications: VM specifications: 1 core, 2GB RAM, 10 GB storage
b. SNMP Service (Agent) installed in the WIndows Virtual Machines you wish to monitor.
Ensure Windows firewall allows SNMP traffic.
Step 1:
Installing the SNMP Service, sub features and management tools: This can be done via the add remove features or via PowerShell using the following command on the nominated Server:
For Wndows Powershell 2014 edition, use : ‘Add-WindowsFeature snmp-service –IncludeAllSubfeatures -IncludeManagementTools’

For Windows Powershell 2016 edition, use
To check if SNMP is installed, ‘Get-WindowsFeature *SNMP*’
To install SNMP, ‘Install-WindowsFeature SNMP-Service -IncludeAllSubFeature -IncludeManagementTools’

Step 2:
Open the ‘Services’ panel via Control Panel / Administrative Tools or by right clicking the start button, selecting ‘Run’ and entering services.msc followed by ‘OK’

Next we will need to click the Security tab followed by the ‘Add’ button under the ‘Accepted Community Names” title. You can now enter in a community name that’s relevant to you, for this example we have used ‘SnmpM0nitor’

Now we will need to configure where the server will accept SNMP Packets from, this is configured under the “Accept SNMP packets from these hosts” title, click on ‘ADD’ button and enter in the IP address/es of the SNMP Monitoring Servers you just set up.
Once completed select Apply and OK to exit. Restart the service by right clicking on the ‘SNMP Service” and selecting Restart
Step 3:
After SNMP has been installed and configured you will need to download and install the following application “SNMP-Informant” - http://www.wtcs.org/informant/files/informant-std-17.zip
This will provide SNMP the correct MIBs for the Cloud Monitoring Service – the additional MIB’s structure the collected information in a compatible format .
Step 4:
Firewall rules will need to be updated to allow the incoming SNMP requests, open ‘Windows Firewall with Advanced Settings” which is located in ‘Control Panel’ then ‘Administrative Tools’
Locate the existing ‘SNMP Sevice (UDP In) rules and double click the first one (which one is not important), select the ‘Advanced Tab’ and make sure ‘Domain, Private & Public’ are ticked then change the ‘Edge Traversal’ to ‘Allow Edge Traversal’. Select OK and close the remaining windows.
Step 5:
Within the Cloud portal, navigate to the server which has the SNMP Agent installed (Services / Servers Tab). Once on the Server Summary page select the Monitoring Tab.
 Select ‘ADD NEW MONITOR’ followed by the ‘Monitor Type’ you are after. The following page will contain the fields required for your Cloud Monitoring System to successfully monitor the desired server.
We recommend populating the following fields:
SNMP Community Name: will be the SNMP community string previously defined in Step 2
Alert Threshold: If your monitoring CPU specify the CPU load that will trigger an alert.
Alert Only if Exceed for: How long the alert threshold is exceed for in duration to trigger an alert (Important as brief CPU spikes do occur)
Alert: This will enable alerts to be created if the alert parameters are met.
Alert Email: Nominate a email address to receive the alert.
Providing these fields are populated, then select Submit. You will be brought back to the previous page “Monitoring Tab” where you will see the new monitor appear. The metrics will start to flow in and you should see some information after 10 minutes. You can then add more monitors depending on your requirements.
Step 6: This step is only required if your server has a Private IP Address and is behind a NAT Firewall.
Prior to this step, it is expected that a Public IP NAT or PAT would have been made on your perimeter firewall to the nominated Server(s). NAT & PAT instructions are not included in this document due to the variety of firewalls available – we recommend you speak to you firewall management vendor to configure this for you.
Once you are aware of your Servers Public IP Nat and the associated firewall rule is enabled to allow SNMP (port 161 UDP), then you will need to edit the ‘Additional Information’ field on the Server Summary Page.
 The information to be inserted is: “SNMP NAT <ip address>” where the <ip address> will contain the Public IP provided by your Firewall Management vendor.

If you have used AT, you will need to specify the port after the IP Address with a semi colon used as a separator. e.g. 110.232.116.11:14000
Click Submit and your monitor should being to show metrics within 10 minute.
How to change Remote Desktop Protocol (RDP) port setting in Windows Server
This procedure comprises of several steps
1. Change the port number
2. Add the port to Windows Firewall
3. Toggle RDP services on/off
4. Reconfigure RackCorp VM Firewall to new port, if applicable
5. Port Scan to verify results.
In this example, we shall use a simple PowerShell script to enact the changes. changing RDP from 3389 to 13990 on windows server.
$portvalue = 13390
Set-ItemProperty -Path 'HKLM:\SYSTEM\CurrentControlSet\Control\Terminal Server\WinStations\RDP-Tcp' -name "PortNumber" -Value $portvalue
New-NetFirewallRule -DisplayName 'RDPPORTLatest-TCP-In' -Profile 'Any' -Direction Inbound -Action Allow -Protocol TCP -LocalPort $portvalue
New-NetFirewallRule -DisplayName 'RDPPORTLatest-UDP-In' -Profile 'Any' -Direction Inbound -Action Allow -Protocol UDP -LocalPort $portvalue Once you have run this script, Toggle RDP in the windows remote desktop settings on and off
Use https://port.tools/nmap-online-port-scan/ to verify that the applicable ports you are opening and closing come up as open or filtered
Getting Started with Hybrid Cloud
Each RackCorp VM by default comes with a Public NIC and Public IPV4 IP . This can be changed at order time or after ordering when the VM is provisioned.
Users can delete the public NIC for a VM after ordering and add private NICs. When adding the private NICs they can select which (or many) of their private VLANs the private NIC has access to. They can add up to three NICs per VM. They can have one public and one private if they wish.
The nature of the hosted private cloud means it is isolated from the internet. We offer a number of different firewall solutions to allow connectivity to these private or Hybrid Clouds For a basic solution we can deploy a VYOS firewall VM for the customer if they want inter-VLAN firewalling and NAT. It gets deployed with basic outbound NAT and remote SSH based management by default. VYOS is strictly a command line only application
A more advanced solution is a managed firewall as a service. We provide ISO27001 managed firewall for them with all changes tracked logged. We also do updates and setup high availability/monitoring.
Increasing and Resizing Linux Virtual Machine Disk space
For RackCorp Cloud VM installer version of Ubuntu 20.04 Only
This guide DOES NOT apply to self installed OS. DATA LOSS MAY OCCUR
Use our ‘add a server’ tool in the RackCorp Portal to add a new server as described below
For this example, deploy a server with 8 core, 16GB RAM and 300GB DISK as shown.
Critically for disk expansion to succeed, we are assuming and relying on that the chosen OS is RackCorp’s cloud image of Ubuntu 2004.

The OS will take a minute or two to deploy. Once it is ready boot it and run
Df -hIt should display 300G for the Linux partition

POST-RESIZE IN PORTAL
Resize to 450GB. Shutdown VM in Portal. Restart VM.
Follow the steps to resize the 300G Linux Partition to 450G.
We can view the partition table using:
sudo gdiskWhere partition #1 is the main OS partition and partition 14,15 at the BEGINGING of the disk are Boot and System Partitions

Safe shutdown the OS (via the OS or the SAFE SHUTDOWN button in the RackCorp portal)

RESIZE the disk to the desired size , ie 450GB


Boot the OS and run
Sudo gdisk /dev/vdathen
pto print the parttable
It will display the old disk size as we have not resized the disk yet

Press the w key to write changes.
We will receive a sector location error press Y to correct. This is expected. Again run:
sudo gdisk /dev/vda
pto examine the existing parttable before we change it.
then run the following to delete the partition from the partition table.
del
1note, this just edits the partition table, not the actual data within those tables. If you do not do final confirm and write of your changes the changes revert back to their existing settings.

Next we will recreate partition #1 to the desired new size, again since we editing the partition table and not the data we do not risk losing data, however care must be taken to observe the right settings.
First, the new partition must be in the right order in the table (it usually is, but there is a sort command if needed.)
The sectors must be in the logical order an the file system should be correct.
Choose n to create new partition
1 for Partition 1
Press enter for First Sector and last sector
Enter 8300 for partition type
Enter P to display the changes.
If you are satisfied, press W to write the changes. If you made a mistake DO NOT write the changes. Try again and once correct THEN W for changes.

Note the message above. We have now successfully written the new partition table.
Next step is to actually resize our file system to fill the partition Run
Sudo partx -u /dev/vda
Sudo resize2fs /dev/vda1Your result should match the below
Run sudo gdisk and print to view the new result, it should reflect 450GB

Lets reboot for good measure to make sure everything is working. We are now done.

Enabling RackCorp Object Storage with Veeam Backup 12
For purpose of this guide, we used the latest Veeam patch at time of writing, 12.2, however the same functionality is exposed on 12.x
Create a Object Storage for direct backups
- Add the backup repository to Veeam; select OBJECT STORAGE

2. Select S3 COMAPTIBLE as we will be using the S3 API to connect to the object store
3. Choose S3 Compatible

4. Give the object store connection a unique name, For example in this excerise we are connecting to the RackCorp Object store in Newcastle

5. Fill in the Server Details for the object store. Use the server name and endpoints provided to you via tech support or the RackCorp Portal

6. Here we will define credentials to use for the storage. Click Add and fill in credentials that should give access to the storage system. which are your ACCESS KEY and SECRET

7. Once added, select the credential as default from the list and hit NEXT.

8. If the credential is valid, veeam will read back the buckets avalibe to you under your credential

A bucket should have been pre-created for you, select it. Veeam will place its backups automatically into a SUBFOLDER of the bucket. Eg BUCKETNAME\Veeeam
But feel free to create a subfolder if you wish for Veeam to use
Eg BUCKETNAME\Backups

9. Once you have selected your bucket and folder, it is important to enable IMMUTABLE. The setting is definable by user but if we are doing a daily backup a 1 day immtuable is fine. Press NEXT to continue

10. We dont need to modify any settings on the mount page, hit NEXT.

11. Review your settings here. IF you are aware that you have existing backups in your storage bucket you can import them here by selecting the option. Hit NEXT.

12. The apply page will execute your settings against the server. There should be no errors (red marks here). When done hit NEXT

13. On completioin we have the Summary page which should be reviewed.

Create a Backup Job
We have successfully created the object store, we wll now create a backup job to backup our files into the object store directly.

Here we can see the 'legacy' S3 storage system and our Object Store system (in blue), both use the S3 API command set however.

2. Make sure to add a descriptive title to the backup job as by default the placeholder names are vague

3. Add the machine DNS name that will be backed up

4. On the same window, Press either add or manage accounts. Here you will define access credentials username/password for the machine that needs to be backed up

5. Return to the Computers window and ensure your desired machines are added successfully and proceed.

6. Under backup mode, choose your desired backup source. for this example we will be backing up the C:\PAYLOAD folder so we choose file level backup


7. The next page is the BACKUP REPOSITORY screen. By default it will suggest the repository local to the backup server itself. n the dropdown box, select the object store we added.

8. Indexing and Malware protection is optional, Select this if you originally had advanced indexing enaled on the windows machine you will be backing up

9. Review your backup schedule op[tions. Select run automatically to enable a backup schedule . To preserve bandwidth you can enbale the Terminate Job checkbox to force backups only duing your defined off peak hours

10. Review your backup job settings. Within a few minutes the backup should start. You will not see an progress immediately. To run the first pass of the job without waiting for the schedule select the Run tis job tickbox

11. Once a few minutes have passed, you can monitor the status and statistics of the backup job. From here on, the backup job will adhere to your defied schedule.
