# Windows Mail
## Windows 10 Mail
### POP/IMAP manual setup
Auto discovery or manual settings can be used with Win10 Mail
[](https://wiki.rackcorp.com/uploads/images/gallery/2022-06/LTVtZSWCKLeDjdXs-image-1656323074090.png)
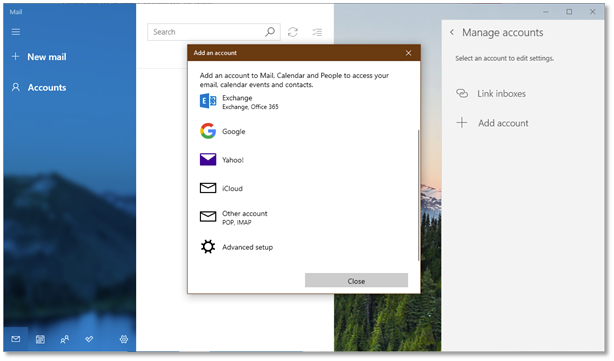
Figure 13 Windows 10 Mail setup – Click Accounts and then add account. Select Advanced setup
[](https://wiki.rackcorp.com/uploads/images/gallery/2022-06/lCVJCd239UuMXdcd-image-1656323083469.png)
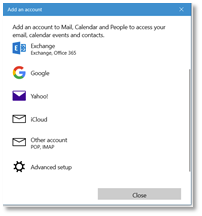
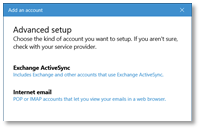
Figure 14 Windows 10 mail manual setup for RackCorp POP/IMAP email - choose advanced setup
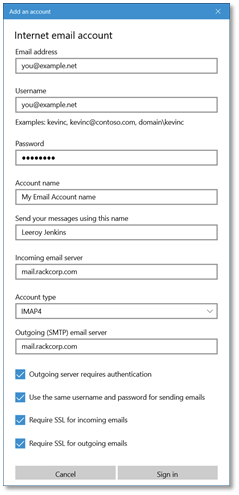
If you are using our Mongolian servers, please use **mail.mn.rackcorp.com** as the mail server.
[](https://wiki.rackcorp.com/uploads/images/gallery/2022-06/92WMSV1dsblIYAj0-image-1656323097525.png)
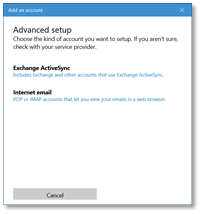
Figure 15 Windows 10 mail manual setup for RackCorp POP/IMAP email - choose Internet email
[](https://wiki.rackcorp.com/uploads/images/gallery/2022-06/bKrYjHWQMTI16L6n-image-1656323106891.png)
Figure 16 Windows 10 mail manual setup for RackCorp POP/IMAP email - fill in the details as illustrated, choose IMAP or POP
### Exchange
At This time, there is an issue with the latest release of the email application for Windows 10, which prevents the ‘**EXCHANGE**’ option below from being chosen, **ADVANCED SETUP** must be chosen
[](https://wiki.rackcorp.com/uploads/images/gallery/2022-06/l662do881JtIMJ15-image-1656323121981.png)
Figure 17 Windows 10 mail setup for RackCorp Hosted Exchange - choose advanced setup
[](https://wiki.rackcorp.com/uploads/images/gallery/2022-06/m9ZdTcoectgmckav-image-1656323129726.png)
Figure 18 Windows 10 mail setup for RackCorp Hosted Exchange - select Exchange ActiveSync
[](https://wiki.rackcorp.com/uploads/images/gallery/2022-06/rTvt43Hn0pqtro2z-image-1656323142986.png)
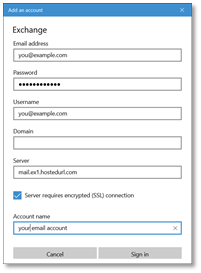
Figure 19 Windows 10 mail setup for RackCorp Hosted Exchange - fill in the details as illustrated. Domain is to be left blank.
Once you have completed **THE ADD AN ACCOUNT** form, Windows will prompt you about security policies for your computer. Select **YES. Selecting YES may strength your windows security settings such as your password strength requirements** You will then receive an **ALL FINISHED** success message.