Настройки электронной почты для RackCorp
RackCorp supportsподдерживает mailавтоматическое autoобнаружение discovery.почты. ThisЭто isфункция, aвстроенная featureв builtсовременные intoпочтовые modernклиенты, emailкоторая clientsпозволяет thatпрограмме allowsэлектронной theпочты emailполучать programправильные toнастройки obtainпочты theдля correctпользователя, mailосновываясь settingsтолько forна aего userадресе basedэлектронной justпочты onи their email address and password.пароле.
ThisЭто worksработает forдля параметров электронной почты POP, IMAP andи Exchange email options onв RackCorp.
IfЕсли youвы doне notхотите wishиспользовать toавтоматическое useобнаружение, autoподдерживаются discovery,стандартные standardнастройки emailэлектронной settingsпочты, areвключая supportedдополнительное including optionalшифрование SSL andи TLS encryptionмежду betweenконечным theпользователем endи userпочтовыми andсерверами RackCorp mail servers.RackCorp.
EmailНастройки Settingsэлектронной почты | POP/IMAP
ChooseВыберите сервер электронной почты POP OR IMAP email server.или IMAP. isОбычно generallyрекомендуется recommended.IMAP.
Электронная почта POP загружает Emailвсе downloadsэлектронные entireписьма emailsна toваше yourустройство, deviceпрежде beforeчем theyих canможно beбудет viewedпросмотреть, andи optionallyпри deletesнеобходимости themудаляет fromих theс server.сервера.
Pros:Плюсы:UsefulПолезноforдляarchival,архивирования,allowsпозволяетinboxуправлятьandпочтовымиmailящикамиmanagementиsuchпочтой,asнапример,zeroсinboxнулевым почтовым ящиком.Cons:Минусы:notнеidealидеальноforподходитmultiдляdevices,несколькихslowerустройств,toмедленнееlookпросматриваетatновыеnewэлектронныеemailsписьма.
IMAP downloadsсначала aзагружает headerзаголовок ofэлектронной theпочты, emailчтобы firstможно soбыло theпредварительно sender,просмотреть subject,отправителя, dateтему canи beдату, previewedа andвся keepsпочта allхранится theна mail on the server.сервере.
Pros:Плюсы:Lightweightлегкийandиstoresхранитmailпочтуonнаserver,сервере,idealидеальноforподходитmultiдляdeviceиспользованияuseсandнесколькимиlowустройствамиbandwidthCons:иofflineнизкойviewingпропускнойofспособностью.- Минусы:
dependsпросмотрonэлектроннойsettingsпочтыandвifавтономномentireрежимеmail(офлайн)hasзависитbeenотdownloaded.настроек и от того, была ли загружена вся почта.
CommonОбщие Settings:настройки:
|
|
|
|
|
|
|
|
your_password |
|
Сервер входящей почты (Incoming |
mail.rackcorp.com |
|
Сервер исходящей почты (Outgoing |
mail.rackcorp.com |
|
Тип исходящего сервера (Outgoing Server |
SMTP |
|
Имя пользователя исходящего сервера (Outgoing Server |
you@example.net (or tick ‘same as incoming’) if available |
|
Пароль исходящего сервера (Outgoing server |
your_password |
ChooseВыберите aтип type of encryption fromшифрования: NoneНет, SSL orили TLS. TLS рекомендуется isдля recommendedобхода for firewall traversalбрандмауэра.
POP
|
POP |
POP |
POP |
|
|
|
|
IMAP
|
IMAP |
IMAP |
IMAP |
|
|
|
|
RackCorp global webmail for standard email is available at https://webmail.rackcorp.com
Email Settings | Exchange
To setup exchange email accounts in your client, the recommended way is to use auto discover with an exchange compatible mail client or use Outlook Web Access (OWA, Microsoft’s implementation of webmail, web based version of the Outlook email client for Exchange Email).
Supply your email address and password to the email client and it will perform the setup process. The setup process on most clients this will also setup Calendar, Tasks and Contacts. On Mobile devices, a device security policy may be applied by the setup process.
The address for OWA varies depending on the region and is available in your Outlook account information
https://mail.ex1.hostedurl.com/owa is the primary OWA system
mail.ex1.hostedurl.com is the primary RackCorp Exchange server if manual configuration is desired

Figure 1 Outlook Web Access (OWA) webmail on RackCorp
Email Client Setup | Microsoft Office Outlook
Outlook 2010/2013/2016
Figure 2 Microsoft Outlook account settings (File Menu)
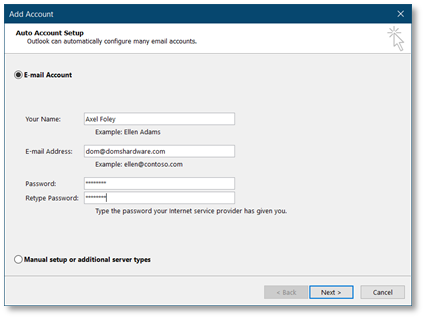
Figure 3 Microsoft Outlook Add Account - Auto Setup
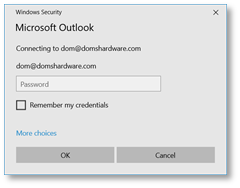
Figure 4 Enter your account password here if prompted during the auto setup process enter it. If you are also prompted to allow server settings, press allow
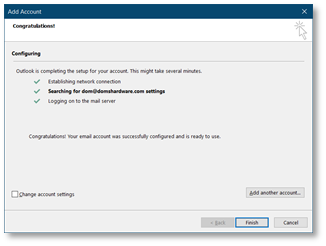
Figure 5 Microsoft Outlook auto account setup successful notfication
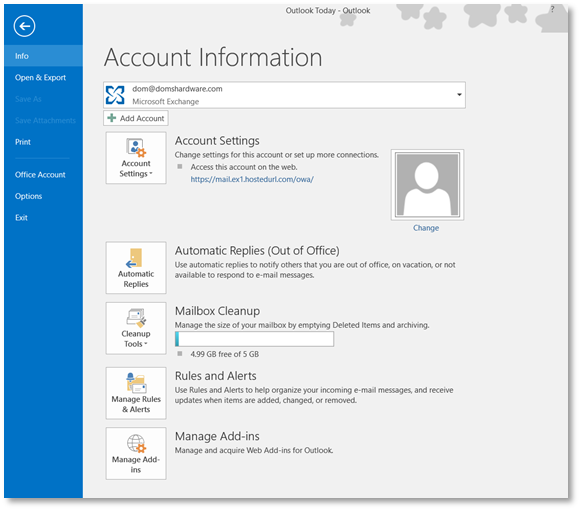
Figure 6 settings for your newly added account are available from the File menu in Microsoft Outlook and selecting the appropriate account from the drop down
Outlook 2019/Outlook 365
The setup screens for both these versions vary to other versions of versions of Outlook so verbal setup instructions will not be fully applicable.
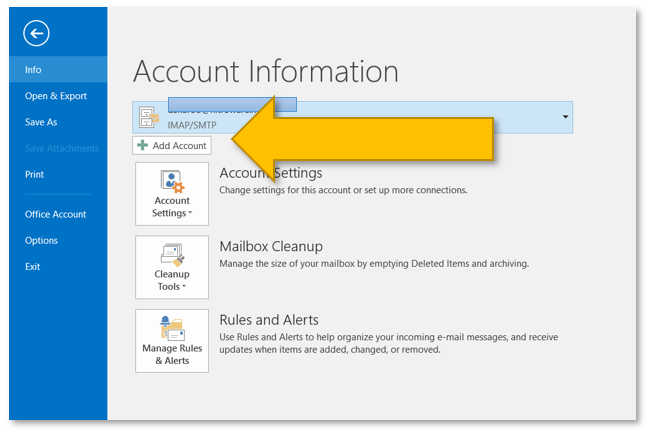
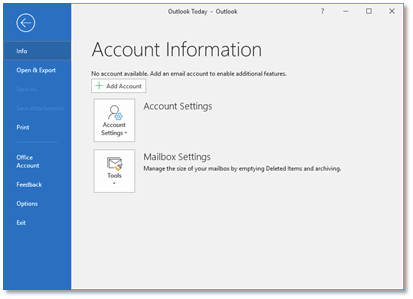
Figure 7 Microsoft Outlook account settings (File Menu)
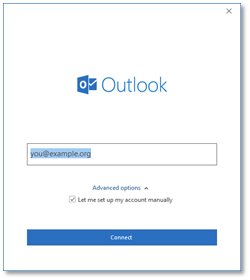
Figure 8 enter your email address in the Outlook welcome screen and tick manual setup
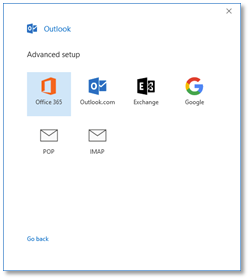
Figure 9 Choose from IMAP or POP email accounts. IMAP is recommended.
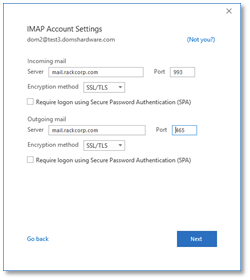
Figure 10 complete the email settings as illustrated, incoming and outgoing mail servers, encryption and ports
If you are using our Mongolian servers, please use mail.mn.rackcorp.com as the mail server.
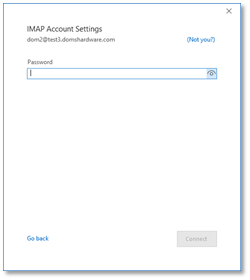
Figure 11 complete the password for your email account
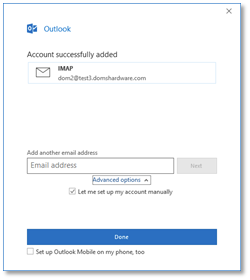
Figure 12 Outlook welcome process is a success message. There is a optional link selected by default that leads to a webpage describing how to install Outlook for mobile.
Email Client Setup | Windows 10 Mail
POP/IMAP manual setup
Auto discovery or manual settings can be used with Win10 Mail
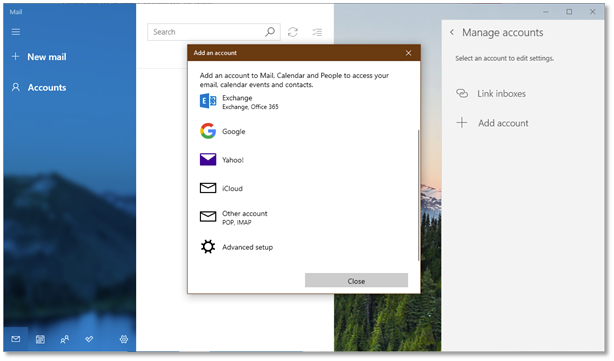
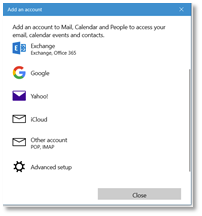
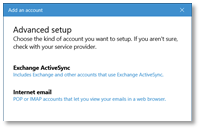
Figure 13 Windows 10 Mail setup – Click Accounts and then add account. Select Advanced setup
Figure 14 Windows 10 mail manual setup for RackCorp POP/IMAP email - choose advanced setup
If you are using our Mongolian servers, please use mail.mn.rackcorp.com as the mail server.
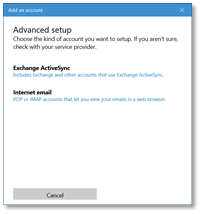
Figure 15 Windows 10 mail manual setup for RackCorp POP/IMAP email - choose Internet email
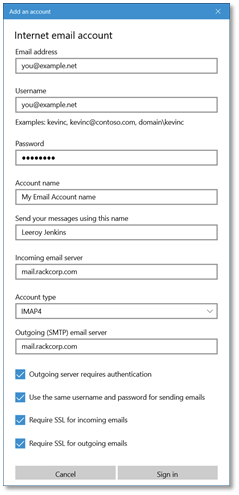
Figure 16 Windows 10 mail manual setup for RackCorp POP/IMAP email - fill in the details as illustrated, choose IMAP or POP
Exchange
At This time, there is an issue with the latest release of the email application for Windows 10, which prevents the ‘EXCHANGE’ option below from being chosen, ADVANCED SETUP must be chosen
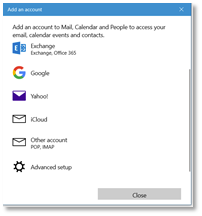
Figure 17 Windows 10 mail setup for RackCorp Hosted Exchange - choose advanced setup
Figure 18 Windows 10 mail setup for RackCorp Hosted Exchange - select Exchange ActiveSync
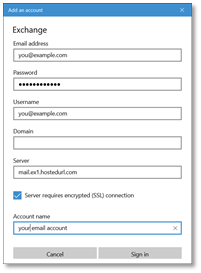
Figure 19 Windows 10 mail setup for RackCorp Hosted Exchange - fill in the details as illustrated. Domain is to be left blank.
Once you have completed THE ADD AN ACCOUNT form, Windows will prompt you about security policies for your computer. Select YES. Selecting YES may strength your windows security settings such as your password strength requirements You will then receive an ALL FINISHED success message.
Email Client Setup | Mozilla Thunderbird
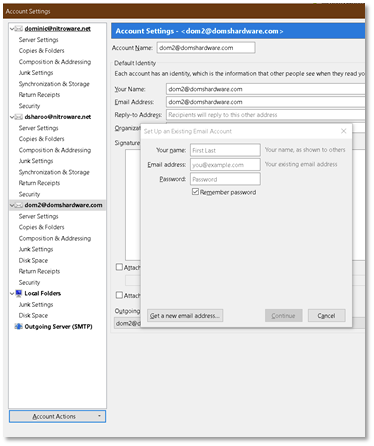
Figure 20 Mozilla Thunderbird setup, choose add mail account from the dropdown and fill in the details then press continue.
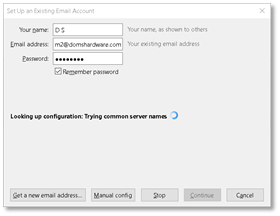
Figure 21 Mozilla Thunderbird email setup - choose manual Config now if you wish to define your own mail server settings
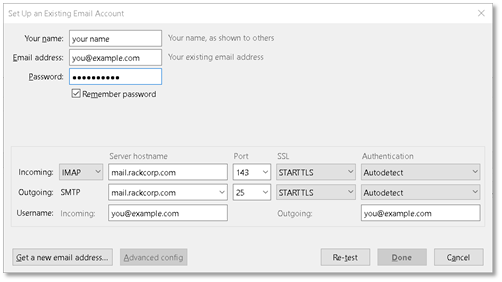
Figure 22 Mozilla Thunderbird setup - once the manual setup window appears, complete the mail server details, choosing IMAP or POP
If you are using our Mongolian servers, please use mail.mn.rackcorp.com as the mail server.
Email Client Setup | Apple Mac E-Mail
Exchange setup
POP3/IMAP manual setup
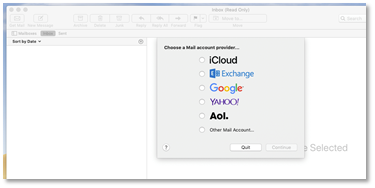
Figure 23 in Mac Mail accounts, select add other mail account
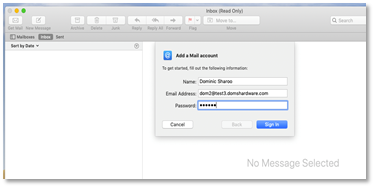
Figure 24 In the Mac Mail setup wizard, fill in your POP/IMAP account details
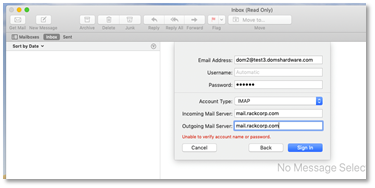
Figure 25 Mac Mail setup wizard will then request the server names. Fill in mail.rackcorp.com
If you are using our Mongolian servers, please use mail.mn.rackcorp.com as the mail server.
Email Client Setup | Android Phone and Tablets
For Android based phones, tablets, Chromebook and IoT devices, there are a number of options of e-mail clients. Some vendors supply their own developed email client however Google’s own GMAIL client is common across all legitimate android devices and we support this client.
POP/IMAP
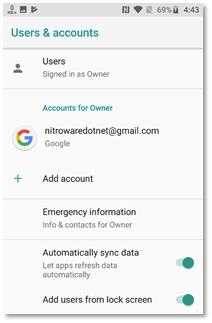
Figure 26 go to the add account function under 'Accounts' In Android settings, or Gmail
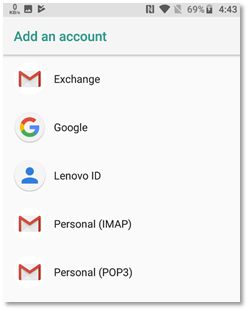
Figure 27 choose to add an IMAP account
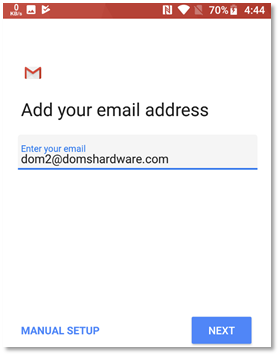
Figure 28 Once the email address is entered, Manual setup is unlocked. Choose MANUAL SETUP
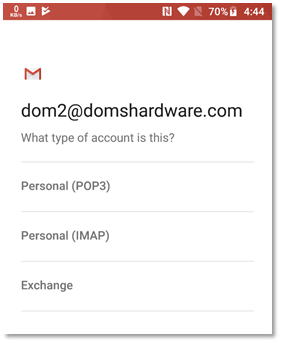
Figure 29 choose IMAP account. Optionally you may choose POP3
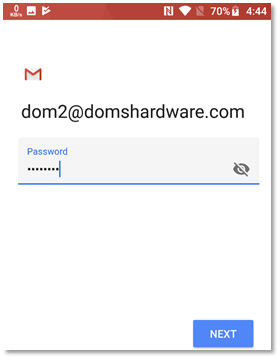
Figure 30 enter the password for the IMAP email account you wish to setup
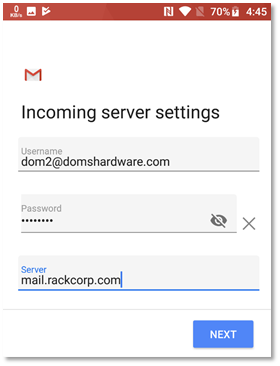
Figure 31 change the INCOMING mail server to mail.rackcorp.com
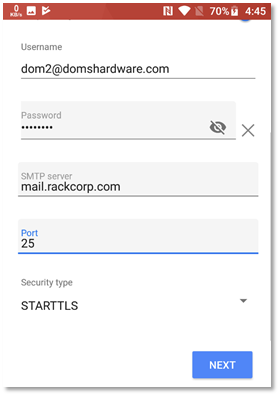
Figure 32 change the OUTGOING mail server to mail.rackcorp.com. Change the port to 25 and security to STARTTLS
If you are using our Mongolian servers, please use mail.mn.rackcorp.com as the mail server.
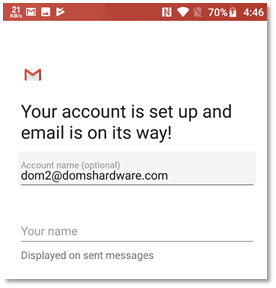
Figure 33 successful account configuration will result in a success message
Exchange
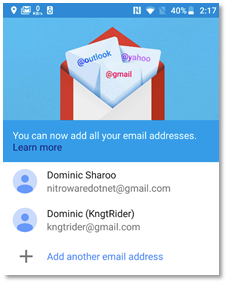
Figure 34 within GMAIL, choose add account or add another email address
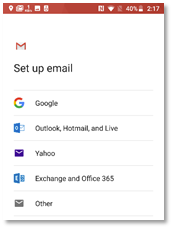
Figure 35 GMAIL will present a list of account types. Choose EXCHANGE
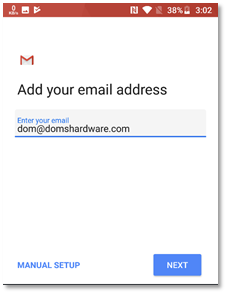
.Figure 36 enter the email address for your EXCHANGE account at the prompt to begin the setup process
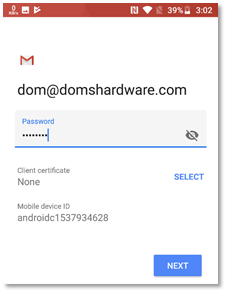
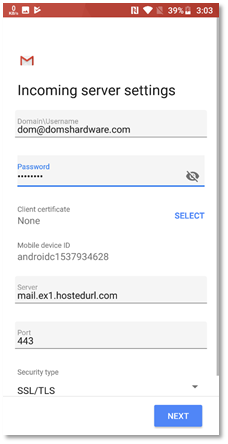
Figure 37 enter the password for your exchange account when prompted
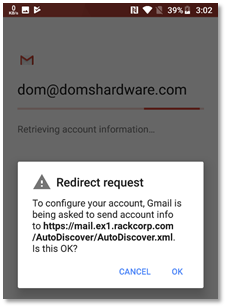
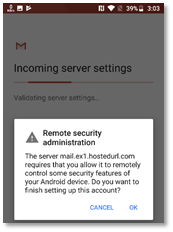
Figure 38 several prompts will be made during the exchange setup process. Agree to these by pressing OK
Figure 39 once your password is accepted, a further page will display a summary of your account settings. simply press NEXT
Figure 40 several prompts will be made during the exchange setup process. Agree to these by pressing OK.
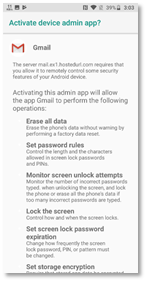
Figure 41 To add exchange accounts to a mobile device, the exchange server requires mobile device management rules as listed to be applied to your device.
Please read the above screen carefully. Changes to the security settings of your device will be made automatically and are required to add exchange mail to your device.
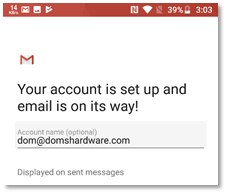
Figure 42 when the Gmail exchange setup process is complete the success message is displayed
Email Client Setup | Apple iPhone and iPad
POP/IMAP manual setup
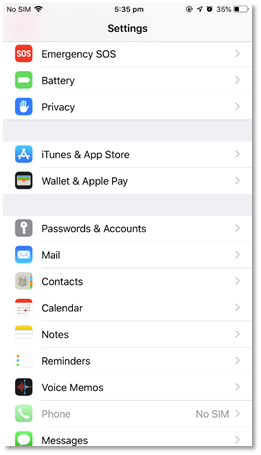
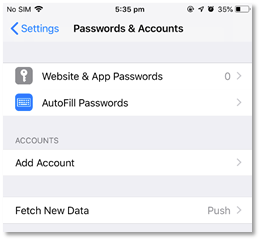
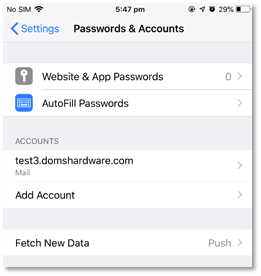
Figure 44 in the Settings -> Passwords & accounts page, hit Add Account. Fetch New Data should be Push
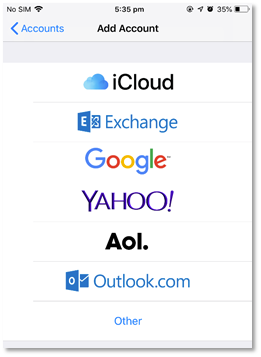
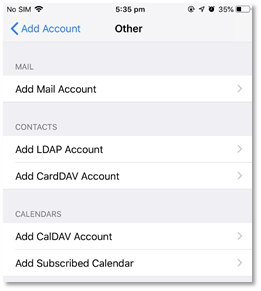
Figure 45 we are manually setting up an IMAP or POP account so choose Other
Figure 46 Under Other - Add Mail Account
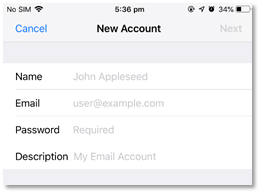
Figure 47 Fill in your email account details as requested
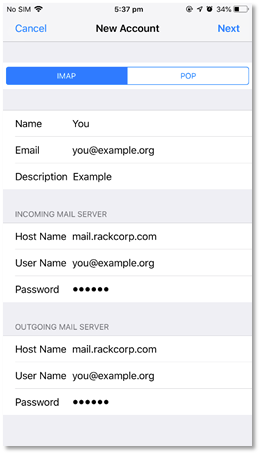
Figure 48 fill in the email account and server details as illustrated
If you are using our Mongolian servers, please use mail.mn.rackcorp.com as the mail server.
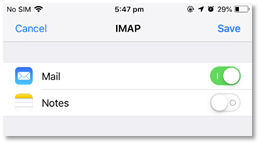
Figure 49 once your account details are saved and tested, you can choose what data to sync to the mail server, leave the default setting
Figure 50 on success your email account is now added to the account list in iOS
Exchange
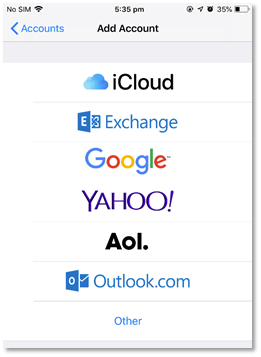
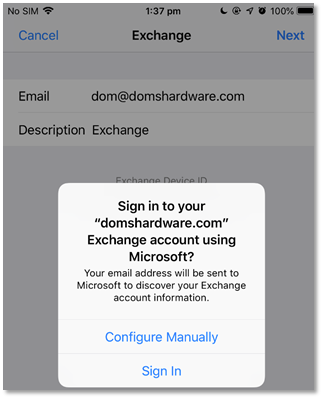
Figure 51 we are setting up an EXCHANGE account
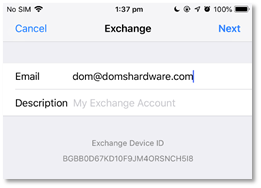
Figure 52 enter your email address for your exchange account
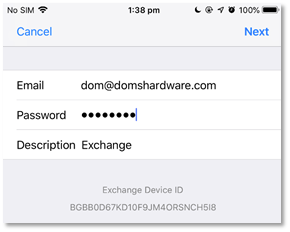
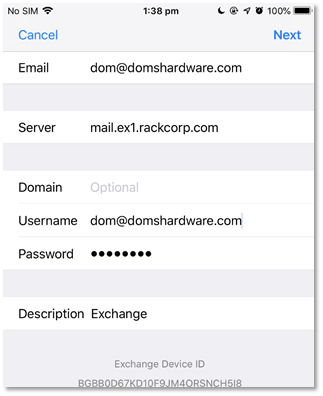
Figure 53 enter your password and create an account description
Figure 53 enter your password and create an account description
Figure 55 fill in your account details as follows
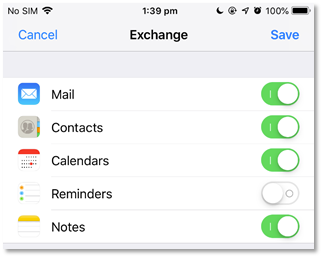
Figure 56 once your account details are confirmed and verified, you will receive a sync options screen. Choose here what options you want to sync to your device. Syncing contacts for example will overwrite your existing contacts and upload existing contacts

