Установка OPNsense 20.x для гибридного обалка RackCorp
Резюме:
Настроить OPNsense достаточно просто, если у вас есть прямой доступ к «голому железу» (bare metal) или есть виртуализация рабочего стола, где можно определить внутренние сетевые адаптеры / сети, которые можно использовать для управления со стороны локальной сети.
Однако, поскольку мы настраиваемся в гибридном публичном/частном облаке, без настройки терминала управления (ВМ) в той же подсети, что и сеть LAN, мы не сможем управлять OPNsense и настраивать его,OPNsense, поскольку заблокированный интерфейс WAN недоступен.является тот,единственным ктооткрытым подвергаетсядля воздействию "внешнего мира.мира". Кроме того, ограниченная конфигурация предоставляется через его терминальную оболочку.шелл.
However,Мы sinceхотим, weчтобы areнекоторые settingуправляющие up in a hybrid public/private cloud, without a management terminalпорты (VM)должным setupобразом onзащищенные) theбыли sameдоступны subnetдля asИнтернета.
Для нашего гибридного облака мы поменяем местами публичный и частный интерфейсы в OPNsense.
Это противоположно ожидаемому процессу установки. Мы делаем это, потому что интерфейс LAN network,имеет weпредустановленное willправило not«разрешить beвсе», ableкоторое toпозволяет manageнам andвходить configureв theпортал OPNsenseуправления.
Это theпозволит lockedнам downлегко настроить систему удаленно через веб-браузер, а затем мы снова изменим настройки на общедоступный IP-адрес на интерфейсе WAN interfaceи isчастный theIP-адрес oneна exposedинтерфейсах to the outside world. Additionally, limited configuration is provided through its’s terminal shell.LAN.
WeОбщие wantшаги toпо have some management ports (properly secured) exposed to the Internet.
For our hybrid cloud, we shall swap the public and private interfaces in OPNsenseThis is the reverse of the expected setup flow. We do this because the LAN interface has a preset ‘allow all’ rule which lets us login to its management portal.
This will allow us to easily configure the system remotely via web browser and then we will change the settings back to the Public IP being on the WAN interface and private IP on the LAN interfaces.
The general steps to getзапуску OPNsense 20 running onна RackCorp Hybrid areзаключаются asв follows:следующем:
InstallУстановить ISO
GetПолучите accessдоступ toк веб-интерфейсу (Web GUIGUI)
MakeСоздать firewallправило ruleфаервола onна интерфейсе WAN interfaceдля forудаленного remote managementуправления
Reassign/swapПереназначить/поменять theместами интерфейсы LAN/WAN interfaces
RekeyПовторно inвведите theправильный correctIP-адрес IPдля address for theинтерфейсов LAN/WAN interfaces
TheIP-адрес WANWAN, IPвключенный includedв inэто thisруководство, guideприведен isтолько forдля exampleпримера. only.Пожалуйста, Pleaseзамените replaceего itна withтот, theкоторый oneВам weпредоставили haveсотрудники provided youRackCorp
1. InstallУстановить ISO.
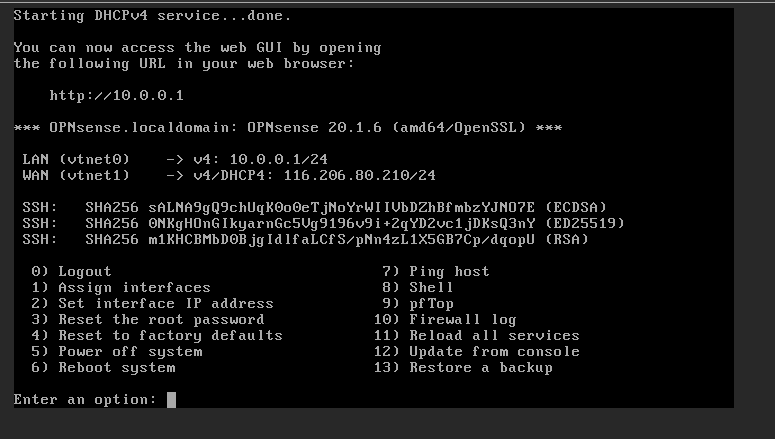
OPNsense assignsназначает itsсвои Interfacesинтерфейсы toсетевым NICsадаптерам in(NIC) theв orderтом theyпорядке, areв assignedкотором toони inназначены theна RackCorpпортале Portal,RackCorp, startingначиная withс LANинтерфейса interface.LAN.
SoИтак, let’sдавайте ‘swap’«поменяем theместами» interfacesинтерфейсы, soчтобы weмы canмогли loginвойти toна theвеб-страницу management webpage:управления:
1. StartНачните offсо withследующей theконфигурации following configuration for theпортала RackCorp Portal andи OPNsense inна yourвашей RackCorpвиртуальной VMмашине RackCorp:
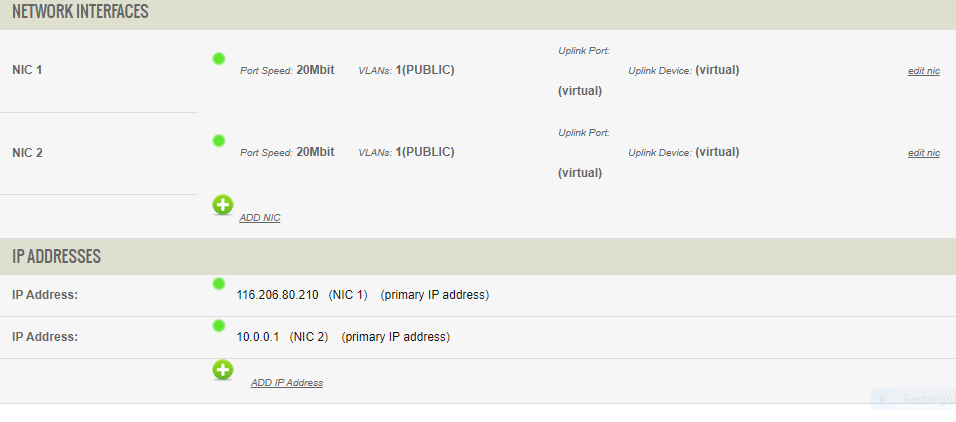
| RackCorp vNIC ID | RackCorp vNIC Label | IP | VLAN | OPNsense Interface |
| NIC 1 | Public | 116.206.80.210 /27 | <your assigned VLAN> Public VLAN1 for Demo |
LAN (vtnet0) |
| NIC 2 | Private | 10.0.0.1 /24 | <your assigned VLAN> Public VLAN1 for Demo | WAN (vtnet1) |
Когда конфигурация верна, на портале Rackcorp portalзагорится willзеленый display green lights when the configuration is correct.
Setup your RackCorp VM with the networking from the above table.свет.
Don’tНеforgetзабудьтеtoдобавитьaddсетиthe VLANsVLANForДляdemonstration,демонстрацииweмыhaveоставилиleft the defaultметки vNIClabels.поIfумолчанию.theЕсли метки vNIClabelsсбиваютareсconfusingтолку,youвыcouldможетеdefineопределитьthemихbasedнаonосновеtheинтерфейса,interface,напримерe.g.ЧастныйPrivateилиorобщедоступныйPublicвcombinedсочетанииwithсtheконцомendMAC-адресаofvNIC,the vNIC MAC address e.g.например 33orили 34.
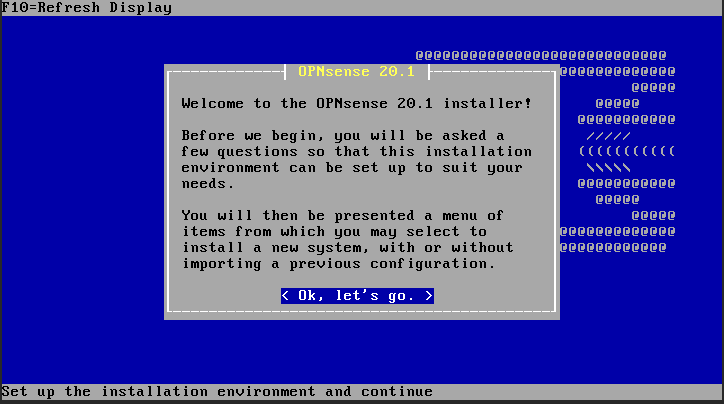
2. FollowСледуйте theинструкциям bootпо andзагрузке installationи instructions for theустановке opnsense 20.xx, usingиспользуя theфайл ISOобраза image file.ISO.
2.1 MountСмонтируйте theISO-образ установщика OPNsense Installerна ISOпортале inRackCorp, RackCorpа andзатем thenзагрузите bootвиртуальную the VM.машину.
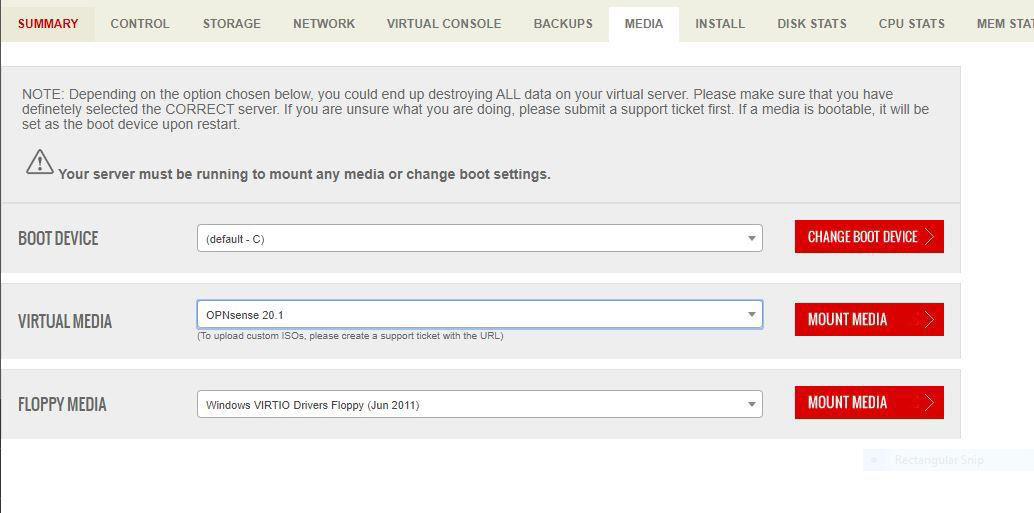
2.2 AЖивая liveсреда environmentзагружается isпри bootedнеобязательной with optional installation.установке.
DoНе notзапускайте runназначение interfaceинтерфейса assignmentво duringвремя bootзагрузки, ifесли youвы areсобираетесь goingустановить to install toна HD.
2.3 Once booted, install the system to disk using the following
2.3 После загрузки установите систему на диск, используя следующие.
Login: installer password: opnsense
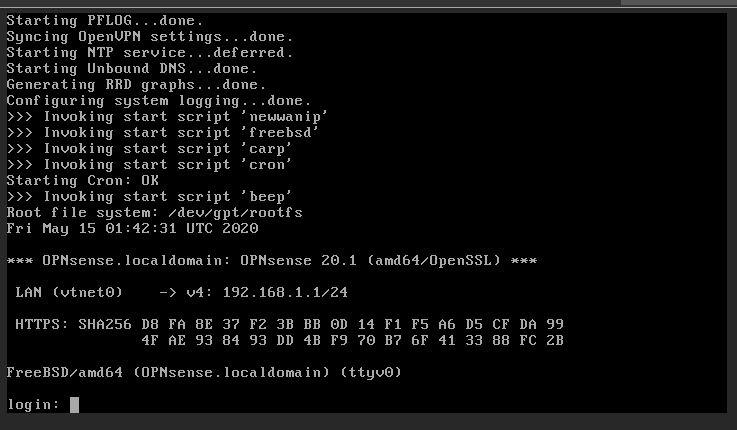
Follow the guided instructions to install to HDD. The defaults are fine for a single disk install. Once complete, follow the prompt to reboot the opnsense install and EJECT the ISO from the RackCorp portal.
2. Get access to Web GUI.
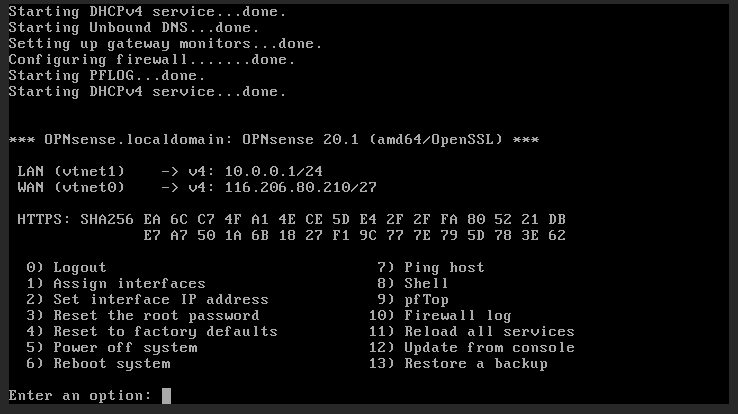
3. Opnsense has a built in wizard in the console menu that aids the user to setup their LAN NIC, WAN NIC, any tertiary NIC such as a DMZ or management NIC as well as IPv4/6 addressing and DHCP. Your Opnsense will have booted to this menu after install.
3.1 SET INTERFACE IP for WAN
Select NONE, this will clear the interface and let us re-assign.
3.2 SET INTERFACE IP for LAN
Select 116.206.80.210/27 as per table.
Since this example uses a 27 bit subnet, our gateway is .193 and our maximum host is .223.
For DNS use RackCorp NS1 110.232.116.249 or Google DNS 8.8.8.8
| Interface | LAN |
| DHCP | No |
| New LAN IP | 116.206.80.210 |
| Subnet | 27 |
| Gateway | 116.206.80.193 |
| Gateway as name server | No |
| IPv4 Name server | 8.8.88 |
| IPv6 LAN Interface via WAN Tracking: | No |
| IPv6 LAN Interface via DHCP: | No |
| IPv6 Address: | <enter> for none |
| LAN DHCP Server: | n |
| HTTP fallback for web GUI | n |
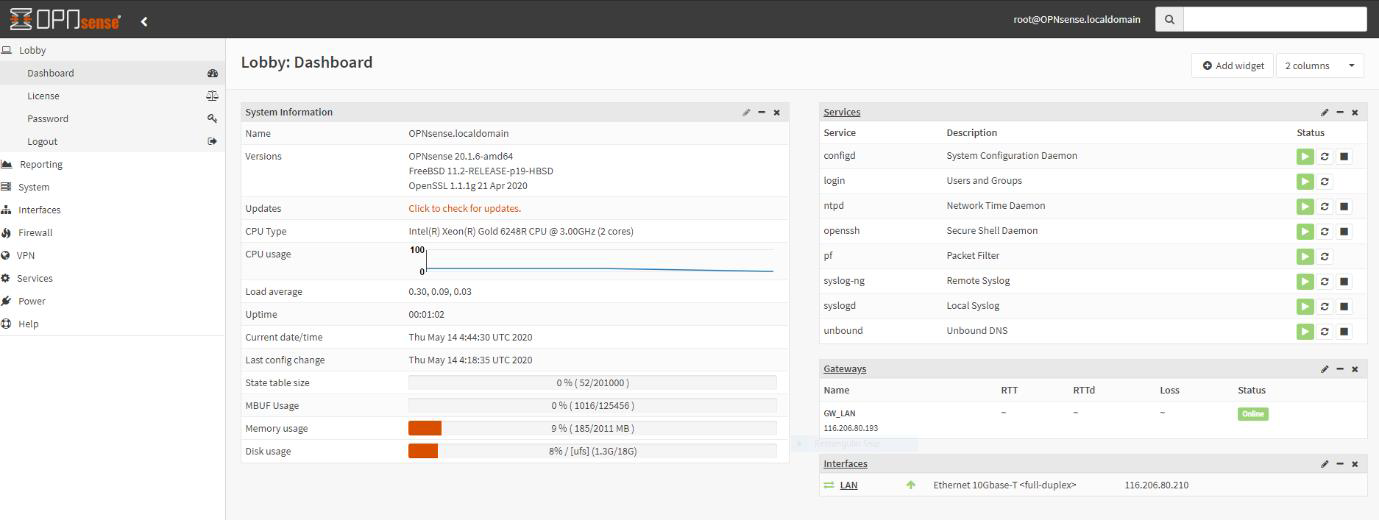
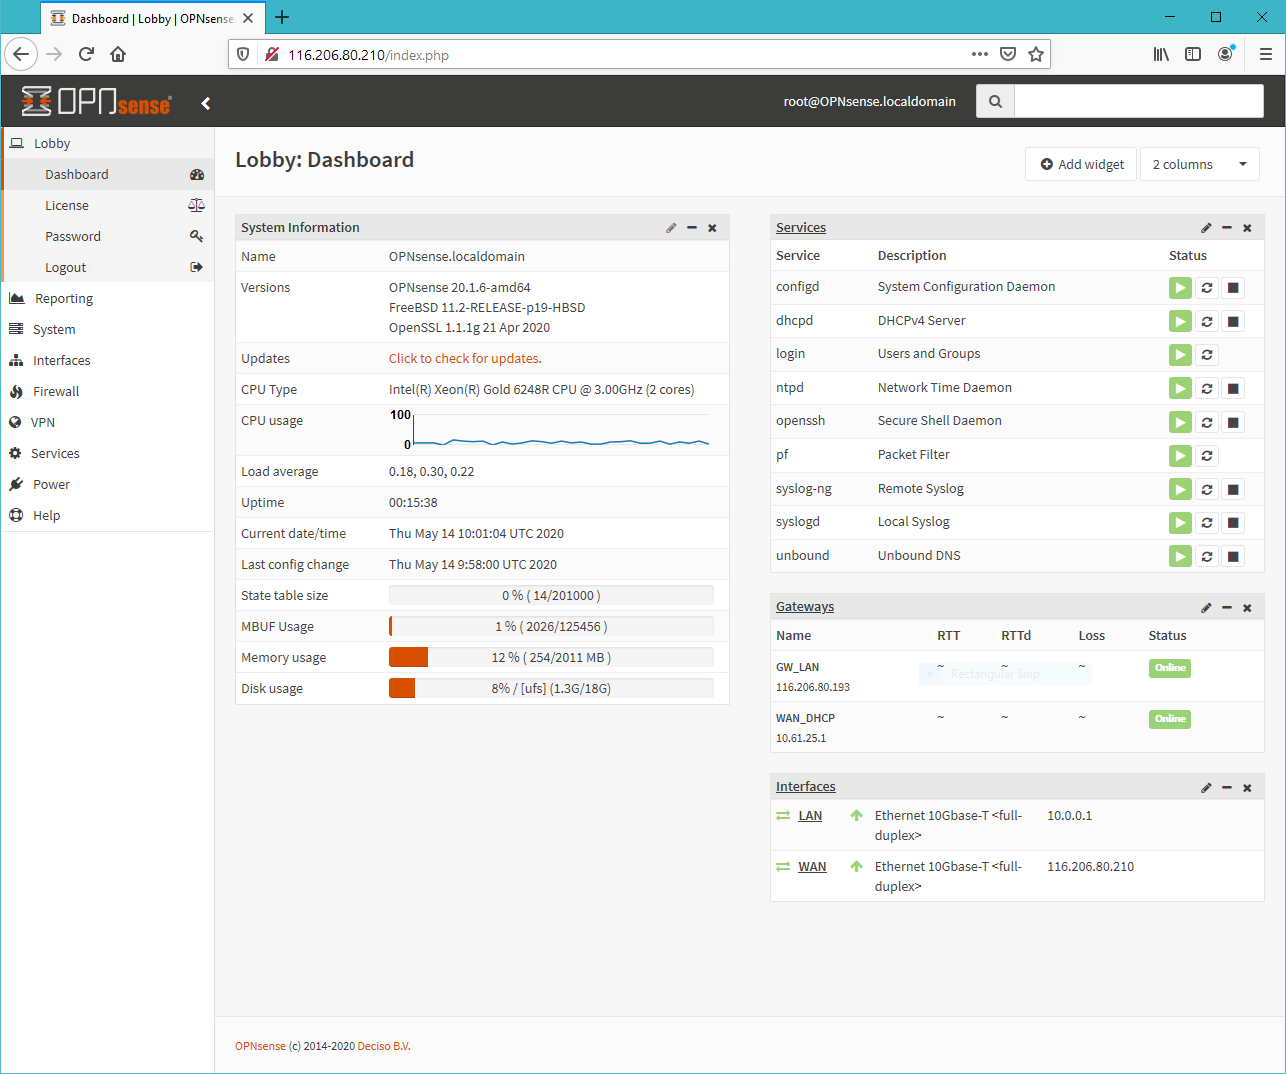
4. Once you have keyed in the LAN IP address, you should be able to access it via web browser. There will be an introductory setup wizard but be sure to skip the WAN setup page. Login to OPNsense web page. Click logo top left to skip configuration wizard.
Once we have logged into the opnsense management page, this is verification that we can access the system
3. Make firewall rule on WAN interface for remote management.
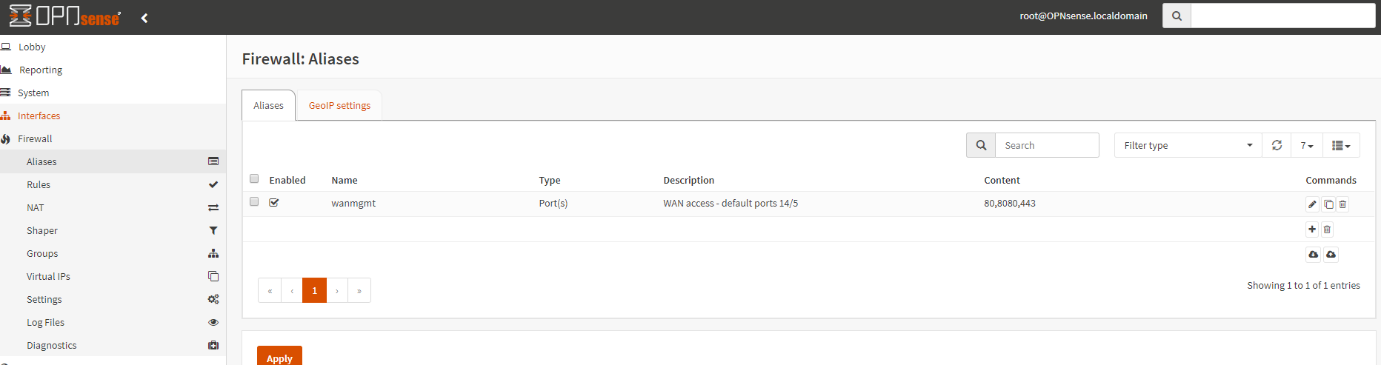
5. Add an alias to define management ports. Firewall-> Aliases. We use ports 80, 443, 8080 in this example.
[Save]. [Apply]
6. Add WAN port forward rule to Firewall -> Rules -> WAN.
| Protocol: | TCP |
| Source Port: | Any |
| Destination port range Start: | <Your alias name> Scroll UP in the list to find it. |
| Destination port range End: | <Your alias name> Scroll UP in the list to find it. |
| Log Packets: | Enabled |
[Save]. [Apply].

4. Reassign/swap the LAN/WAN interfaces.
7. Interfaces-> Assignments. Compare the settings here versus Rackcorp portal
Where are we now: a LAN Interface with public IP set in OPNsense and WAN interface with no WAN IP set.
Since our Port Forward that will allow us to access management interface externally is now defined, we can swap the interfaces. You need to swap both the interfaces in opnsense portal.
7.1 In OPNense portal, (Interfaces->Assignments) Swap so that
(LAN) -> VTNET1 RackCorp NIC 2
(WAN) -> VTNET0 RackCorp NIC 1
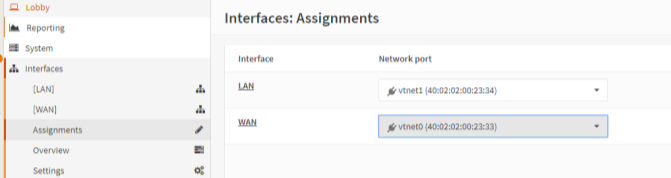
[SAVE]
5. Rekey in the correct IP address for the LAN/WAN interfaces.
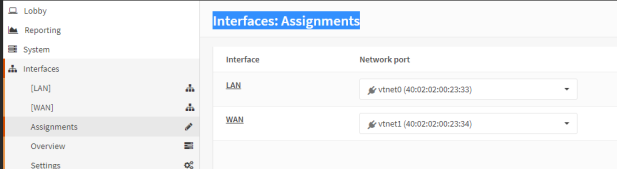
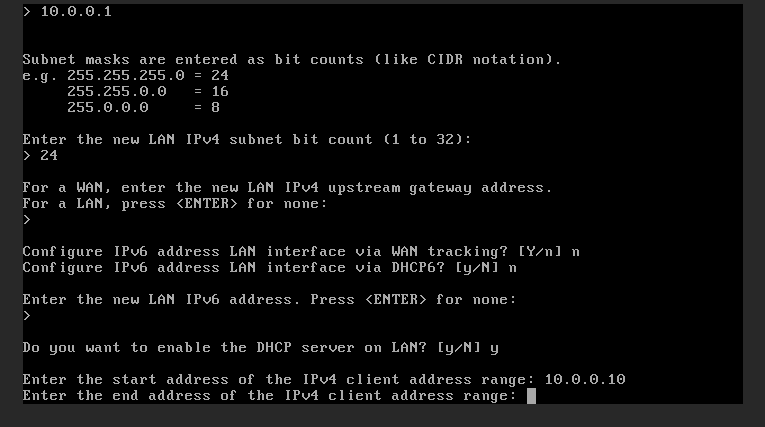
8. Once you have swapped, opnsense might forget the IP subnets and we need to re-key them into the console.
Re-key in the IP/subnets using option 2. Clear them if necessary with <ENTER NONE>
| Interface | LAN |
| Configure via DHCP | No |
| New LAN IP | 10.0.0.1 |
| Subnet | 24 |
| Gateway | <enter> for none |
| IPv6 LAN Interface via WAN Tracking: | N |
| IPv6 LAN Interface via DHCP6: | N |
| IPv6 Address: | <enter for none |
| LAN DHCP Server: | Y |
| SDHCP End Address: | 10.0.0.20 |
| Revert to HTTP as web GUI protocol | N |
| Interface | WAN |
| Configure via DHCP | N |
| New WAN IP | 116.206.80.210 |
| Subnet | 27 |
| Gateway | 116.206.0.193 |
| Gateway as name server | no |
| IPv4 Name server | 8.8.8.8 |
| IPv6 WAN Interface via DHCP6: | N |
| IPv6 Address: | <enter> for none |
| Revert to HTTP as web GUI protocol | N |
9. Once both LAN and WAN have been rekeyed, you should be able to log in to the opnsense management portal via its WAN address and RackCorp vNIC status lights turn green.
10. Follow our additional tasks for further configuration as required.
11. If you have problems with this procedure, select (4) Reset Factory Settings in the console menu. The Opnsense will reset itself, then shutdown. Restart the VM from RackCorp and try again. 11) Reload all services can also help
ADDITIONAL TASKS
Once your basic setup is running, it can be further configured to suit your requirements.
Consult your security policy on how to handle such appliance management.
Things to consider can be, of which many are industry best practice
- Considering adding a management network or 1 or more DMZ networks to the firewall for added functionality
- Use VPN functionality for management login instead of HTTP/S ports.
- Use VPN functionality for remote workers to be able to access enterprise content.
- If HTTP/S ports are desired for management via WAN/Internet, consider changing the port numbers and or whitelisting the opnsense IP/URL to particular authorised management systems.
- Configure and test SSH access if necessary, bound by whitelisting, management interface or VPN tunnel.
- Install additional plugins, such as Wireguard VPN or other utilities via the plugins page to enhance the functionality of the firewall.