Windows Mail
Windows 10 Mail
POP/IMAP manual setup
Auto discovery or manual settings can be used with Win10 Mail
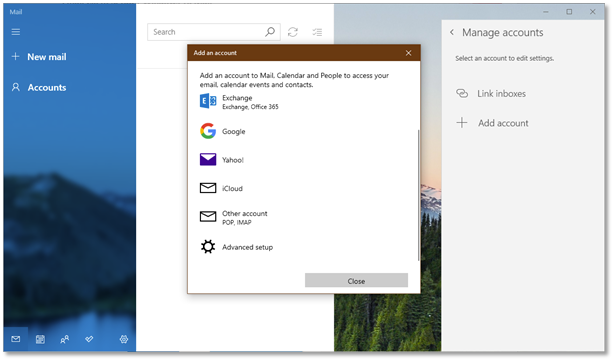
Figure 13 Windows 10 Mail setup – Click Accounts and then add account. Select Advanced setup

Figure 14 Windows 10 mail manual setup for RackCorp POP/IMAP email - choose advanced setup
If you are using our Mongolian servers, please use mail.mn.rackcorp.com as the mail server.
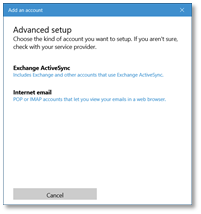
Figure 15 Windows 10 mail manual setup for RackCorp POP/IMAP email - choose Internet email
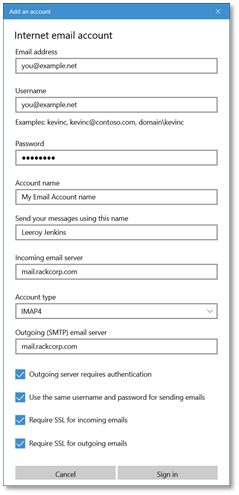
Figure 16 Windows 10 mail manual setup for RackCorp POP/IMAP email - fill in the details as illustrated, choose IMAP or POP
Exchange
At This time, there is an issue with the latest release of the email application for Windows 10, which prevents the ‘EXCHANGE’ option below from being chosen, ADVANCED SETUP must be chosen
Figure 17 Windows 10 mail setup for RackCorp Hosted Exchange - choose advanced setup
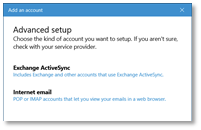
Figure 18 Windows 10 mail setup for RackCorp Hosted Exchange - select Exchange ActiveSync
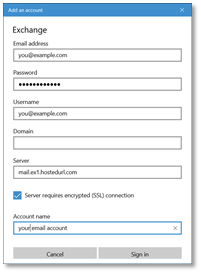
Figure 19 Windows 10 mail setup for RackCorp Hosted Exchange - fill in the details as illustrated. Domain is to be left blank.
Once you have completed THE ADD AN ACCOUNT form, Windows will prompt you about security policies for your computer. Select YES. Selecting YES may strength your windows security settings such as your password strength requirements You will then receive an ALL FINISHED success message.
No comments to display
No comments to display